Original Link: https://www.anandtech.com/show/3634/intel-dp55kg-and-dp55sb
Intel DP55KG and DP55SB - Two P55s Reviewed
by Rajinder Gill on April 6, 2010 7:45 PM EST- Posted in
- Motherboards
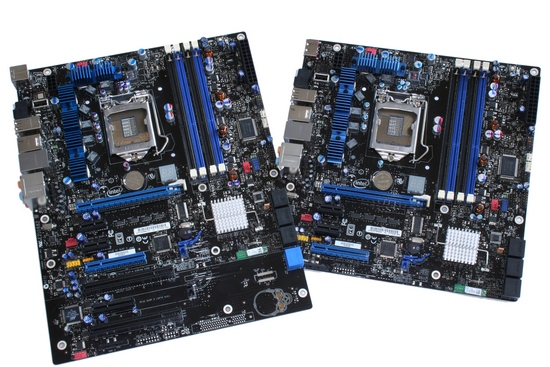
It’s been few months since AnandTech featured a P55 board review, but while Intel is expanding on their high-end with $1,100 Core i7 980X CPU’s, their low-to-mid-range P55 platform is still the one on most people’s radars. Today we’re looking at two Intel P55 boards that fall under Intel’s “Extreme” series, the DP55KG and DP55SB.
The “Extreme” series has historically produced one board per chipset so that Intel has an offering for those consumers with overclocking high on their agenda. This time round, Intel has gone for a couple of boards, their separating feature being the form factor – one ATX and one MicroATX.
Overview/Conclusion
In the DP55KG and the DP55SB we have two almost identical boards, separated only by the visual and physical difference of their form factors. The extra expansion slots and SATA/E-SATA ports of the DP55KG are very much tacked onto the same foundation of the DP55SB board and unsurprisingly, there is little to separate the two in terms of performance, power consumption or price. This is very much a case of one design filling two spaces in the Intel product line-up.
The vast range of ATX-based P55 boards proves to be tough competition for the DP55KG. While the layout of the BIOS is good in general, it lacks experience in the overclocking section. The board misses out on certain features as well as the quality of components that rival boards offer in direct comparison. On sale at $199, its direct competition includes EVGA's excellent P55 FTW and even looking $20-25 cheaper, the Asus P7P55D Deluxe and Biostar’s TPOWER i55 both make stronger cases. Move away from P55, and you‘ve got the option of running with H57 instead, specifically at the $200 mark, ASUS’s P7H57D-V EVO, offering SATA 6G and USB 3 capabilities and excellent overclocking potential.
The DP55SB comes in ~$5 cheaper than the DP55KG at $195 which puts it right at the top of the M-ATX price bracket with only the ASUS Maximus III Gene as competition. Unfortunately, the Gene offers a lot more in terms of features and overclocking potential so you're left wondering where you money is going. While both the driver install and BIOS updating procedures are so simple that a 5-year old could manage it in their sleep and the on-board Intel NIC is a positive addition, it's not enough to paper over the cracks.
In our testing, both boards ran into problems with automated overclocking, memory overclocking on the 2:10 ratio and S3 resume over 170 bclk. While these are all problems that could be argued to be ‘bonuses’ on Intel’s standard desktop boards, when you step up into the $150-200 range of overclocking-focussed boards, it doesn't cut the mustard. EVGA’s E-Leet, Asus’ Turbo-V and ROG Connect and even MSI’s OC Genie make Intel’s IDCC look distinctly average.
Performance Summary
With all boards featuring the same chipset, CPU and memory, there is little to separate them in terms of performance - the two Intel boards produce almost identical results.
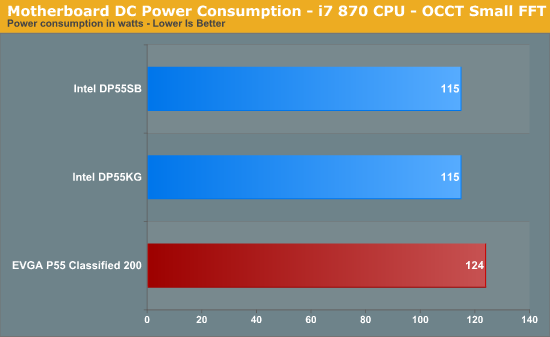
Power Consumption
Our power consumption testing utilizes the same batch of components under similar circumstances in a bid to monitor variances between idle and CPU load conditions. We install the vendor supplied power saving utilities on each board and enable power saving modes that don't involve any kind of underclocking or CPU core frequency modulation in order to run an apples to apples comparison.
ATX PSU switching losses are absent from our figures because we monitor power consumption directly at the DC rails of the PSU. These figures measure only the CPU, motherboard and memory DC power draw and exclude any other peripherals such as the graphics card, fans and hard drives etc. As such, AC power consumption will be anywhere from 15~40% higher than these figures depending upon the efficiency of your power supply.
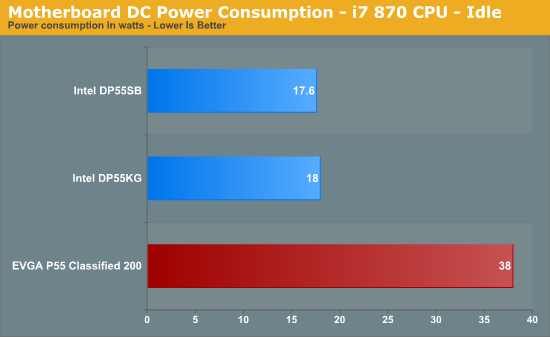

Intel’s boards look pretty good in this respect, showing well against the power-hungry, but feature-rich P55 Classified.
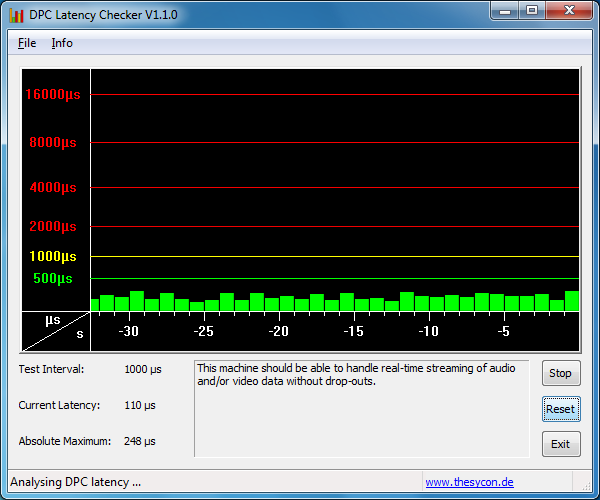
DPC Audio Latency
We’re often asked to include a DPC latency screenshot by audio enthusiasts; both the DP55KG and the DP55SB turn in respectable performances:
DP55KG:
DP55SB:

Overclocking
Overclocking on both boards was ok – we were able to POST and boot into the OS at 200 bclk as well. This was achieved using a low CPU multiplier as we were using the stock Intel heatsink.
Also of note was that this bclk was only achievable on the 2:6 or 2:8 memory ratios – the 2:10 ratio ran into problems and refused to boot around the 175 bclk area which equated to 875 MHz or DDR3-1750. This was despite trying up to 1.35v VTT and loosening timings to 9-9-9-27 and slacking off tRFC and tFAW. Anything higher than 175 BCLK on the 2:10 memory ratio resulted in the board shutting down during stress testing or when loading Windows. On the face of it, we're lead to believe there is some kind of over-current protection in place on the VTT rail - not good.
Board Features
The extra expansion slots and SATA/E-SATA ports of the DP55KG are very much tacked onto the same foundation of the DP55SB.
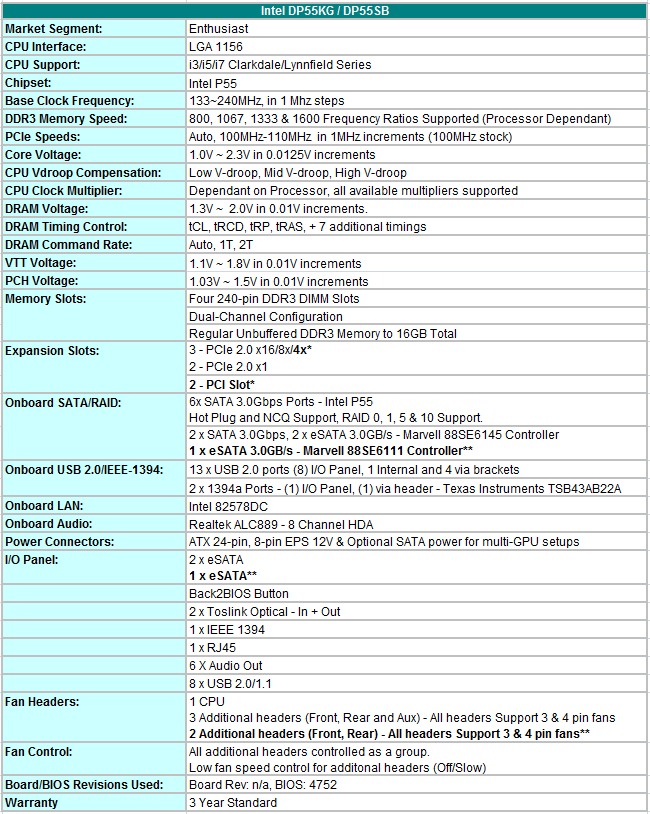
* DP55KG only.
** DP55SB specs - In place of previous specs statement
The only notable element of component choices on the two P55 boards is that you get Intel’s 82578DC NIC, other than the standard Realtek offering included by most vendors at this price point. Realtek is not absent from Intel’s choices altogether though, the ALC889 codec is used to supply 7.1 HD audio, although you don’t get any bundled Dolby upscaling software.
Included with the boards you get the following peripherals/items:
DP55KG:
4x Blue UV reactive SATA cables
2x Blue normal SATA cables
DP55SB:
4x Blue UV reactive SATA cables
Both:
- 1 X I/O backplate
- 1 x fixed 3-slot SLI bridge
- 1 x Bluetooth antenna
- 1x BIOS Post code sheet
- 1 X User manual
- 1 X Driver CD
There’s nothing exciting on the software CD either, unless free trials of DivX and Norton 360 float your boat. This disk contains system drivers and Intel’s “Silent Install” GUI which is very much along the lines of Gigabyte’s “InstallALL” for making driver installation quick and easy - you just tick the drivers you want, provide the software with your Windows login (if need be) and leave the machine alone for the rest of the installation process.
BIOS
BIOS options for overclocking are provided, but somewhat minimal. Intel have decided to group the “Overrides” by the component they affect – a logical choice, but it does mean that your access to the CPU Vcore, CPU VTT, VDIMM and PCH voltages are on three different BIOS sub-menus. We would prefer the component groups to remain, but to add a fourth option for “Voltage Overrides” so they could be grouped together.
One option that we highlighted in the DH57JG review was that in the performance section of the BIOS, Intel has put the CPU VTT and VDIMM options in the advanced menu of the DRAM timing page which means that you have to not only access, but set memory timings including a number of sub-timings without ‘auto’ options just to specify voltages. This is unfortunately the same with both P55 boards and something we hope Intel will agree needs to be changed.
The DP55KG and the DP55SB both have a number of fall-back mechanisms in order to catch an over-enthusiastic user asking for a little bit too much from their hardware.
The primary recovery option is Intel’s Failsafe Watchdog which tried to detect a failed POST, and when successful, POST’s with default settings and allows you into the BIOS to give you a chance at trying a different set of options. This feature worked pretty well in general, catching failed POST when you went slightly past what was possible – I would hazard a guess of about 8/10 times.
The other 2/10 scenarios were usually down to memory timings or large steps in bclk – in this instance, the board would get locked into a failed boot cycle. This was where the Back2BIOS switch on the IO Panel came in exceptionally useful. If you press the button, it will light up in red and the board will POST with default settings. One significant upside to this is all your BIOS changes are still remembered so you can just change the ones you need, save, power off, unpress the Back2BIOS switch and POST.
There was a one or two occasions where even the Back2BIOS switch failed to boot and we had to resort to the jumper next to the SATA ports but we don’t expect this to be a common requirement – it’s not happened since I’ve got a better idea of how the boards work.
Fan control is automatic and varies according to CPU core temperature. You get two options to control the speed ramp and damping slope which can be set to more aggressive for lower efficiency heatsinks. The system fan header speed is also controlled by a temperature setting, probably CPU, and works with 3-pin fan connectors.
BIOS flashing is made very easy by Intel, a built in flash routine is included in the BIOS that can be used with USB pen drives or HDD’s. If you head over to the Intel support site, you get no fewer than four different flashing options, ranging from burning a CD image to downloading an executable file that instigates a BIOS flash from the OS. Unlike other OS level flashing routines though, Intel’s utility reboots the motherboard and automatically flashes the BIOS outside the OS for you – it’s very slick and very simple.


Board Layout
.jpg)
.jpg)
General layout of both boards is fine upon first glance – the front panel connectors for buttons, leds and USB are all on the side of the board just below the 24-pin ATX power connector, rather than the traditional bottom which might please some as it should lead to easier cable tidying possibilities.
All the SATA ports are right angled – ideal if you’re running two long graphics cards but perhaps a little bit restrictive in small MicroATX cases and a couple of straight ports could’ve ticked another box here.
.jpg)
The two blue PCI-E slots for dual graphics cards at 8x PCI-E2.0 are 3 spaces apart, with two 1x PCI-E2.0 ports in between. The upside to this is that even with two large dual slot cards installed, you still have one of the PCI-E slots available in between.
Now for the less convincing choices:
Intel has focussed on locating the important system components in positions of highest strength in the board – this typically means in between the motherboard mounting screws. With the PCI-E and DDR3 slots positioned in this way, the area around the CPU socket is restricted to the point that some of the larger CPU heatsinks would block 1, 2 or even more of the DDR3 slots and be close to the back of the GPU.
.jpg)
Another side-effect of this positioning is that the memory slot latches are inaccessible if you are using a long graphics card. This is an unnecessary hindrance that could be easily avoided.
The decision to arrange the components in this way is primarily for those SI builders that ship pre-built systems to the customer. In this position, a SI needs confidence that despite what the courier tries to do to the package, the system will arrive without the motherboard snapped in half. Intel have done a lot of testing in this department and while I'm not in a position to question if it works, I’m not sure it's worth the restriction for their “Extreme” series. Heatsink compatibility and memory accessibility are almost certainly more important factors in a board purchase to an overclocking-minded user
Testbed setup and power
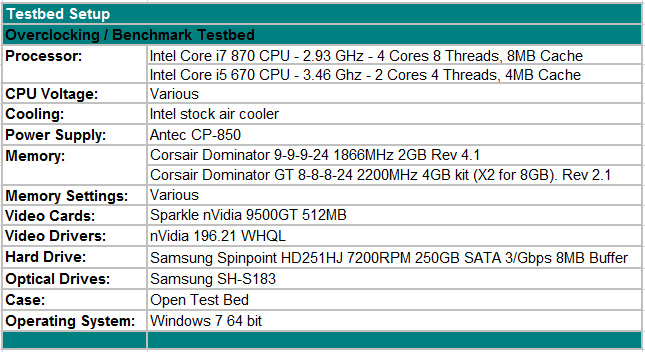
For our test results we set up each board as closely as possible in regards to memory timings. Otherwise all other settings are left on auto. The DDR3 timings were set to 7-7-7-20 1T at DDR3-1333 for the i7-870 processor.
Power Consumption
Our power consumption testing utilizes the same batch of components under similar circumstances in a bid to monitor variances between idle and CPU load conditions. We install the vendor supplied power saving utilities on each board and enable power saving modes that don't involve any kind of underclocking or CPU core frequency modulation in order to run an apples to apples comparison.
ATX PSU switching losses are absent from our figures because we monitor power consumption directly at the DC rails of the PSU. These figures measure only the CPU, motherboard and memory DC power draw and exclude any other peripherals such as the graphics card, fans and hard drives etc. As such, AC power consumption will be anywhere from 15~40% higher than these figures depending upon the efficiency of your power supply.
The Intel boards prove to be extremely efficient in terms of power consumption, benefiting from the lack of additional features and components that the P55 Classified 200 has.
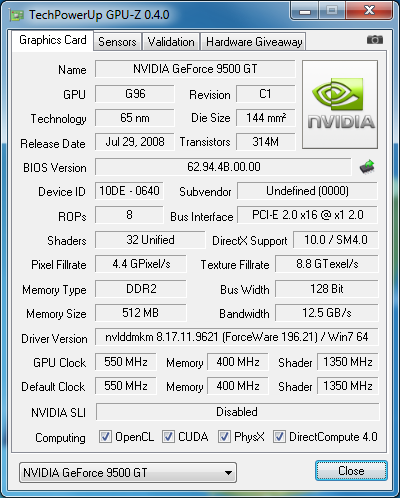
Gaming and 3D performance
Before any of the results, I've personally got to stick my hand up and admit that a 9500GT is not really a suitable graphics card for differentiating these boards in terms of testing. This is something I will look to address for my next review.
We uncovered a bug with the two Intel boards when testing with our i5 670 Clarkdale CPU. At stock or overclocked, the 16x PCI-E 2.0 graphics card slot dropped to 1x link width. This only happened with the Clarkdale, our i7 870 CPU ran with the full 16x speed. This occurred on the latest 4816 BIOS on the Intel website as well as the 4752 BIOS that the rest of the testing was carried out on. Intel states that the i5 670 should be supported from the 3878 BIOS onwards.
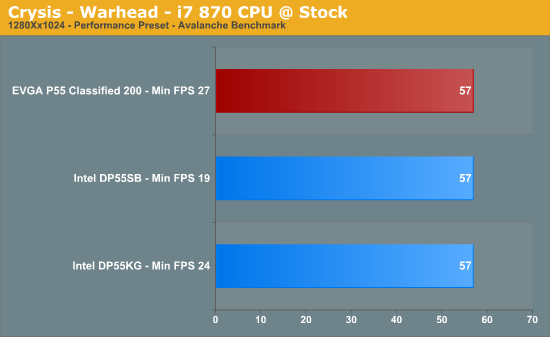
Crysis : Warhead
Using Crytek’s CryEngine 2, Crysis : Warhead still provides one of the most intensive graphical benchmarks available.
Very little to separate the boards in this benchmark, the minimum FPS slightly preferring the two ATX boards.
Far Cry 2
Featuring fantastic visuals courtesy of the Dunia Engine, this game also features one of the most impressive benchmark tools we have seen in a PC game.
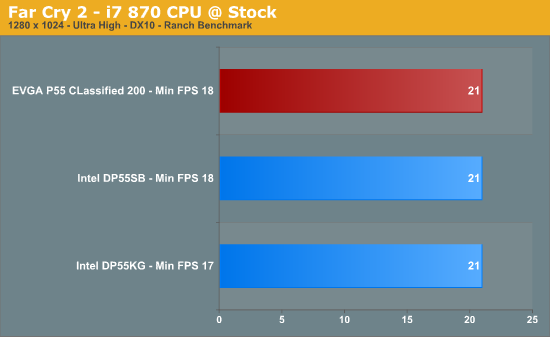
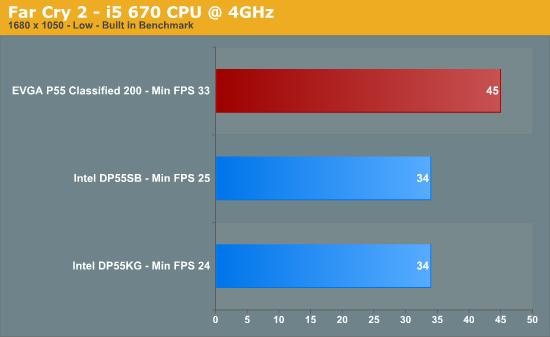
Intel's boards come in a fair way behind the P55 Classified 200 with the Clarkdale CPU, the 1x PCI-E bandwidth proving a significant bottleneck.
Warhammer 40K: Dawn of War II
We are big fans of the Warhammer franchise, especially Dawn of War II. One of the latest RTS games in our library is also one of the more demanding titles on both the CPU and GPU.
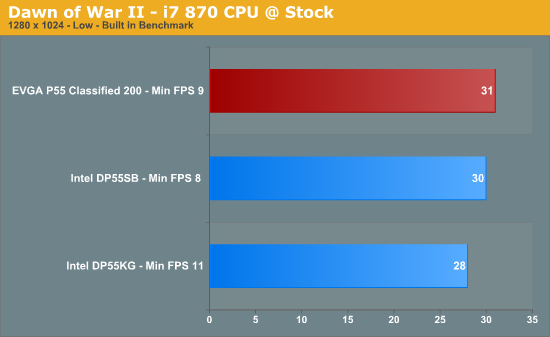
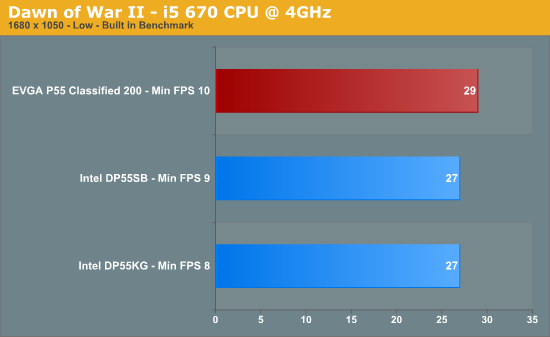
Again, the 1x PCI-E bottleneck doesn't help the Intel boards in Dawn of War II either.
AutoCAD 2010 x64—Cadalyst 2008
We utilize AutoCAD 2010 x64 and the Cadalyst Labs 5 benchmark.
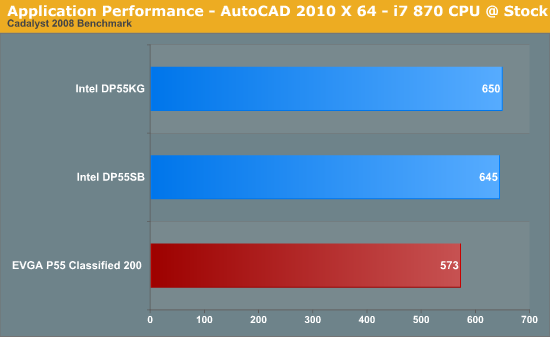
The Cadalyst benchmark seems to be a great all round test of 3D performance mingled with fast hard drive access. We're at a loss to explain why the P55 Classified 200 came out so much worse on this test, but this was repeatable.
System Benchmarks
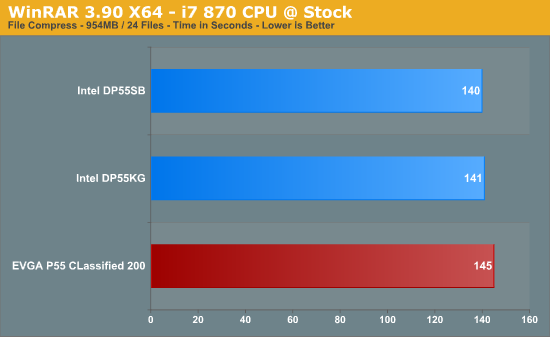
WinRAR 3.9 x64
This benchmark compresses our AT workload consisting of a main folder that contains 954MB of files in 15 subfolders. The result is a file approximately 829MB in size.
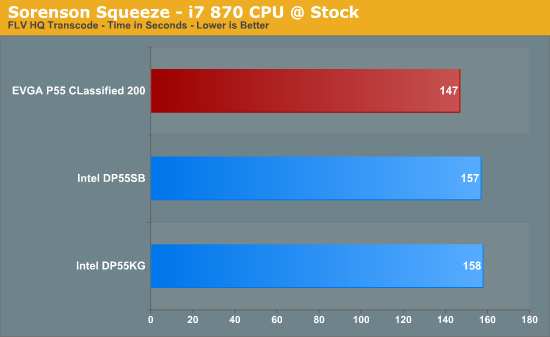
Sorenson Squeeze 6
We are using Sorenson Squeeze to convert eight AVCHD videos into HD Flash videos for use on websites. This application heavily favors physical core count and processor clock speed.
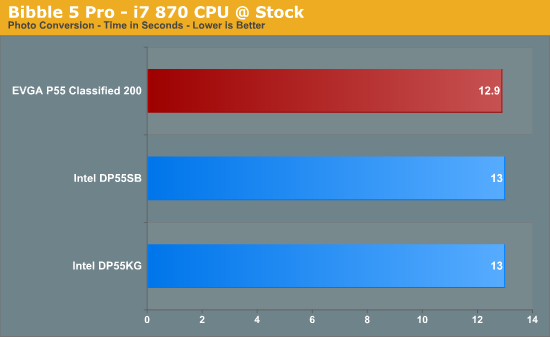
Bibble 5.0
We utilize Bibble Labs' Bibble 5 v2 to convert 50 RAW image files into full size JPEG images with the program's default settings. This program is fully multithreaded and multi-core aware.
We'll sum up the weaknesses for both boards together, as they are essentially the same. Automated overclocking routines seem to be an increasing trend among the board-makers, but sadly Intel's "Auto-Tune" software failed horribly. With our i7 870 sat at stock and BIOS defaults, we started the Auto-Tune and chose the 1st option of overclocking within Intel’s safe range. The program quickly ran into problems such as application crashes and BSOD’s. Auto-Tune’s pre-programmed routines start IDCC and reinitialize the Auto-Tune option when Windows loads, so unfortunately this problem persisted as it failed to advance past the point it kept failing at. The only solution was to stop Auto-Tune starting at the Windows UAC prompt and then uninstall and reinstall the software.
Memory overclocking was disappointing. While the 2:6 and 2:8 memory ratios were satisfactory, the 2:10 ran into problems and refused to boot any higher than 175 BCLK from a power cycle which equated to 875 MHz or DDR3-1750. This was despite trying up to 1.35v VTT and loosening timings to 9-9-9-27 and slacking off tRFC and tFAW. The only way to get both boards to POST past 175 BCLK was to use or high-end Corsair 2200 MHz modules - and that too was only possible by ramping BCLK slowly so that the board did not need a full power cycle when exiting BIOS.
Unfortuantely, we ran into problems whilst stress testing at memory freqeuncies above 1800MHz, the board shut-down when running Hyper-Pi. We tried all manner of changes to circumvent this problem, finding that using VTT voltage above 1.42V resulted in the board shutting down whilst loading Windows. It would be logical for us to put this down to some kind of over-current protection - we're used to seeing more overhead from motherboards that are given an 'Extreme' moniker. It's clear this is an area that Intel need to work on in the future.
Four months after the launch of Intel's 32nm Clarkdale CPUs and after a number of supported BIOS releases, we didn't expect to run into a bug such as the PCI-E x16 slot running at 1x speed with an i5 670. This was another disappointing discovery that affects the lowly 9500GT in terms of benchmark results, meaning that better and faster cards are likely the be affected even more.
S3 resume was ok on both boards until around abut 170-175 BCLK where the board would resume Windows, but fail-back to restore the session from the hard drive like a hibernation. Again, this is an area where Intel are not quite competitve with the rest.
The list of what we would like to see improved or added to Intel’s “Extreme” series is quite lengthy. The BIOS could be better laid out, with more options to tweak but even just the simple things like ‘Auto’ settings for memory timings. The IDCC software could also be improved, with Auto-Tune needing a large overhaul. Memory overclocking should be a strong focus, with the minimum requirement of having all the dividers working as expected, at least to the same level as other vendors.
Stepping back from the specifics, the board layout, while understandable for Intel’s standard desktop range, should have been redesigned to allow larger aftermarket heatsinks to be used and a full board of good quality solid capacitors isn’t much to ask as it's become standard for products in this price range.
If you forget that these boards are part of Intel’s “Extreme” series and just look upon them as basic P55 ATX and M-ATX boards, they’re much easier to recommend. As with all of Intel’s boards, they have a lot of ‘little things’ that just work and you find yourself overlooking some of the finer details unless you stop to think. The disappointing fact is that Intel is marketing these under their “Extreme” series and they just don’t do enough to satisfy their ‘extreme’ price tags.


