
Original Link: https://www.anandtech.com/show/4501/silverstone-raven-rv03-streamlined-bird-of-prey
SilverStone Raven RV03: Streamlined Bird of Prey
by Dustin Sklavos on July 20, 2011 1:00 AM EST- Posted in
- Cases/Cooling/PSUs
- SilverStone
- Full-Tower
Introducing the SilverStone Raven RV03
At this point, SilverStone's signature in the enclosure world is the 90-degree rotation of the motherboard. This unique engineering decision makes cases like the FT03 possible, but for a long time enclosures with this design have been extremely pricey and outside the reach of most users. While the new Raven RV03 is still fairly expensive compared to the enclosures we've tested thus far, at $159 it's at least closer to the realm of reasonable though it still must contend with offering at least as much value as the cases at $100 or below we've reviewed so far. Is it worth spending up?
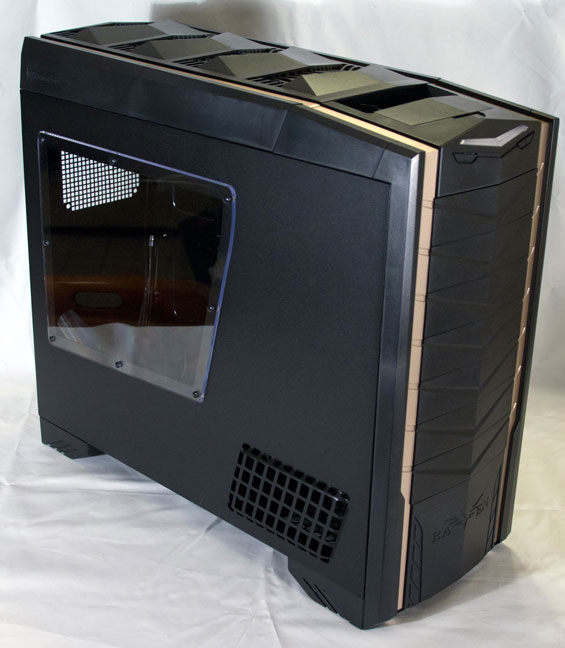
Since restarting our case reviews with the new testing methodology, we haven't had in an enthusiast-class (and enthusiast-priced) enclosure like the RV03 in house yet, so our comparisons may seem a little bit unfair. This can't really be helped, but we have a Thermaltake Level 10 GT in for review soon and that should balance things out a bit. In the meantime, the RV03 is certainly bigger than the other units we've tested, and I'm anxious to see how it turns out.
The last generation Raven, the RV02, was expensive but proved popular nonetheless. The trio of fans, fairly clean internal design, and SilverStone's signature rotated motherboard helped keep that enclosure running cool and quiet, and the styling was a little bit more subdued. To reduce the Raven's price tag (and its footprint) for the RV03, some changes needed to be made. SilverStone has reduced the number of internal 180mm fans from three to two, but increased their efficiency. Mounting space for drives has been dramatically increased, and as a whole the RV03 is a far more modular design than its predecessor. At least on paper, this Raven is an impressive specimen.
| SilverStone Raven RV03 Specifications | ||
| Motherboard Form Factor | SSI EEB, SSI CEB, Extended ATX, ATX, Micro ATX, Mini ITX | |
| Drive Bays | External | 7x 5.25" (six occupied by 2x5.25"-to-3x3.5" adapters) |
| Internal | 10x 3.5" (see above), 2x 2.5" | |
| Cooling | Front | 4x 120mm fan mount (attached to bay adapters) |
| Rear | 1x 120mm fan mount | |
| Top | 1x 120mm | |
| Side | 1x 120mm fan mount (back) | |
| Bottom | 2x 180mm (compatible with three 120mm fans) | |
| Expansion Slots | 8 (one blocked off if rear fan mount used) | |
| Front I/O Port | - | |
| Top I/O Port | 2x USB 3.0, headphone and mic jacks, fan controller | |
| Power Supply Size | ATX | |
| Clearance | 13.58" (Expansion Cards), 163mm (CPU HSF), 180mm (PSU) | |
| Weight | 25.1 lbs. | |
| Dimensions | 20.55" x 9.25" x 22.44" | |
| Price | $159 | |
The enclosure is essentially designed to employ bottom-to-top convection style cooling, but SilverStone includes the means to turn it into a more typical front-to-back design using the bay adapters. Admittedly, one of my biggest concerns with the rotated motherboard design is the noise being moved out of the top of the enclosure instead of the rear since so many users keep their towers on the floor (myself included.) With cases as big as this one, that's really the only place for it.
In and Around the SilverStone Raven RV03
I may be a glutton for punishment at this point, but for me, half the fun of a SilverStone enclosure is figuring out how it comes together. There's always a logic to it, but SilverStone's designs often deviate wildly from the norm and so assembly is oftentimes just as unusual. Before getting into that, though, it's worth addressing the RV03's exterior and unfortunately I think they've taken a step back with this model.
The gold strips that run up the front and across the top are removable, and that's good because they're an accent that cheapens the look of the RV03. Taken on its own this iteration's face is a little more subdued than most gaming enclosures, but compared to the RV02 it's gaudy. The RV02's 5.25" bay covers didn't have the same V-shaped accents the RV03's have (or the colored trim for that matter), and the top of the enclosure was sleeker.
There's a little bit of schizophrenia in the placement of the fan controls and USB 3.0 ports as well; the USB 3.0 ports and audio jacks are covered by a door while the fan controls are entrenched in a metal plate in the open gap between the door and snap-on cover that shields the expansion slots and I/O cluster. I can't help but feel like all of these should've been hidden under the door.
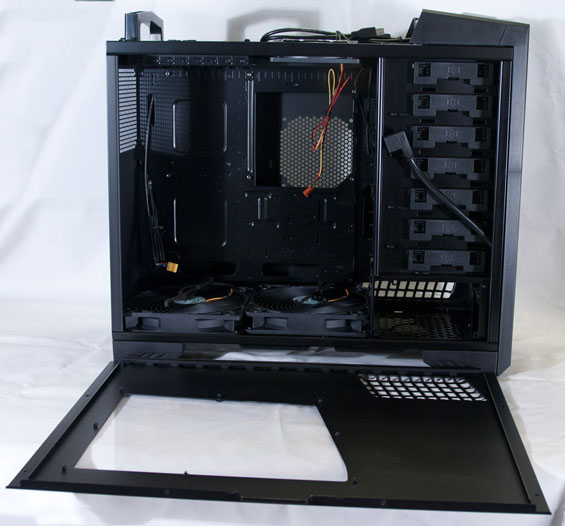
When you do pop the RV03 open, you'll find an interior that seems a lot busier than its predecessor (not to mention most other cases), and that's due to the modularity of the design. SilverStone is pretty big on customization with their enclosures and the RV03 is a doozy that way. Cable routing should be fairly simple given the spacious motherboard tray and routing holes surrounding it, and SilverStone included two drive bay adapters for the copious 5.25" bays in front (seven in all) that allow you to trade three 5.25" bays for three 3.25" bays and additional 120mm fan mounts.
Beneath the column of 5.25" bays is the power supply mount with a cable that routes in from the plug on the bottom of the case. Users of larger PSUs beware: this bay supports 180mm of depth max. There are grilles on both side panels around this bay to improve airflow and cable clearance, but this bay is really designed for PSUs with bottom intakes.
Next to the motherboard tray at the "rear" of the case is yet another 120mm fan mount that, if used, will block off the eighth expansion slot. Finally, there's a 120mm exhaust fan at the top of the case, where one would usually be in relation to a motherboard. Well, not finally, we're not quite done yet.
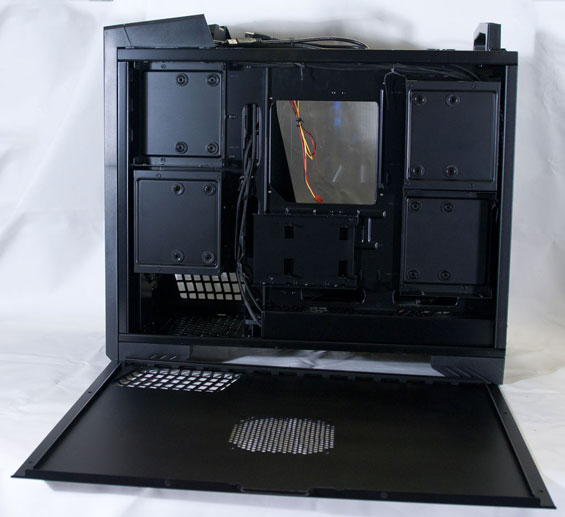
Pop over to the other side and you'll see not only the opening in the motherboard tray for aftermarket cooling ([insert generic jab at Intel's HSF mounting mechanism here]), but four 3.5" drive mounts and a fifth mount able to hold a pair of 2.5" drives. That fifth mount is expressly for SSDs, as odds are good two stacked mechanical drives would overheat if used there. Keeping the drives behind the motherboard tray is an interesting choice since it helps minimize cabling around the motherboard itself, but there's virtually no ventilation back here. SilverStone includes a 120mm fan mount in the side panel that will blow directly onto the back of the processor socket and hopefully spill some of that air to the surrounding drives, but I'd be concerned about heat nonetheless. Mechanical hard drives are specced to tolerate between 50C and 60C maximum, but remember they're mechanical: do you really want to push it?
Assembling the SilverStone Raven RV03
While assembly of the RV03 is remarkably straightforward given its unusual design, you may still want to keep the instruction manual handy just in case. Thankfully, the steps we usually go through when installing our testbed into a new chassis can still be followed easily enough with the RV03: motherboard, then drives, then expansion cards, then PSU, then cable everything and call it a day.
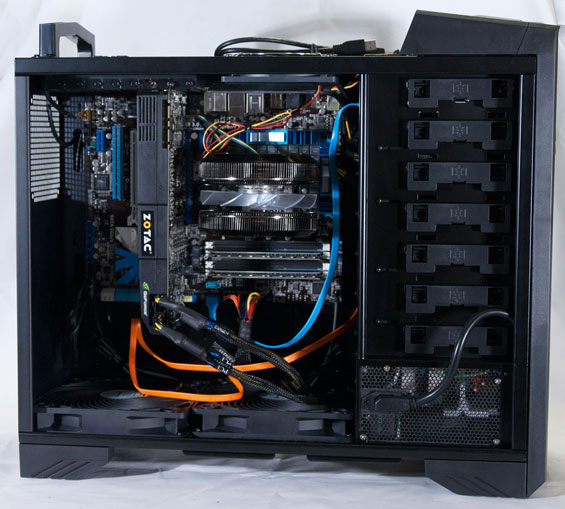
Installing the motherboard was easy enough; you'll need to place all the standoffs yourself, but the case is able to accept so many different form factors that this isn't too surprising. Our CPU cooler has pretty much stayed mounted to the board since the word "go" when we started doing these reviews, and there weren't any clearance issues. In fact this will be one of the few enclosures you'll ever see where trying to connect the AUX 12V line doesn't result in bloodletting.
Everything else is trickier--way trickier. The 5.25"-to-3.5" drive bay adapters require you to remove drive trays behind the motherboard tray in order to access the screws that keep them in place, then remove the face plates for the necessary 5.25" drive bays. Those 5.25" bay covers, by the way, are actually two pieces: a vent and an actual plate. The vents are for those that plan on using the drive bay adapters, while the plate is designed to be affixed to the front of an optical drive to maintain the looks of the face of the tower. That's a nice idea, but SilverStone only includes enough material to install just one optical drive.
Thankfully, the top 5.25" bay is empty. You'll need to pop the bay covers off with a flathead screwdriver or your fingernail and I never was able to get them to snap back on exactly right, but once you've opened up the front of the bay, the optical drive slides in easily and the tool-less mechanism works well for keeping the drive in place.
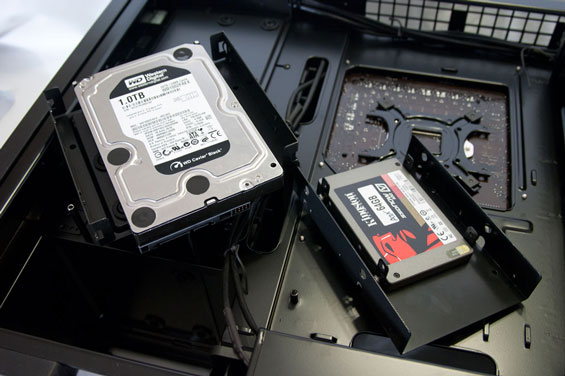
Installing 2.5" or 3.5" drives using the drive trays behind the motherboard tray isn't particularly difficult, but the optical drive was the only tool-less part of this assembly. The 3.5" drive trays each have silicon grommets that dampen vibrations, and you'll need to use special screws that come with the RV03 to mount drives in them, while the 2.5" drive tray is again--I can't stress this enough--really intended for SSDs instead of notebook-sized mechanical hard drives. (Not that most people would be interested in using notebook HDDs.) It supports two drives but it does stack them almost directly on top of each other. All of the drive trays are affixed to the back of the motherboard tray with screws, so you'll be using between six and eight screws per drive installation. This is par for the course for the unusual design, as the FT03 worked the same way.
When I mounted the GeForce GTX 580, I did note that I had to "stretch" the mounting plate on it a little more than I've normally had to in order to line it up with the screw holes. Alignment issues are honestly par for the course when assembling new cases and it's not the first time I've had to struggle a little, but this was a slightly larger gap than I've normally seen.
The power supply we use for testing cases fit into the PSU bay, but it was mighty snug and at times I was worried I was going to scratch up or damage something. You can force it almost all the way in, then use the mounting screws to get it the rest of the way (minds out of the gutter, folks) and lock it into place. I've read other reviews where reviewers have had issues with connecting the power cable to the PSU due to a cable tie on the interior of the case, but my review unit had no such tie and it's my understanding that was an issue confined to early review hardware. The case I have could easily connect the PSU cable anywhere within the confines of the bay.
Routing cables was for the most part simple but the space behind the power supply, despite the allowance made in the design of the case panel, was still pretty tight. This has been yet another enclosure where I've been overwhelmingly glad the power supply was modular. There's definitely space behind the motherboard tray for all of the cables along with places to wrap zip ties, but part of the issue is that ventilation behind the motherboard tray is actually important in the RV03. If you're planning to install a rear 120mm fan (and it's something I'd seriously consider), this could become a bit fraught. Finally, the USB 3.0 ports at the top of the case still use routing cables to the I/O cluster instead of a front panel header. It would've been nice to have had a bridge on hand at least, but some motherboards come with a USB 3.0 port bracket that could probably just be routed internally behind the motherboard tray.
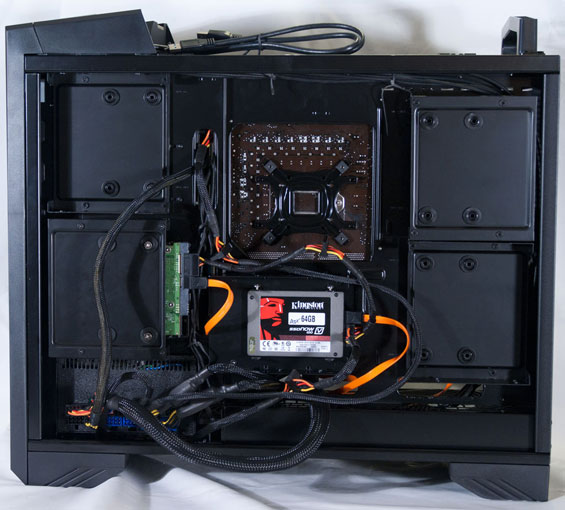
"Closing up" took about the same amount of effort it almost always does with traditional enclosures, requiring some pressure on the back panel to lock it into place. The RV03 does require an additional step beyond most cases, though: since the I/O cluster and expansion slots are at the top of the case instead of the rear, there's a vented cover that needs to be snapped on and off. I've read some people concerned that the cover is fragile, but I removed and reattached it quite a few times and it seems fine. Cables get routed out a special loop in the back of the case and there's enough space there for even the menagerie coming out the back of my own case. Note that if you're using any type of display connector changer, like DVI-to-VGA, there isn't enough clearance for the large block adapters; you'll need a flexible one.
Testing Methodology
For testing ATX cases, we use the following standardized testbed in stock and overclocked configurations to get a feel for how well the case handles heat and noise.
| Full ATX Test Configuration | |
| CPU |
Intel Core i7-875K (95W TDP, tested at stock speed and overclocked to 3.8GHz @ 1.38V) |
| Motherboard | ASUS P7P55D-E Pro |
| Graphics Card | Zotac NVIDIA GeForce GTX 580 (244W TDP) |
| Memory | 2x2GB Crucial Ballistix Smart Tracer DDR3-1600 |
| Drives |
Kingston SSDNow V+ 100 64GB SSD Western Digital Caviar Black 1TB SATA 6Gbps Samsung 5.25" BD-ROM/DVDRW Drive |
| CPU Cooler | Zalman CNPS9900 MAX with Cooler Master ThermalFusion 400 |
| Power Supply | SilverStone Strider Gold 750W 80 Plus Gold |
A refresher on how we test:
Acoustic testing is standardized on a foot from the front of the case, using the Extech SL10 with an ambient noise floor of ~32dB. For reference, that's what my silent apartment measures with nothing running, testing acoustics in the dead of night (usually between 1am and 3am). A lot of us sit about a foot away from our computers, so this should be a fairly accurate representation of the kind of noise the case generates, and it's close enough to get noise levels that should register above ambient.
Thermal testing is run with the computer having idled at the desktop for fifteen minutes, and again with the computer running both Furmark (where applicable) and Prime95 (less one thread when a GPU is being used) for fifteen minutes. I've found that leaving one thread open in Prime95 allows the processor to heat up enough while making sure Furmark isn't CPU-limited. We're using the thermal diodes included with the hardware to keep everything standardized, and ambient testing temperature is always between 71F and 74F. Processor temperatures reported are the average of the CPU cores.
For more details on how we arrived at this testbed, you can check out our introductory passage in the review for the IN-WIN BUC.
Last but not least, we'd also like to thank the vendors who made our testbed possible:
Thank You!
We have some thanks in order before we press on:
- Thank you to Crucial for providing us with the Ballistix Smart Tracer memory we used to add memory thermals to our testing.
- Thank you to Zalman for providing us with the CNPS9900 MAX heatsink and fan unit we used.
- Thank you to Kingston for providing us with the SSDNow V+ 100 SSD.
- Thank you to CyberPower for providing us with the Western Digital Caviar Black hard drive, Intel Core i7-875K processor, ASUS P7P55D-E Pro motherboard, and Samsung BD-ROM/DVD+/-RW drive.
- And thank you to SilverStone for providing us with the power supply.
Noise and Thermal Testing, Stock
For cases with adjustable fan settings like the Antec Sonata IV and NZXT H2, we're using the intermediate setting since in both cases it offered the best balance of noise and performance. The SilverStone Raven RV03 also includes a fan controller for the two bottom fans, but this is a bit tricky: there's no way to disconnect these fans from the controller, regardless of whether or not you're also using fan control from the BIOS, and all three fans that ship with the Raven RV03 use three-pin connectors.
The fan controller has two settings for each of the bottom fans, "High" and "Low," and so the RV03 was tested with each. Note that there's a frankly staggering number of fan configurations you could conceivably use in the RV03 and addressing each one would push this review out quite a ways, so we're sticking with the stock setup.
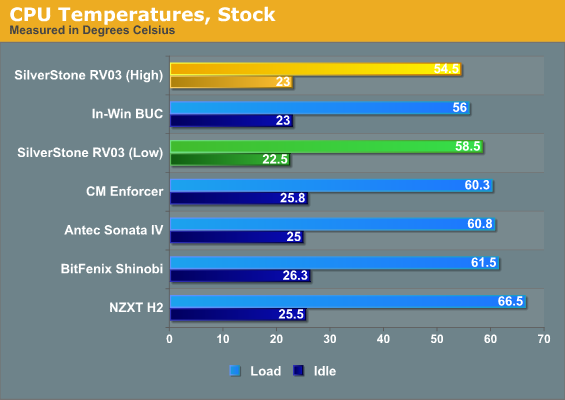
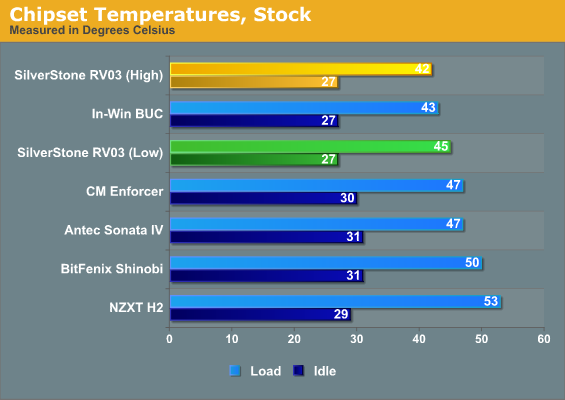
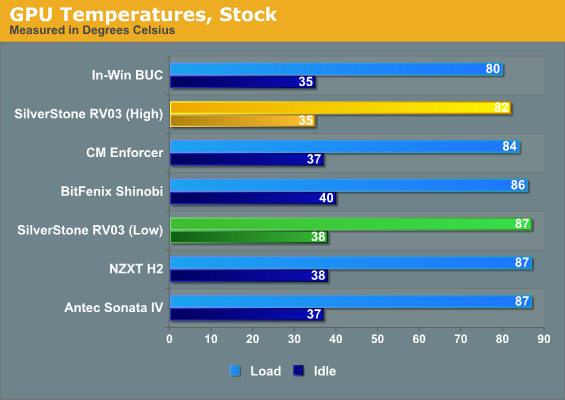
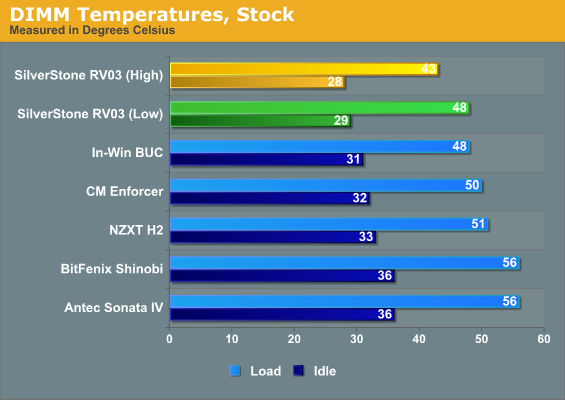

Temperatures are among our best, but the RV03 really needs to be running at high fan speed to separate from the rest of the pack. It's at this point that it's worth reminding you that airflow in the RV03 is very specifically directed; while the In-Win BUC is pretty much wall-to-wall ventilation, the RV03 very specifically pulls air from the bottom and blows it out the top, creating a positive-pressure wind tunnel.
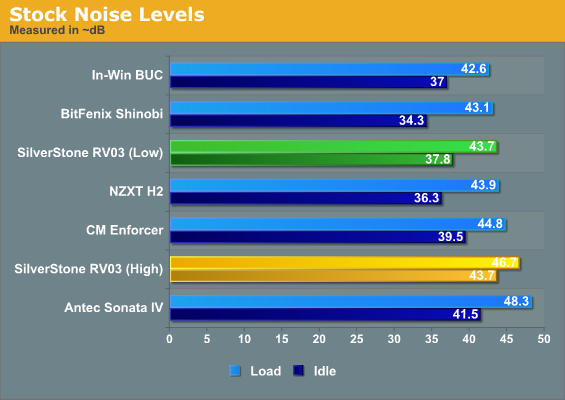
Unfortunately the RV03 also separates from the pack in another way: it's among the loudest cases we've tested when it's running at full bore. I personally checked other reviews of the RV03 from reputable sites and their findings largely jibe with mine: noise, along with airflow, is directed out of the top and thus closer to the end user. In the RV03's defense, though, the character of the noise is different: it's audible, but the noise is very low-pitched and hollow. It's not a jet engine, and thankfully you still get decent thermals when running the fans at low speed.
Noise and Thermal Testing, Overclocked
It's in our overclocked testing that I expected SilverStone's Raven RV03 to acquit itself better. This enclosure isn't a solution designed for stock operation nor is it priced that way: the RV03 practically demands to be used in higher performance environments like this one.
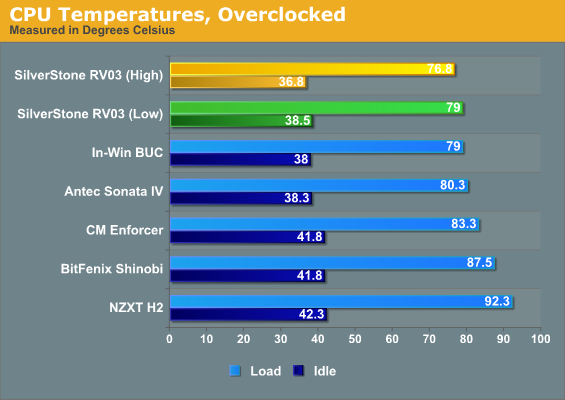
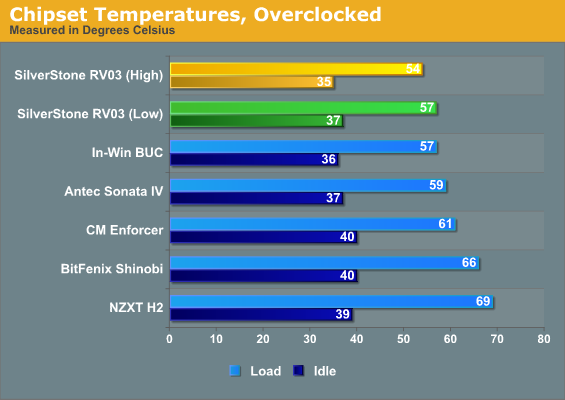
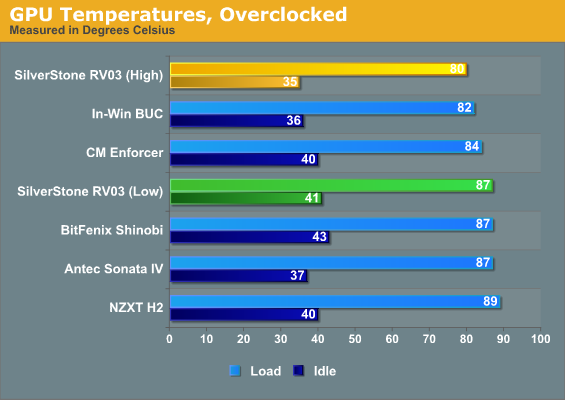
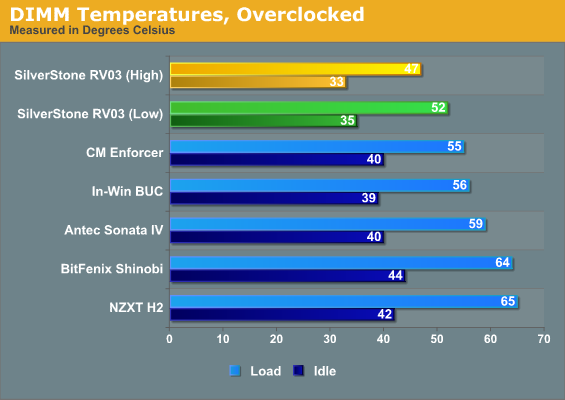
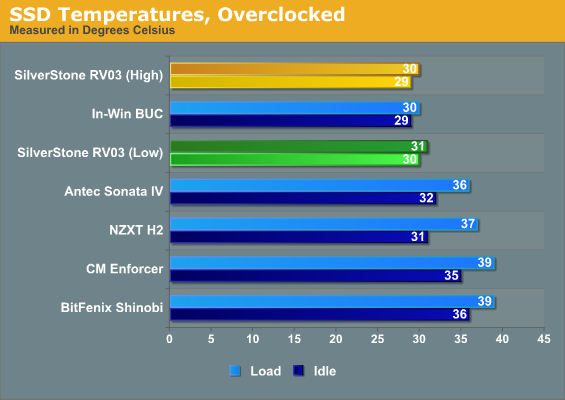
The "low" fan setting (along with the RV03) acquits itself much better in this environment. SilverStone seems to have designed the new Raven to excell with these kinds of high thermal loads and it pays off. At the "high" fan setting, the RV03 moves to the top of our thermal charts.
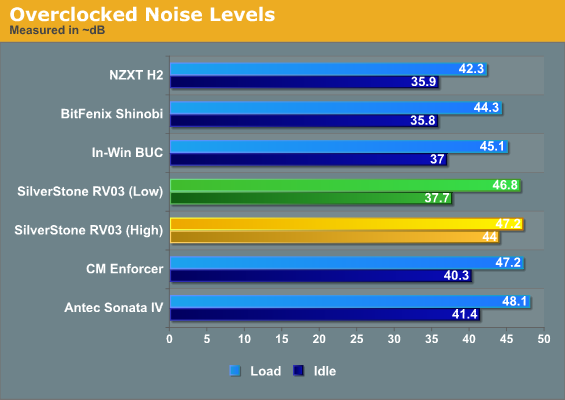
Unfortunately, at its "high" fan setting, the RV03 is very nearly the loudest case we've yet tested, while at "low" it's in the middle of the pack. Again, the character of the noise is different from other cases. The Sonata IV measures a little louder, but it's higher-pitched and more obtrusive than the RV03, which sounds mostly like very loud white noise.
Conclusion: Not Bad, But Needs Care
I'm not going to sugar coat it: I'm a little disappointed with the SilverStone Raven RV03. As a dyed-in-the-wool fan of their engineering and having been particularly impressed by how the FT02 acquitted itself in handling an extremely power-hungry, heat-heavy build when I tested DigitalStorm's Black Ops, I was expecting the RV03 to be a lean and aggressive enthusiast option. What I'm left with is an enclosure that's by no means bad (and certainly a good conversation piece), but it feels like it's being pulled in too many directions.
The RV03 lacks the focus of enclosures like the FT02, FT03, and even its predecessor, the RV02. And what our thermal testing didn't show you was just how hot the single hard drive got: pushing 43C under load. That's within spec, true, but that's also just one drive out of a possible four behind the motherboard tray. The FT03 at least pushes the drives against the aluminum side panel to dissipate heat, but the RV03 has no such allowance. Likewise, the drive bay adapters in the front seem like a nice idea that makes the case even more modular, but the fan mounts make them feel self-defeating.
When you get something that's off the beaten path like the RV03 is, you should be expecting to have to work a little harder to put it together, so I can't fault it for not being a tool-less design the way many of the other cases I've tested are. What I wasn't prepared for was just how much work the RV03 really is. After my initial testing I e-mailed the SilverStone representative with my findings and he replied saying the case frankly should've worked better. He narrowed it down to my cabling: he felt the odd couple of cables (the two video card leads and a couple of SATA cables) above one of the intakes was hampering performance. That felt like an awful lot of impact for just some thin cables, but retesting after tying them back vindicated him as the RV03's performance jumped up to near, if not the top, of our charts. Of course, this meant crowding the space behind the motherboard tray even more, which wound up being bit difficult in and of itself.
If you're the type of end user that loves to tinker, there's a good chance that the RV03 is going to be a lot of fun for you and will pay off handsomely once you've customized it. But for users that want to focus more on the hardware in their machine than cooling it, the RV03 is going to seem like too much work. The RV03's noise floor at 37.8dB is good, but the enclosure will need some coaxing to deliver its best performance.


