Original Link: https://www.anandtech.com/show/16033/the-nzxt-n7-z490-motherboard-review-
The NZXT N7 Z490 Motherboard Review: From A Different Direction
by Gavin Bonshor on October 7, 2020 10:30 AM EST- Posted in
- Intel
- ASRock
- Motherboards
- NZXT
- Z490
- Comet Lake
- Intel 10th Gen
- i7-10700K
- N7 Z490
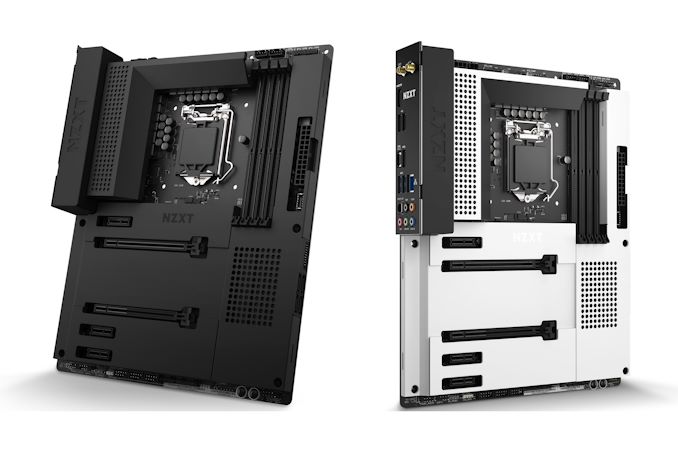
It's been nearly two years to the day since NZXT last released a motherboard, which was the Z370 N7. NZXT initially used ECS as its motherboard OEM, but has opted to use ASRock this time round for a new N7 model. This has the same N7 infused armor, albeit using a combined metal and plastic instead of just metal which does reduce the overall cost. Aiming for the mid-range market, NZXT's N7 Z490 features 2.5 GbE, Wi-Fi 6, dual M.2, and four SATA ports, and we give it our focus in this review.
The N7 Z490: Going For Mass Effect
At the beginning of September, NZXT reached out to me explaining that they intended to launch a new motherboard into an already cramped Z490 market. One of the elements NZXT wanted to address over its motherboard offerings was the firmware and overclocking, given that ECS isn't really a popular name on those two fronts. This time around, NZXT has leveraged ASRock's services for the underlying platform, on top of which NZXT has layered its own styling and form.
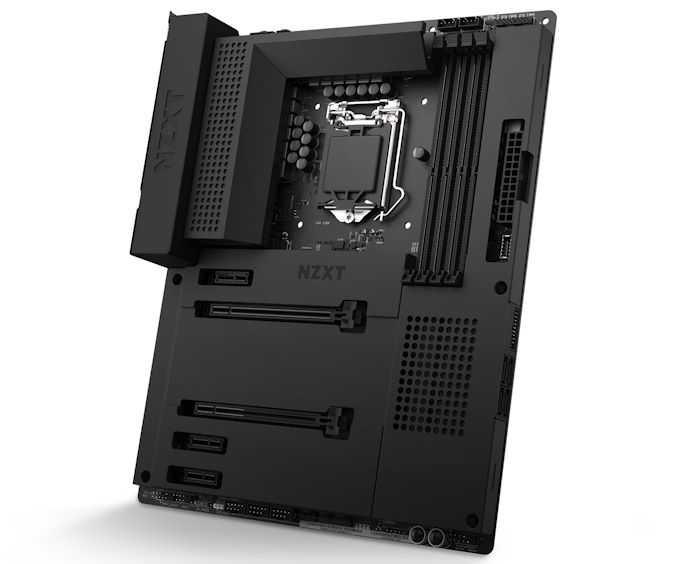
Armed and equipped with a reasonable mid-ranged feature set, the NZXT N7 Z490 includes a premium HD audio codec, combined with 2.5 GbE and an Intel Wi-Fi 6 interface. Perhaps one of the most notable features is the boards full cover armor plating (plastic and metal), which users familiar with NZXT's previous motherboards will recognize. It stretches across the entirety of the PCB, only showing the CPU socket area, memory slots, and the top and bottom edges of the board.
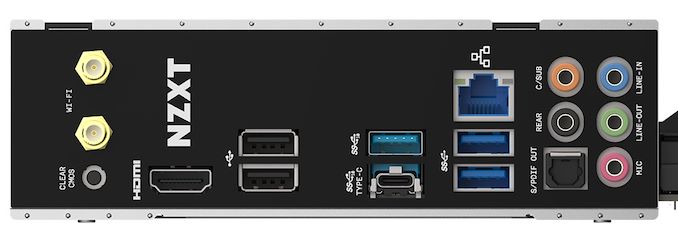
Looking at memory support closer, the N7 Z490 includes the capacity to install up to 128 GB, with speeds of up to DDR4-4266 supported. This is a couple of pegs lower than other models on the market, but the likelihood of regular users opting for higher speeds than this is likely to be slim due to cost. The board uses two PCIe 3.0 x4 M.2 slots for storage, with four SATA ports available. On the rear panel, the N7 Z490 uses just two USB 3.2 G2 ports, a single Type-C, and just one Type-A, with two USB 3.2 G1 Type-A and two USB 2.0 ports.
In our performance testing, the N7 Z490 performed and behaved like any other Z490 board we've tested from ASRock. We saw the N7 Z490 do well in our Non-UEFI POST time test, get a good result in our DPC latency test, and observed competitive performance in our computational and gaming benchmarks. Overall, for any stock level performance, it was hard to find fault with the board.
For overclocking, the NZXT N7 Z490 performed better than any NZXT board I've tested so far (I've owned all of them). Similar to other ASRock models, when adjusting the CPU VCore voltage in the firmware, it reverts the LLC profile to level 1 for tighter and aggressive VDroop control. It feels as if the firmware isn't quite polished to the standard we would expect for release - in our manual overclock testing, setting 1.250 V in the firmware at 4.8 GHz, all cores gave us a load VCore of 1.384 V, which is way too much. This presented even more problems at higher overclocks and caused a lot of downclocking, which skewed our results, with a possible issue within the board's loadline calibration profile settings. More info on this in the review.
The NZXT N7 Z490 has an MSRP of $230, which puts it in direct competition with models such as the ASRock Z490 PG Velocita ($235), the GIGABYTE Z490 Aorus Elite AC ($220), and the ASUS Prime Z490-A ($230). All of the competing models include support for faster memory, more SATA ports, with the ASUS model offering better USB 3.2 G2 connectivity. What NZXT has squarely in its favor is a competitive networking combination, with a unique and uniformed aesthetic due to the PCB armor, which looks great. The crux of the matter is whether or not the NZXT N7 Z490 steps up to the challenge in our test suite.
Read on for our extended analysis and comparison tests.
Visual Inspection
If you are familiar with NZXT's previous N7 motherboards, the N7 Z490 follows a very similar aesthetic with near full-cover armor plating hiding the black PCB. In a move which looks down to reducing the overall cost, one of the complains on the Z390, NZXT has opted for a metal and plastic cover as opposed to the full metal cover. The NZXT N7 Z490 is an ATX sized model, with the armor plating and large power delivery heatsink combining to create a fairly seamless design. It should also be noted that the NZXT N7 Z490 is also available in white, which reminds me of the stylings of the ASUS TUF Z97 Mark S which we reviewed over six years ago.
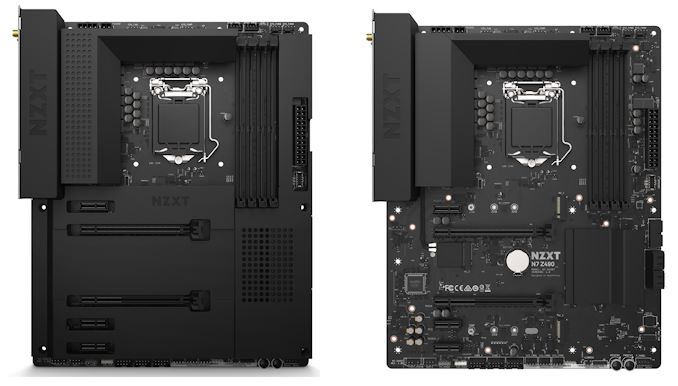
Looking at the NZXT N7 Z490 side by side with the armor on and off, it clearly covers the majority of the board. The N7 in itself doesn't include any integrated RGB LED lighting, but NZXT has added an RGB and fan controller which can be controlled using its CAM software. Users can add their own RGB LED strips via two NZXT RGB LED, one 12 V RGB LED, and one 5 V addressable RGB header. For cooling, the N7 Z490 has seven 4-pin headers which are divided up into one for a CPU fan, one for an AIO pump, and five for chassis fans. Located in the bottom right-hand corner is a basic overclockers toolkit which consists of a reset and power button pairing, with four POST LEDs to allow users to diagnose POST issues.
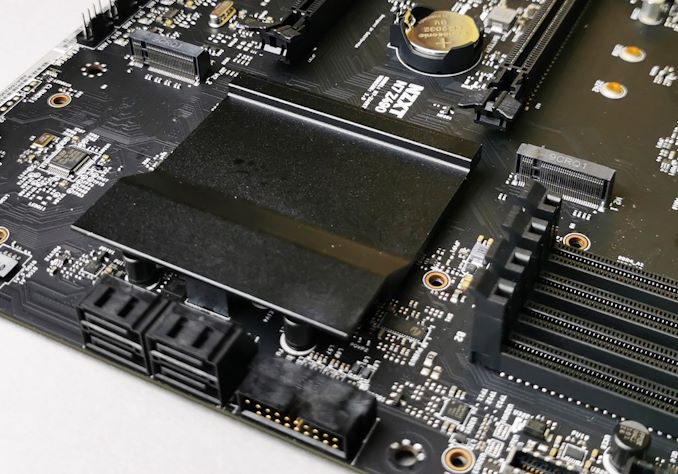
In the top right-hand corner are four memory slots with the capability to install up to 128 GB, with maximum supported speeds of DDR4-4266. In the storage department, NZXT includes two PCIe 3.0 x4 M.2 slots, with one featuring support for both PCIe 3.0 x4 and SATA drives which is located along the bottom. In regards to SATA, there are just four right-angled SATA ports along the bottom `right-hand side of the board, with support for RAID 0, 1, 5, and 10 arrays.
The NZXT N7 Z490 is using a 10-phase design for the power delivery, which is being controlled by an Intersil ISL69269 PWM controller. It is operating in an 8+2 configuration, with eight Vishay SiC632A 50 A power stages for the CPU VCore, and two Vishay SiC632A 50 A power stages for the SoC. For the board's VCCSA, the N7 Z490 is using an Intersil RAA220001 driver, with a Sinopower SM4337 high-side and Sinopower SM4436 low-side MOSFET pairing. The VCCIO uses the same MOSFET configuration but is instead controlled and driven by an Anpec APW8828 controller.
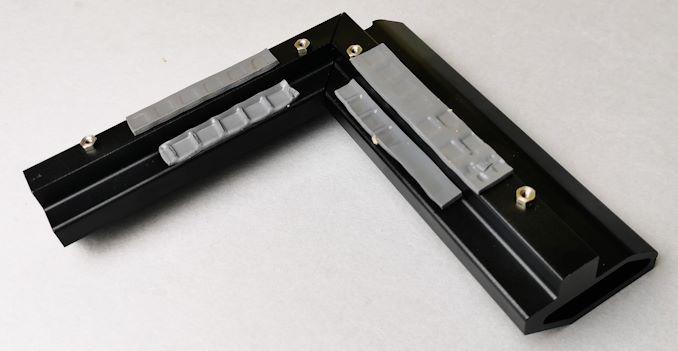
Keeping the power delivery cool is an L-shaped heatsink, which is hollowed out to allow airflow in. The heatsink itself doesn't include any fins for passive airflow to catch, so it relies solely on airflow being directed down the hollowed out channel. Despite not including a fin array, the mounting between the heatsink and the power delivery is solid, with very good impressions on the thermal pads.
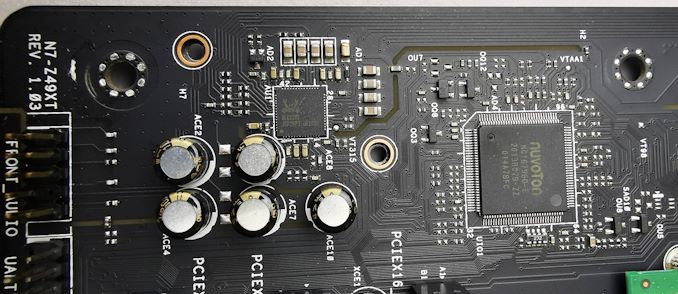
Looking closer at the audio section of the PCB, it is using five Nichicon fine gold series audio capacitors, which are assisting the premium Realtek ALC1220 HD audio codec. The codec itself doesn't include any EMI shielding, but the audio PCB is separated from the rest of the board's componentry.
On the rear panel is a scarce selection of input and output, with just two USB 3.2 G2 ports, a Type-A and a Type-C. Also present are two USB 3.2 G1 Type-A and two USB 2.0 ports, with a further two USB 3.2 G1 Type-A (one header) and six USB 2.0 ports available through the use of internal headers. There is a single HDMI 1.4b video output, with five 3.5 mm audio jacks and S/PDIF optical output which is powered by a Realtek ALC1220 HD audio codec.
What's in The Box
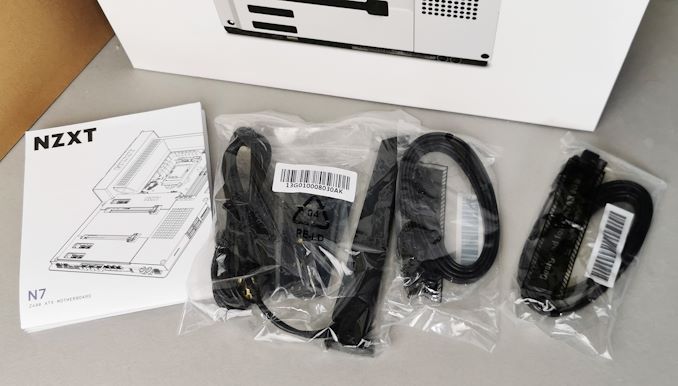
Included in the NZXT N7 Z490 accessories bundles are four SATA cables, an Intel AX200 Wi-Fi 6 interface antenna, and N7 users manual.
- 4 x SATA cables
- Intel AX200 antenna
- User manual
BIOS
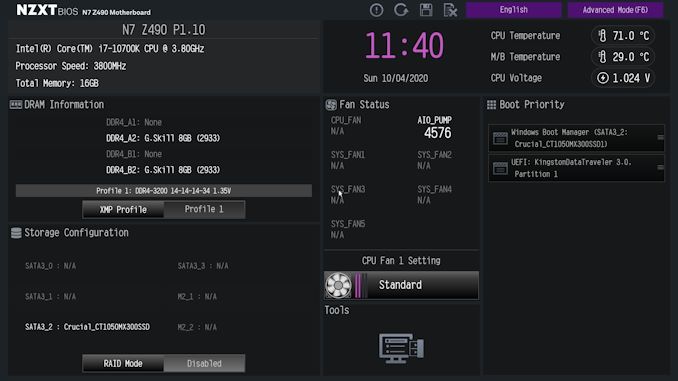
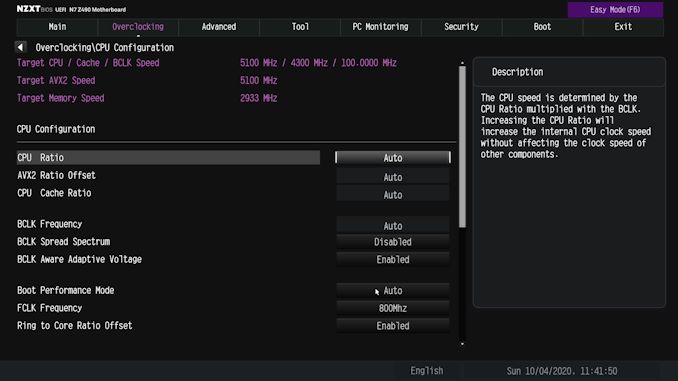
Although the N7 Z490 is NZXT's latest motherboard on the market, the ASRock OEM does the heavy lifting regarding the firmware, with all the hallmarks of an ASRock BIOS, with a custom NZXT GUI. The interface includes a black background with grey and white text, with some vibrant purple accentuation.
The NZXT/ASRock UEFI firmware includes two primary modes, basic and advanced. Looking at the basic mode, it includes a basic list of information on the installed hardware, with some function through the X.M.P 2.0 profile enabler, which can be done at the click of a button. Users can alter the CPU fan setting in the basic mode, and enable or disable RAID mode, and set a boot priority, and that's about it. It does include basic monitoring for the board 4-pin fans.
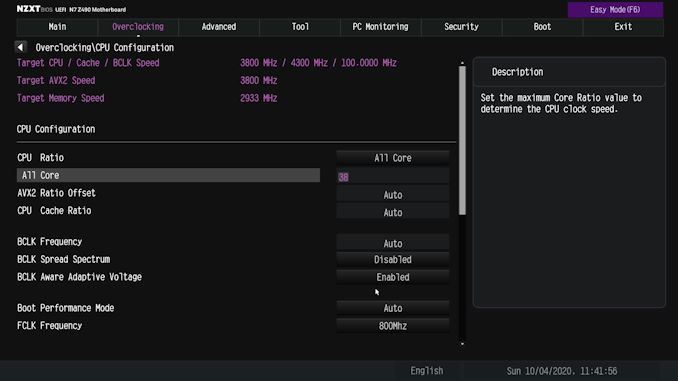
A simple press of the F6 key will alternate between the basic and advanced modes, with the latter featuring the more comprehensive list of options for users to customize. All of the boards overclocking functions can be found within the Overclocking menu, with all three core menus including CPU, DRAM, and voltage, each getting its own section. Within the CPU area, users can adjust the CPU and BCLK frequencies to overclock the CPU, with options for AVX2 ratio offset adjustment and CPU Cache ratio control. Users can tweak memory settings in the DRAM section, with plenty of options for altering memory latencies, although users can enable X.M.P 2.0 profiles on compatible memory within three clicks.
Outside of the typical overclocking and monitoring functions, there isn't much in the way of features with NZXT's firmware with a basic fan profile customizer. NZXT keeps things simple with the GUI, functionality. However, all of the relevant settings for customizing Intel's Thermal Velocity Boost are present, so all of the tools needed to squeeze more performance out of Intel's Comet Lake processors is available to use. The firmware itself is strong and stable, with more than enough for users to sink their teeth into, without over complicating things where it doesn't need to be.
Software
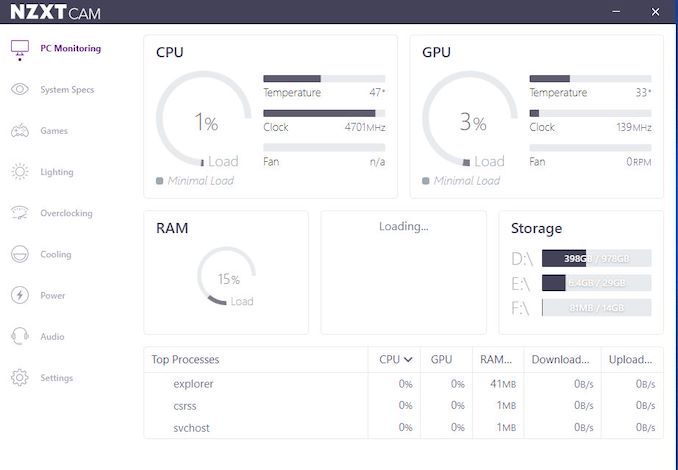
The NZXT software bundle comes amalgamated via its CAM software, which acts as the central hub for all the available utilities. It offers various menus covering different elements of the software, including a cool PC Monitoring section, an overclocking section for users to perform basic VGA overclocking, and a lighting section for users looking to customize externally added RGB LEDs.
The CAM software is one of NZXT's most prominent software packages in the companies history and is used across most of its devices. Relating directly to the N7 Z490, the NZXT CAM software allows plenty of functionality, including power options, when used with compatible NZXT power supplies, enabling the boards' customization 4-pin cooling headers, as well as an integrated section for the onboard audio.
It should be noted that the version of the NZXT CAM software we were sent from NZXT for the N7 Z490 review is currently still in BETA, and as such, doesn't seem completely polished off. Despite having the drivers for the Realtek ALC1220 HD audio codec installed, the audio section wasn't functional. The overclocking section includes a large warning screen that provides a caution for users looking to make adjustments. This is especially useful for regular users without much experience who go browsing and tweaking settings without much thought for consequences that overclocking without knowledge can have. Unfortunately, the CAM software at present doesn't allow for CPU or memory overclocking within Windows, with the only VGA currently supported within CAM.
The games section provides a list of playtime for each game played used, which can be useful for monitoring how much time is actually spent gaming, especially when users should be working. Alas, it could be useful for me, who spends a lot of the evening gaming, perhaps too much!
Board Features
The NZXT N7 Z490 is an ATX-sized motherboard which slots directly into the mid-ranged Z490 portion of the market offering. The main target market is system builders looking to add a bit of flair with its plastic full-cover across the majority of the PCB. It features much of what a board in the $200-250 price point should have, with dual PCIe 3.0 x4 M.2 slots, four SATA ports with support for RAID 0, 1, 5, and 10 arrays, and a premium Realtek ALC1220 HD audio codec. It has two full-length PCIe 3.0 slots that operate at x16/+x4, with three PCIe 3.0 x1 slots. The N7 Z490's memory capabilities include support for DDR4-4266, with a maximum capacity of up to 128 GB across four available memory slots. For cooling, the N7 includes a total of seven 4-pin headers, with one for a CPU, one designated for an AIO pump, and five for regular chassis fans.
| NZXT N7 Z490 Motherboard | |||
| Warranty Period | 3 Years | ||
| Product Page | Link | ||
| Price | $230 | ||
| Size | ATX | ||
| CPU Interface | LGA1200 | ||
| Chipset | Intel Z490 | ||
| Memory Slots (DDR4) | Four DDR4 Supporting 128 GB Dual-Channel Up to DDR4-4266 |
||
| Video Outputs | 1 x HDMI 1.4b | ||
| Video Inputs | N/A | ||
| Network Connectivity | Realtek RTL8125BG 2.5 GbE Intel AX200 Wi-Fi 6 |
||
| Onboard Audio | Realtek ALC1220 | ||
| PCIe Slots for Graphics (from CPU) | 1 x PCIe 3.0 x16 | ||
| PCIe Slots for Other (from PCH) | 1 x PCIe 3.0 x4 3 x PCIe 3.0 x1 |
||
| Onboard SATA | Four, RAID 0/1/5/10 (Z490) | ||
| Onboard M.2 | 1 x PCIe 3.0 1 x PCIe 3.0 x4/SATA |
||
| Thunderbolt 3 | N/A | ||
| USB 3.2 (20 Gbps) | N/A | ||
| USB 3.2 (10 Gbps) | 1 x USB Type-C (Rear panel) 1 x USB Type-A (Rear panel) |
||
| USB 3.2 (5 Gbps) | 2 x USB Type-A (Rear panel) 2 x USB Type-A (One header) |
||
| USB 2.0 | 2 x USB Type-A (Rear panel) 6 x USB Type-A (Three headers) |
||
| Power Connectors | 1 x 24-pin Motherboard 1 x 8-pin CPU 1 x 4-pin CPU |
||
| Fan Headers | 1 x 4-pin CPU 1 x 4-pin AIO 5 x 4-pin Chassis |
||
| 1 x HDMI 1.4b Output 1 x USB 3.2 G2 Type-A 1 x USB 3.2 G2 Type-C 2 x USB 3.2 G1 Type-A 2 x USB 2.0 Type-A 1 x RJ45 (Realtek) 2 x Wi-Fi 6 Antenna (Intel) 5 x 3.5 mm audio jacks (Realtek) 1 x S/PDIF Optical output (Realtek) 1 x Clear CMOS button |
|||
The NZXT N7 Z490 includes a single Realtek RTL8125BG 2.5 GbE port, with Wi-Fi 6 and BT 5.0 connectivity provided by an Intel AX200 CNVi interface. On the rear panel is a very basic set of input and output, with just two USB 3.2 G2 ports (Type-A and Type-C, two USB 3.2 G1 Type-A, and two USB 2.0 ports. Further capability is available for the use of internal headers, with one USB 3.2 G1 header (two ports), and three USB 2.0 headers which can add a further six USB 2.0 ports. For users looking to use Intel's UHD integrated graphics, there is a single HDMI 1.4b video output, while a handily located clear CMOS button is present on the rear panel.
Test Bed
As per our testing policy, we take a high-end CPU suitable for the motherboard that was released during the socket’s initial launch and equip the system with a suitable amount of memory running at the processor maximum supported frequency. This is also typically run at JEDEC subtimings where possible. It is noted that some users are not keen on this policy, stating that sometimes the maximum supported frequency is quite low, or faster memory is available at a similar price, or that the JEDEC speeds can be prohibitive for performance. While these comments make sense, ultimately very few users apply memory profiles (either XMP or other) as they require interaction with the BIOS, and most users will fall back on JEDEC supported speeds - this includes home users as well as industry who might want to shave off a cent or two from the cost or stay within the margins set by the manufacturer. Where possible, we will extend out testing to include faster memory modules either at the same time as the review or a later date.
| Test Setup | |||
| Processor | Intel Core i7-10700K, 125 W, $374 8 Cores, 16 Threads 3.8 GHz (5.1 GHz Turbo) |
||
| Motherboard | NZXT N7 Z490 (BIOS P1.10) | ||
| Cooling | Thermaltake Riing 360mm AIO | ||
| Power Supply | Corsair HX850 850 W 80 PLUS Platinum | ||
| Memory | G.Skill TridentZ DDR4-2933 CL 14-14-14-34 2T (2 x 8 GB) | ||
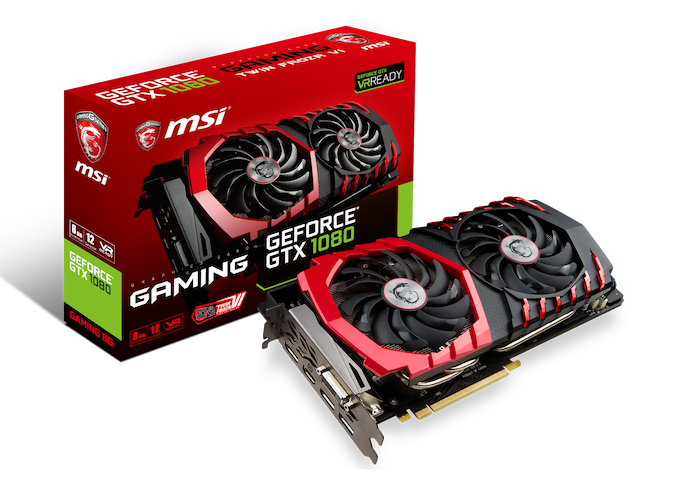
| Video Card | MSI GTX 1080 (1178/1279 Boost) | ||
| Hard Drive | Crucial MX300 1TB | ||
| Case | Corsair Crystal 680X | ||
| Operating System | Windows 10 1909 inc. Spectre/Meltdown Patches | ||
Readers of our motherboard review section will have noted the trend in modern motherboards to implement a form of MultiCore Enhancement / Acceleration / Turbo (read our report here) on their motherboards. This does several things, including better benchmark results at stock settings (not entirely needed if overclocking is an end-user goal) at the expense of heat and temperature. It also gives, in essence, an automatic overclock which may be against what the user wants. Our testing methodology is ‘out-of-the-box’, with the latest public BIOS installed and XMP enabled, and thus subject to the whims of this feature. It is ultimately up to the motherboard manufacturer to take this risk – and manufacturers taking risks in the setup is something they do on every product (think C-state settings, USB priority, DPC Latency / monitoring priority, overriding memory sub-timings at JEDEC). Processor speed change is part of that risk, and ultimately if no overclocking is planned, some motherboards will affect how fast that shiny new processor goes and can be an important factor in the system build.
System Performance
Not all motherboards are created equal. On the face of it, they should all perform the same and differ only in the functionality they provide - however, this is not the case. The obvious pointers are power consumption, POST time and latency. This can come down to the manufacturing process and prowess, so these are tested.
For Z490 we are running using Windows 10 64-bit with the 1909 update.
Power Consumption
Power consumption was tested on the system while in a single MSI GTX 1080 Gaming configuration with a wall meter connected to the power supply. This power supply has ~75% efficiency > 50W, and 90%+ efficiency at 250W, suitable for both idle and multi-GPU loading. This method of power reading allows us to compare the power management of the UEFI and the board to supply components with power under load, and includes typical PSU losses due to efficiency. These are the real-world values that consumers may expect from a typical system (minus the monitor) using this motherboard.
While this method for power measurement may not be ideal, and you feel these numbers are not representative due to the high wattage power supply being used (we use the same PSU to remain consistent over a series of reviews, and the fact that some boards on our testbed get tested with three or four high powered GPUs), the important point to take away is the relationship between the numbers. These boards are all under the same conditions, and thus the differences between them should be easy to spot.
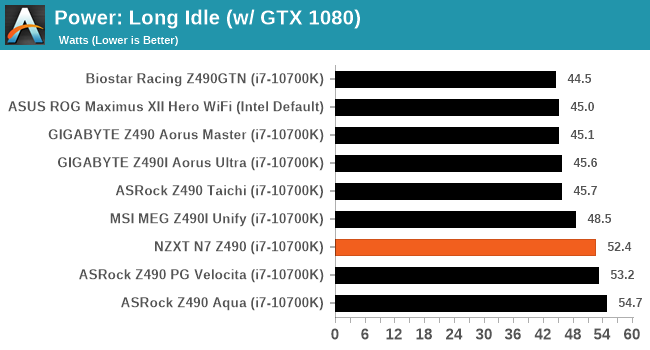
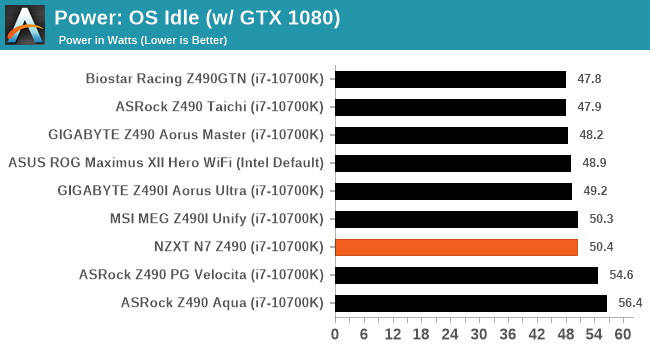
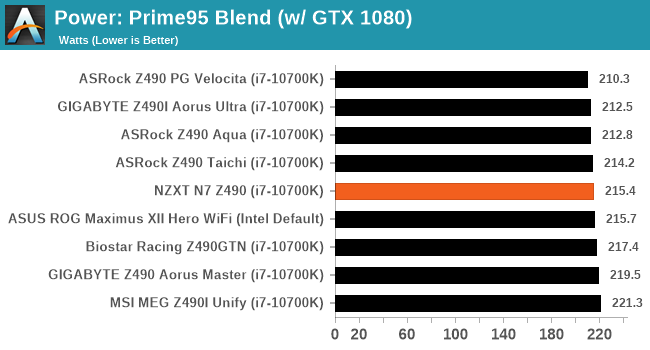
Like a few of our ASRock boards, power consumption at idle is higher than others. But at load that evens out.
Non-UEFI POST Time
Different motherboards have different POST sequences before an operating system is initialized. A lot of this is dependent on the board itself, and POST boot time is determined by the controllers on board (and the sequence of how those extras are organized). As part of our testing, we look at the POST Boot Time using a stopwatch. This is the time from pressing the ON button on the computer to when Windows starts loading. (We discount Windows loading as it is highly variable given Windows specific features.)
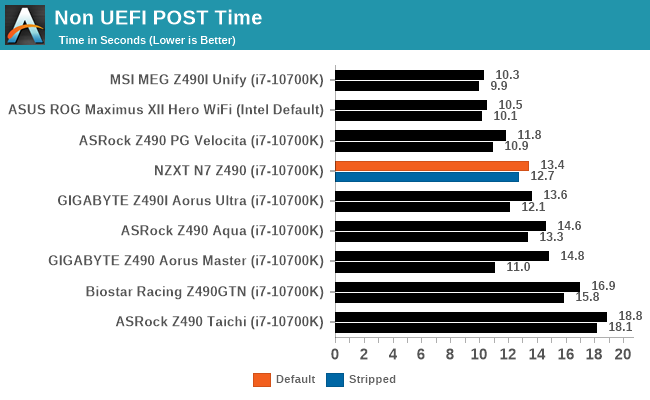
POSTing time is in the better half of the table.
DPC Latency
Deferred Procedure Call latency is a way in which Windows handles interrupt servicing. In order to wait for a processor to acknowledge the request, the system will queue all interrupt requests by priority. Critical interrupts will be handled as soon as possible, whereas lesser priority requests such as audio will be further down the line. If the audio device requires data, it will have to wait until the request is processed before the buffer is filled.
If the device drivers of higher priority components in a system are poorly implemented, this can cause delays in request scheduling and process time. This can lead to an empty audio buffer and characteristic audible pauses, pops and clicks. The DPC latency checker measures how much time is taken processing DPCs from driver invocation. The lower the value will result in better audio transfer at smaller buffer sizes. Results are measured in microseconds.
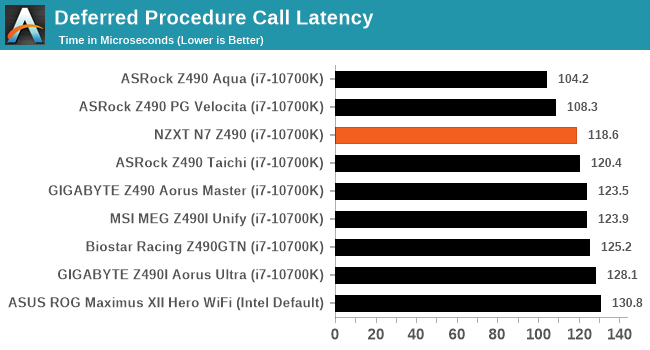
DPC Latency is also quite good, matching the other ASRock boards tested.
CPU Performance, Short Form
For our motherboard reviews, we use our short form testing method. These tests usually focus on if a motherboard is using MultiCore Turbo (the feature used to have maximum turbo on at all times, giving a frequency advantage), or if there are slight gains to be had from tweaking the firmware. We put the memory settings at the CPU manufacturers suggested frequency, making it very easy to see which motherboards have MCT enabled by default.
For Z490 we are running using Windows 10 64-bit with the 1909 update.
Update: A Note About Z490 and Turbo
Normally we test our motherboards with out of the box settings. This means that the performance will get boosted based on whatever default algorithm each motherboard vendor implements with regards turbo time and boost power. Intel actively encourages this - the numbers it puts in for turbo time and turbo power are recommendations, rather than specifications, and Intel wants motherboard vendors to engineer their products to the turbo and power that each vendor deems acceptable for their product. As a result, a lot of motherboards will implement an aggressive turbo algorithm.
For this generation, ASUS has done something different. ASUS' enthusiast motherboards offer two different options on first boot: Intel recommendations, or ASUS recommendations. This means that there is a small performance delta between the two, especially for ASUS' high-end motherboards. ASUS has put this into the product based on customer feedback and how motherboard vendors have slowly drifted over the last decade to well beyond what Intel recommends.
For our testing methodology, we try to leave as much as we can on default, because this is part of what makes a motherboard different to any other, and the motherboard vendor has to decide how aggressive it must be. Also, for non-enthusiasts who daren't enter the BIOS, or understand even what turbo or a CPU or what memory channels are, they will just end up with the non-XMP default settings. It is unclear what such a person might select when presented with the ASUS default option.
Rendering - Blender 2.7b: 3D Creation Suite
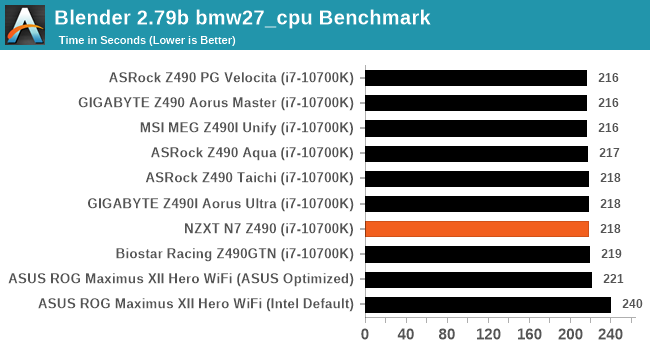
A high profile rendering tool, Blender is open-source allowing for massive amounts of configurability, and is used by a number of high-profile animation studios worldwide. The organization recently released a Blender benchmark package, a couple of weeks after we had narrowed our Blender test for our new suite, however their test can take over an hour. For our results, we run one of the sub-tests in that suite through the command line - a standard ‘bmw27’ scene in CPU only mode, and measure the time to complete the render.
Rendering – POV-Ray 3.7.1: Ray Tracing
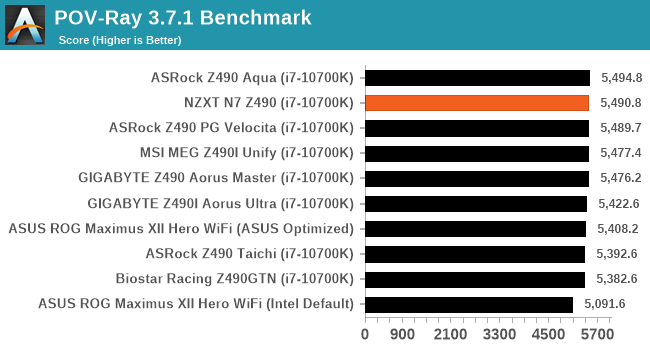
The Persistence of Vision Ray Tracer, or POV-Ray, is a freeware package for as the name suggests, ray tracing. It is a pure renderer, rather than modeling software, but the latest beta version contains a handy benchmark for stressing all processing threads on a platform. We have been using this test in motherboard reviews to test memory stability at various CPU speeds to good effect – if it passes the test, the IMC in the CPU is stable for a given CPU speed. As a CPU test, it runs for approximately 1-2 minutes on high-end platforms.
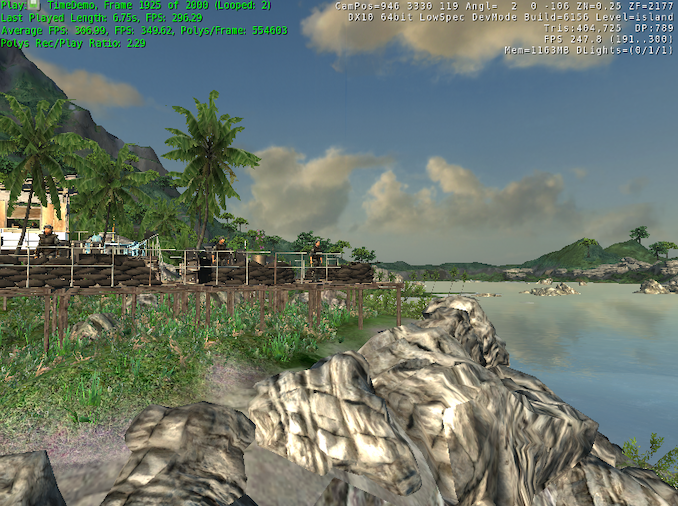
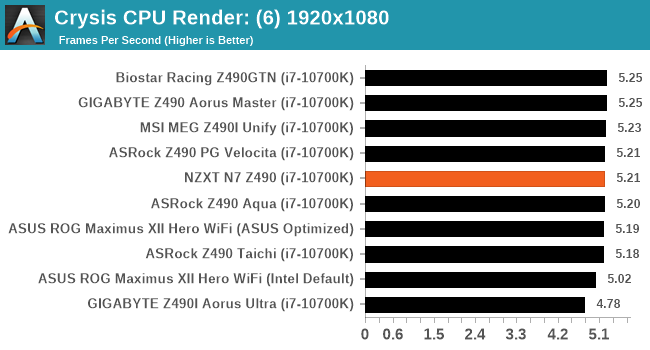
Rendering - Crysis CPU Render
One of the most oft used memes in computer gaming is ‘Can It Run Crysis?’. The original 2007 game, built in the Crytek engine by Crytek, was heralded as a computationally complex title for the hardware at the time and several years after, suggesting that a user needed graphics hardware from the future in order to run it. Fast forward over a decade, and the game runs fairly easily on modern GPUs, but we can also apply the same concept to pure CPU rendering – can the CPU render Crysis? Since 64 core processors entered the market, one can dream. We built a benchmark to see whether the hardware can.
For this test, we’re running Crysis’ own GPU benchmark, but in CPU render mode. This is a 2000 frame test, which we run over a series of resolutions from 800x600 up to 1920x1080. For simplicity, we provide the 1080p test here.
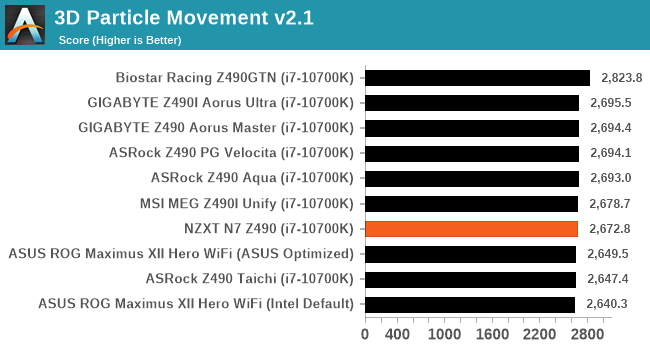
Point Calculations – 3D Movement Algorithm Test: link
3DPM is a self-penned benchmark, taking basic 3D movement algorithms used in Brownian Motion simulations and testing them for speed. High floating point performance, MHz, and IPC win in the single thread version, whereas the multithread version has to handle the threads and loves more cores. For a brief explanation of the platform agnostic coding behind this benchmark, see my forum post here.
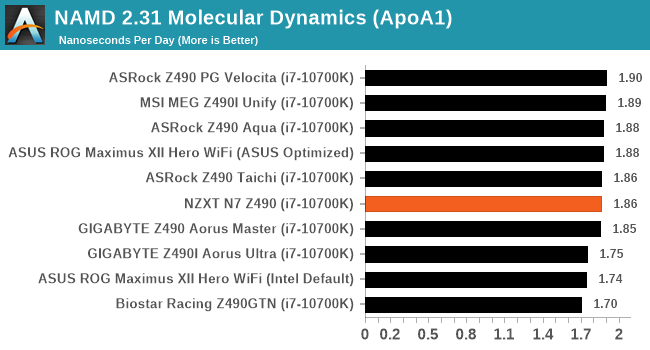
NAMD ApoA1
One frequent request over the years has been for some form of molecular dynamics simulation. Molecular dynamics forms the basis of a lot of computational biology and chemistry when modeling specific molecules, enabling researchers to find low energy configurations or potential active binding sites, especially when looking at larger proteins. We’re using the NAMD software here, or Nanoscale Molecular Dynamics, often cited for its parallel efficiency. Unfortunately the version we’re using is limited to 64 threads on Windows, but we can still use it to analyze our processors. We’re simulating the ApoA1 protein for 10 minutes, and reporting back the ‘nanoseconds per day’ that our processor can simulate. Molecular dynamics is so complex that yes, you can spend a day simply calculating a nanosecond of molecular movement.
Gaming Performance
For Z490 we are running using Windows 10 64-bit with the 1909 update.
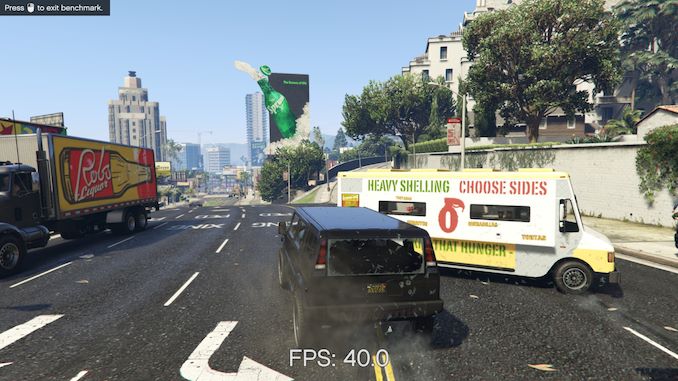
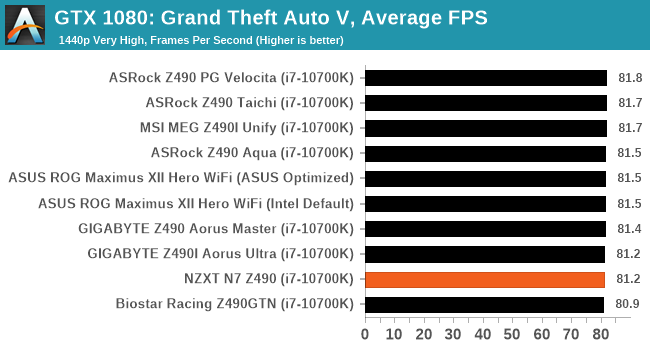
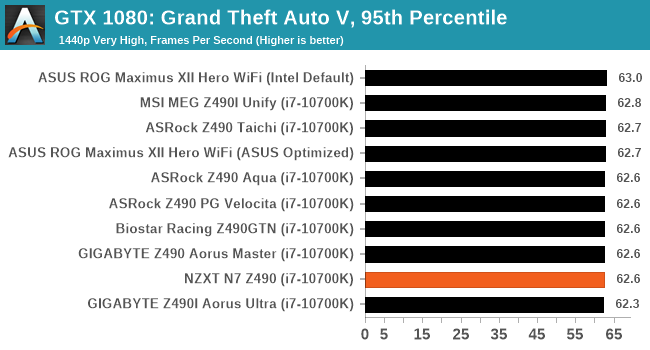
Grand Theft Auto V
The highly anticipated iteration of the Grand Theft Auto franchise hit the shelves on April 14th 2015, with both AMD and NVIDIA in tow to help optimize the title. GTA doesn’t provide graphical presets, but opens up the options to users and extends the boundaries by pushing even the hardest systems to the limit using Rockstar’s Advanced Game Engine under DirectX 11. Whether the user is flying high in the mountains with long draw distances or dealing with assorted trash in the city, when cranked up to maximum it creates stunning visuals but hard work for both the CPU and the GPU.
For our test we have scripted a version of the in-game benchmark. The in-game benchmark consists of five scenarios: four short panning shots with varying lighting and weather effects, and a fifth action sequence that lasts around 90 seconds. We use only the final part of the benchmark, which combines a flight scene in a jet followed by an inner city drive-by through several intersections followed by ramming a tanker that explodes, causing other cars to explode as well. This is a mix of distance rendering followed by a detailed near-rendering action sequence, and the title thankfully spits out frame time data.
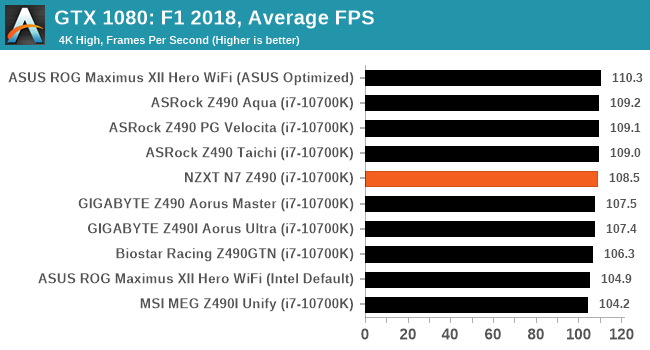
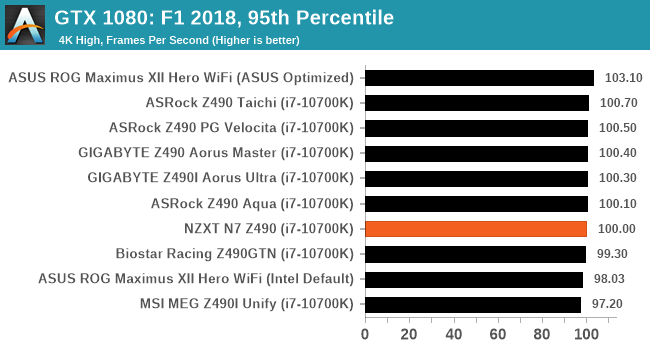
F1 2018
Aside from keeping up-to-date on the Formula One world, F1 2017 added HDR support, which F1 2018 has maintained; otherwise, we should see any newer versions of Codemasters' EGO engine find its way into F1. Graphically demanding in its own right, F1 2018 keeps a useful racing-type graphics workload in our benchmarks.
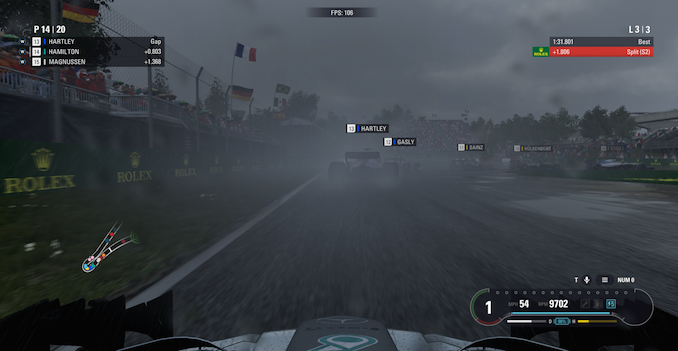
Aside from keeping up-to-date on the Formula One world, F1 2017 added HDR support, which F1 2018 has maintained. We use the in-game benchmark, set to run on the Montreal track in the wet, driving as Lewis Hamilton from last place on the grid. Data is taken over a one-lap race.
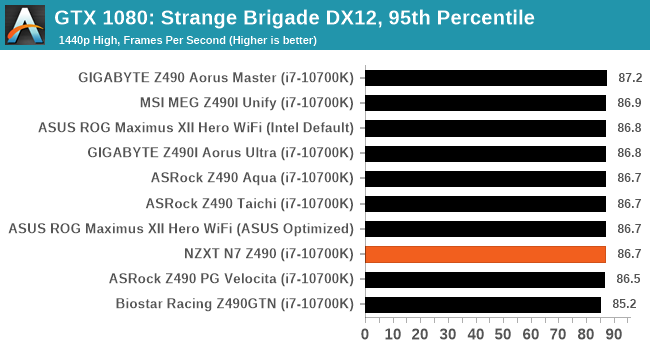
Strange Brigade (DX12)
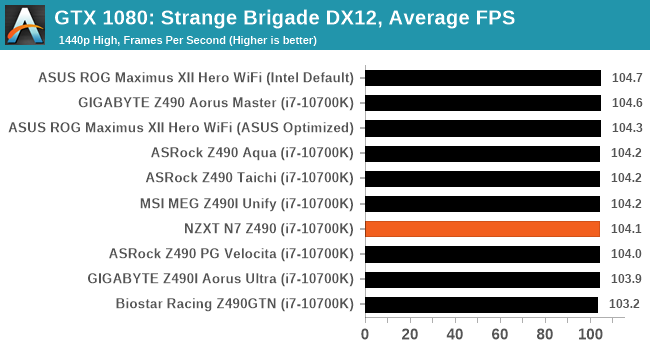
Strange Brigade is based in 1903’s Egypt and follows a story which is very similar to that of the Mummy film franchise. This particular third-person shooter is developed by Rebellion Developments which is more widely known for games such as the Sniper Elite and Alien vs Predator series. The game follows the hunt for Seteki the Witch Queen who has arose once again and the only ‘troop’ who can ultimately stop her. Gameplay is cooperative centric with a wide variety of different levels and many puzzles which need solving by the British colonial Secret Service agents sent to put an end to her reign of barbaric and brutality.
The game supports both the DirectX 12 and Vulkan APIs and houses its own built-in benchmark which offers various options up for customization including textures, anti-aliasing, reflections, draw distance and even allows users to enable or disable motion blur, ambient occlusion and tessellation among others. AMD has boasted previously that Strange Brigade is part of its Vulkan API implementation offering scalability for AMD multi-graphics card configurations.
Overclocking
Experience with the NZXT N7 Z490
One of the best ways to benefit from Intel's 10th generation Comet Lake desktop processors at stock is to keep them cooled effectively and efficiently. This is due to the inner workings of how Intel's Thermal Velocity Boost work which when kept below 70°C, allows the fastest two cores to achieve faster speeds than Turbo Boost Max 3.0 does. This can be a very nice burst of 'free' performance, with Intel recommending premium cooling for the most efficient performance; this includes at least a 240 mm AIO for the Core i7-10700K, and at least a 280 mm for the top SKU, the Core i9-10900K. By default, the Comet Lake desktop processors run warm, and many vendors are using very aggressive profiles within the firmware to give them the edge over the competition, some more aggressive than others.
Focusing on the NZXT N7 Z490, the firmware is OEM ASRock, along with the rest of the PCB. NZXT in this scenario is the vendor, which in previous iterations of the N7, has gone with ECS as its OEM of choice. Using a more favored OEM such as ASRock has a variety of benefits, but from personal experience, overclocking on an NZXT motherboard is as good as it has ever been. All of the board's overclocking settings can be found in the Overclocking menu, with each of the main sections divided into three sub-menus, CPU, DRAM, and Voltages.
The NZXT GUI is nice, but it's clear to users familiar with ASRock's UEFI firmware that they share near-identical layouts, which offers easy access to all of the board's available settings. Although this can make specific settings easier to find due to all of the relevant settings in each sub-menu, I feel for novice users, having all of them in a list can be more beneficial. Switching constantly between three different sub-menus tweaking the same two components could lead to confusion, and as a matter to make a point, users struggling with remembering settings could write variables such as CPU ratio, CPU VCore voltage, and other related power settings down on a piece of paper to use as a reference point.
Overall the NZXT firmware doesn't feel like a finished product (check our overclocking results below to see why), with some very odd behavior, which is likely due to bad settings from the factory. Outside of the overclocking fiasco that's going on with this board, the firmware is relatively stable and easy to navigate, which is reminiscent of the fact NZXT has chosen ASRock for its OEM.
Overclocking Methodology
Our standard overclocking methodology is as follows. We select the automatic overclock options and test for stability with POV-Ray and Prime95 to simulate high-end workloads. These stability tests aim to catch any immediate causes for memory or CPU errors.
For manual overclocks, based on the information gathered from the previous testing, starts off at a nominal voltage and CPU multiplier, and the multiplier is increased until the stability tests are failed. The CPU voltage is increased gradually until the stability tests are passed, and the process repeated until the motherboard reduces the multiplier automatically (due to safety protocol) or the CPU temperature reaches a stupidly high level (105ºC+). Our testbed is not in a case, which should push overclocks higher with fresher (cooler) air.
Overclocking Results
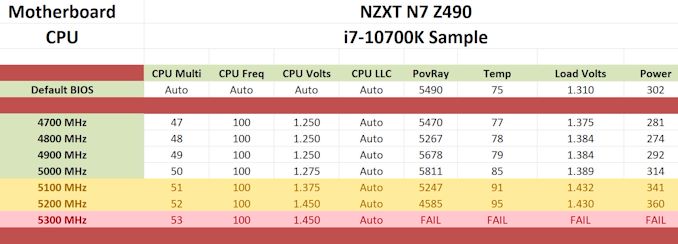
When it comes to overclocking performance on the NZXT N7 Z490, the firmware is heavily overcompensating for voltage, with very lackluster VDroop control under load. It feels as if there is an underlying problem with the firmware, especially in regards to the level of power throttling, especially at an easily achievable overclock of 5.1 GHz. Normally our board can achieve 5.2 GHz all core in all of the Z490 boards we've tested, but this system has throttling above 5.0 GHz. With our 5.1 GHz overclock at 1.375 V in the firmware translating to a whopping 1.432V CPU VCore under load; this is a serious problem for users looking to manually overclock their CPU in this motherboard.
The effect of the throttling at 5.1 GHz shows in our POV-Ray benchmark performance. This is despite the CPU temperature still well within the thermal limitations, even with this setting disabled within the firmware. One possibility is that there could be a power limitation issue on this board within the firmware itself.
It is likely that NZXT will patch the firmware with a new revision, All of our testing was done on BIOS P1.10. We have reached out to NZXT about this issue, and they are aware. Should they fix the issue, the BIOS will be available to download at their website. For a board targeted at the K processors, it has to be able to at least push them to a good all-core turbo in line with the other offerings on the market.
Power Delivery Thermal Analysis
A lot more focus has been put onto power delivery specifications and capabilities, not just by manufacturers, but as a result of users demands. In addition to the extra power benefits from things like overclocking, more efficient designs in power deliveries and cooling solutions aim to bring temperatures down. Although this isn't something most users ever need to worry about, certain enthusiasts are bringing more focus onto each board's power delivery. The more premium models tend to include bigger and higher-grade power deliveries, with bigger and more intricate heatsink designs, with some even providing water blocks.
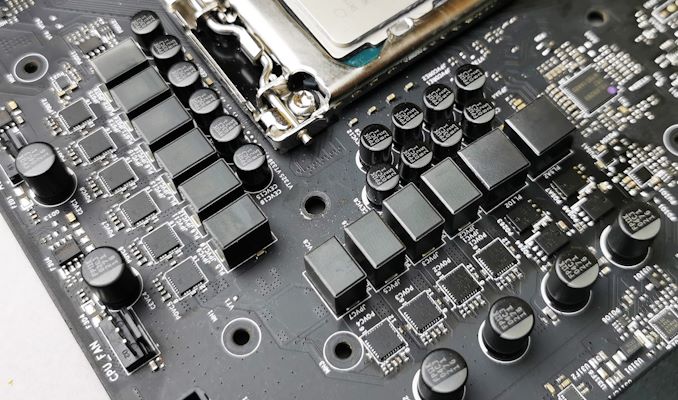
The 8+2+1 power delivery on the NZXT N7 Z490
Testing Methodology
Our method of testing out if the power delivery and its heatsink are effective at dissipating heat, is by running an intensely heavy CPU workload for a prolonged method of time. We apply an overclock which is deemed safe and at the maximum that the silicon on our testbed processor allows. We then run the Prime95 with AVX2 enabled under a torture test for an hour at the maximum stable overclock we can which puts insane pressure on the processor. We collect our data via three different methods which include the following:
- Taking a thermal image from a birds-eye view after an hour with a Flir Pro thermal imaging camera
- Securing two probes on to the rear of the PCB, right underneath CPU VCore section of the power delivery for better parity in case a probe reports a faulty reading
- Taking a reading of the VRM temperature from the sensor reading within the HWInfo monitoring application
The reason for using three different methods is that some sensors can read inaccurate temperatures, which can give very erratic results for users looking to gauge whether an overclock is too much pressure for the power delivery handle. With using a probe on the rear, it can also show the efficiency of the power stages and heatsinks as a wide margin between the probe and sensor temperature can show that the heatsink is dissipating heat and that the design is working, or that the internal sensor is massively wrong. To ensure our probe was accurate before testing, I binned 10 and selected the most accurate (within 1c of the actual temperature) for better parity in our testing.
To recreate a real-world testing scenario, the system is built into a conventional desktop chassis which is widely available. This is to show and alleviate issues when testing on open testbeds which we have done previously, which allows natural airflow to flow over the power delivery heatsinks. It provides a better comparison for the end-user and allows us to mitigate issues where heatsinks have been designed with airflow in mind, and those that have not. The idea of a heatsink is to allow effective dissipation of heat and not act as an insulator, with much more focus from consumers over the last couple of years on power delivery componentry and performance than in previous years.
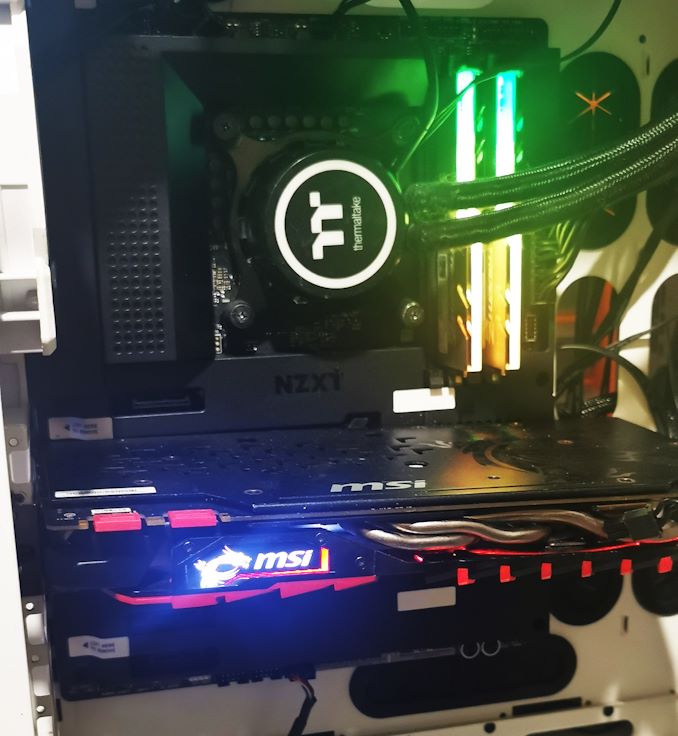
NZXT N7 Z490 undergoing our VRM thermal testing (we close the side panel when testing)
For thermal image, we use a Flir One camera as it gives a good indication of where the heat is generated around the socket area, as some designs use different configurations and an evenly spread power delivery with good components will usually generate less heat. Manufacturers who use inefficient heatsinks and cheap out on power delivery components should run hotter than those who have invested. Of course, a $700 flagship motherboard is likely to outperform a cheaper $100 model under the same testing conditions, but it is still worth testing to see which vendors are doing things correctly.
Thermal Analysis Results
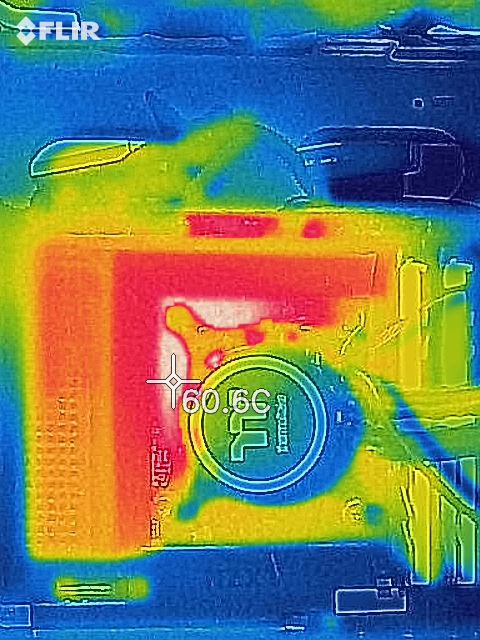
We measured 60.6°C on the hottest part of the PCB which was around the CPU socket
The NZXT N7 Z490 is using a 10-phase design for the power delivery, which is being controlled by an Intersil ISL69269 PWM controller. It is operating in an 8+2 configuration, with eight Vishay SiC632A 50 A power stages for the CPU VCore, and two Vishay SiC632A 50 A power stages for the SoC.
It is cooled by a decent-sized L-shaped heatsink, and although it doesn't use a fin array, it has a hollowed-out channel to help direct airflow through this to keep it cool.
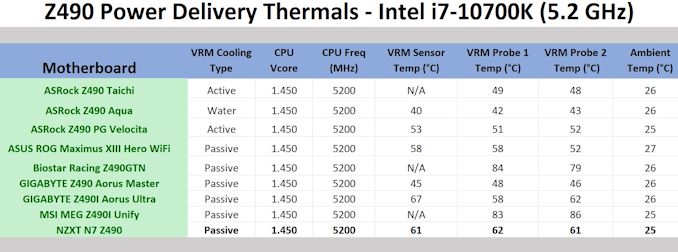
Focusing on the power delivery thermals, the NZXT N7 Z490 doesn't do a bad job, with the board's integrated sensor reporting a maximum temperature of 61°C. This was similar to the readings we got from our pair of K-type thermal probes with temperature readouts of 62 and 61°C respectively.
Compared to other boards we have tested so far, it runs quite warm for an ATX sized model, but it is still well within the rated specifications, which is clearly a plus. The design of the heatsink could be better, but NZXT appears to have focused solely on aesthetics as opposed to raw performance.
NZXT N7 Z490 Conclusion
It's quite late into the Z490 product cycle but NZXT has gone with an October launch for its latest N7 model. Whether this is just an internal cycle, or it allows more time for the development of its N7 series, only NZXT knows this. The NZXT N7 Z490 is geared towards the mid-range, and on paper, it seems quite reasonable for a sub $250 board with Wi-Fi 6, 2.5 GbE, and dual PCIe 3.0 x4 M.2 slots, but it's not the board we expected in our testing.
It seems NZXT has focused primarily on aesthetics, which is fine for a case manufacturer looking to create a solution that fits in with its current chassis range (NZXT's own H series). It still has to get things correct in regards to the componentry for end-users to make use of. Things are acceptable performance-wise at default settings, with a very aggressive profile that makes it competitive with other models we've tested. NZXT has also added a variety of RGB headers with NZXT's CAM software doing much of the lifting regarding control. An integrated fan controller has also been added, which can also be controlled by CAM, with a total of seven 4-pin headers available to use.
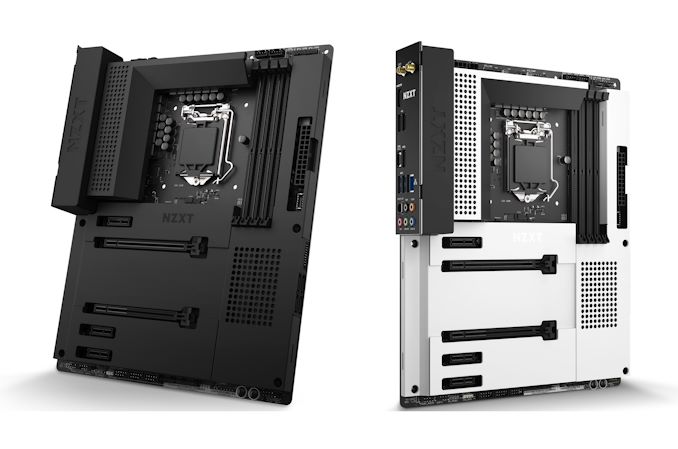
The NZXT N7 Z490 will be available in black or white.
It offers two full-length PCIe 3.0 slots that operate at x16/+x4, with three additional PCIe 3.0 x1 slots. Memory support is a tad lower than most brands on the market, with DDR4-4266. However, it does support up to 128 GB of memory, with two PCIe 3.0 x4 M.2 slots and four SATA ports. Four is somewhat low, considering this is an ATX board at a mid-range price point. The rear panel is also a little lackluster, with just two USB 3.2 G2 ports (Type-A and Type-C, with two USB 3.2 G1 Type-A and two USB 2.0 ports. NZXT does include a single USB 3.2 G1 header (two ports), and three USB 2.0 headers in which users can add another six USB 2.0 ports. Still, this is frankly unacceptable for a board in this price point.
Touching on the performance, our test suite shows that the N7 Z490 is competitive in all of our system tests, with all-around mid-level performance in our power, system POST, and DPC latency testing. We didn't highlight any anomalies in our computational and gaming tests, but overclocking was a different story...
Overclocking? Not Yet
In our overclocking tests, we hit a bit of a snag. We weren't able to locate the exact problem in time for the review, but NZXT is aware. The board works perfectly fine at stock settings, but manually overclocking on the board caused both an overzealous load voltage on the CPU, and throttling issues beyond 5.0 GHz. These weren't thermal throttling issues, as our CPU temperatures were still within reason and the VRMs seemed to be cool enough. We were told (and confirmed) that the N7 uses a 4-layer PCB, which is very low number of layers for a Z490 model; in fact, you would likely see this this number of layers used on a H-series board. As a result, it could be a fundamental issue relating to tracing crosstalk around the power delivery area. Ultimately, with the current firmware situation on the N7 Z490, we can't recommend it with an overclocked CPU until the issues are fixed.
From an aesthetics standpoint, it's a good looking board with the armor covering up much of the PCB, but adding cost to some areas and detracting from others such as rear panel connectivity and PCB quality is something that cannot be ignored. NZXT has set an MSRP of $230 for the N7 Z490, which on paper, looks a good proposition. But the competition the N7 Z490 is up against is strong. It's not too harsh to say that every other model at the $200-250 price point appears to offer something more (which NZXT has swapped for aesthetics). If NZXT want to get into this market, it might be worth having two variants, one more competitive and one more styled, in future.

