Original Link: https://www.anandtech.com/show/5052/asus-f1a75v-pro-vs-gigabyte-gaa75ud4h-llano-at-120
ASUS F1A75-V Pro vs. Gigabyte GA-A75-UD4H – Llano at ~$120
by Ian Cutress on November 7, 2011 6:00 AM EST- Posted in
- Gigabyte
- Motherboards
- Asus
- A75
With recent reports showing a profit for AMD from Llano, we can safely say that the processors, and thus the chipsets, are selling. As a result, we have taken a full size A75 board each from ASUS and Gigabyte, in the $115-$120 range, and put them through their paces to see which one we would use. Results show that these boards are quite different in terms of performance and usability!
Overview of the ASUS F1A75-V Pro
Having had a play around with the ASUS board for a while, I can tell you it feels pretty solid as a platform for A75. There are a lot of features here, and the system provides the distinct ASUS stability and usability that we expect.
A few points are of note. The second PCIe x16 is actually runs at x4, limiting any dual GPU solutions that don’t use the APU, but on the plus side the board has all six SATA 6 Gbps ports from the FCH and another from an ASMedia controller—but this seventh would be covered by any long GPU in the first x16 slot. Also of interest is that this board does not have a Firewire port or header.
Software is good with the ASUS board, with options for the fan controls still being some of the best we have ever seen. Though as with the F1A75-I Deluxe I reviewed earlier there is a DPC Latency issue when the ASUS Suite II software is run. The BIOS still covers almost all the bases we want in a BIOS.
Visual Inspection
Out of the anti-static bag, this board feels refined. The stark black PCB with ASUS blues gives it a sturdy feel. Instantly noticeable is that the VRM heatsink and the FCH heatsink are connected by a thin heatpipe. Neither is substantial in size, however spreading the heat from heavy CPU or heavy I/O usage is always a good idea.
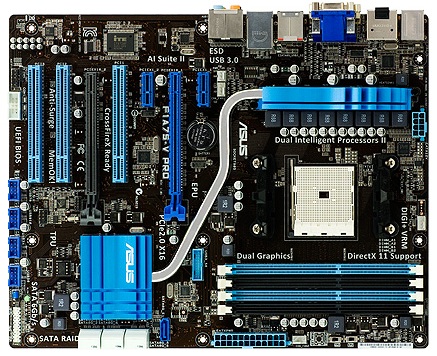
Around the socket itself are four fan headers, two above the first PCIe x1, one north of the CPU, and another tucked in beside the 24-pin ATX power connector. The four DDR3 DIMM slots have alternating latches, with the thicker ones indicating which banks to fill in first. To the right of the DIMMs we see ASUS’ dual intelligent processor switches, one controlling the EPU (energy saver) and the other being the TPU (turbo unit). These are now standard on a range of ASUS boards. Rather than a standard switch, personally I would prefer buttons with an LED to indicate if they are on or not. Next to these is a MEM OK button, which when pressed should default memory settings if they are incompatible or set too high.
Rather than split the 6 FCH SATA 6 Gbps ports between the board and eSATA as the Gigabyte board has done, ASUS have kept all 6 on board and added in an ASMedia SATA controller for a total of 7 ports on the board and one eSATA on the back. As one would expect, this extra controller does not get included in hardware RAID setups, but the six from the FCH support RAID 0, 1 and 10. However, the extra SATA port on board is blocked when a full-length GPU is used in the top PCIe x16 slot.
ASUS have stuck with ASMedia in their USB 3.0 controllers, with a header available between the DIMMs and the FCH. It seems in a slightly odd place, about an inch inside the edge of the board—usually they are placed on the bottom for a back panel connector or near the edge for a front panel connector. This is definitely in front panel territory, which is a shame that no USB 3.0 front panel device is included with the board, but given this is a ~$120 product, to ask for one would perhaps be asking too much.
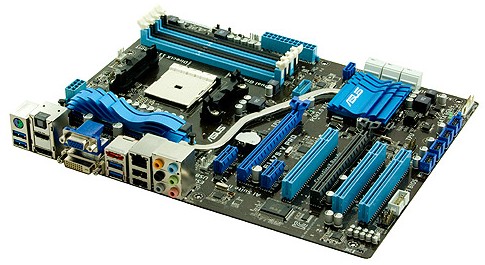
Along the bottom are four USB 2.0 headers, as well as the front panel array, a COM header, S/PDIF out and front panel audio. Above these is the PCIe layout, which differs from the Gigabyte board. Here we have a PCIe x1, a PCIe x16 (which when populated with a full length GPU would cover the onboard ASMedia SATA port), another PCIe x1, a PCI, another PCIe x16 (electrically limited to x8, hardware limited to x4), and two more PCI slots.
The second PCIe x1 actually shares data lanes with the second PCIe x16, so when using two single lane GPUs for CrossFireX, this PCIe 1x becomes unavailable. However the first PCIe x1 can still be used.

The back panel is fairly standard with no surprises—a PS/2 connector; two USB 3.0 ports; an optical S/PDIF output; HDMI, DisplayPort, DVI-D and D-Sub video outputs; two USB 3.0 ports; an eSATA 6 Gbps; Gigabit Ethernet (Realtek 8111E); another two USB 2.0 ports and standard audio headers. I would have liked to see a Clear CMOS button, but with the IO this packed, I do not think there is space for it, unless they removed some features.
BIOS
ASUS’ BIOS is pretty ingrained into the psyche of motherboard reviewers—it has not changed much since the beginning of the year and it is on every new ASUS motherboard product. I did not find any issues in the BIOS particularly—perhaps a few more features could be added, but nothing provided any issues.
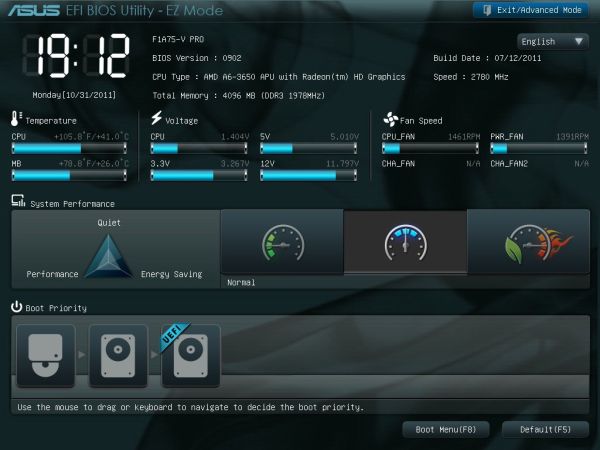
The front screen is what we want from every manufacturer—an easy to use mode which states all the information I want to see on the board. We can see the motherboard model and BIOS version, the CPU being used, memory, memory speed, fan speeds, voltages, temperatures, a quick select for power saving or performance modes, and a quick boot priority select. If I were to change anything on this, I would have a quick one-button press to the advanced mode, and I would want to double click something on the boot order to instantly boot from that device. Perhaps for future versions!
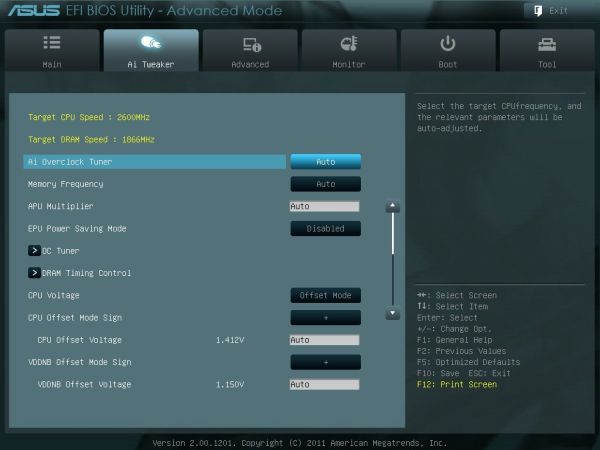
Inside the advanced mode is also the standard ASUS fare. Overclock options are available in terms of manual CPU adjustment, or DOCP—a kind of memory auto overclock feature which adjusts the CPU to meet memory conditions. DRAM timings are as we would expect, and voltage modifications can be done in terms of an offset or an absolute value. The ASUS BIOS team has heard various user requirements for adjustments and has taken them on board.
The Digi+ VRM options might confuse people who have not ever read one of ASUS’ overclocking guides. The guide usually states that to get the best overclock, these options should be put to the max potential—these are adjustable in the OS with AI Suite, which offers pictures and a better explanation of what each of the options do.
By default, the BIOS will enable IDE, so users wanting AHCI should make that change. There are slight overclock differences between the two modes, as stated below.
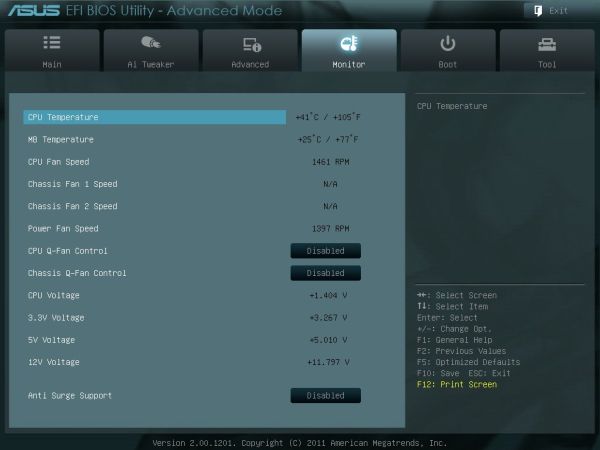
The monitor screen is also standard ASUS—here the fans can be adjusted (note, they can be adjusted in the OS as well) with low speed limits and preset profiles. A manual ramp can be applied as the user wants. ASUS states that the level of detail available of these fan options is due to the extra cents they spend on their fan controllers on board, at no extra cost to the consumer.
Overclocking
If you read my ASUS F1A75-I Deluxe review, you may remember there were a series of issues regarding how to implement an overclock more than a few MHz. Unfortunately, the same series of problems plague this board as well.
Simply put, with the SATA ports in AHCI mode, the board will not boot into Windows beyond 106 MHz. This means that using ASUS’ auto-OC on Extreme causes a reboot cycle until a user either resets the BIOS or reduces the CPU frequency manually.
However, in IDE mode, we can actually probe some limits.
CPU Overclocking
Initially, I used ASUS’ Auto-OC methods from the OS. These are available in ‘Fast’ and ‘Extreme’ flavors—the Fast setting automatically puts a 3% overclock on the CPU with no issues and no fuss. The Extreme setting is a dynamic mode which probes CPU temperatures, voltages and speeds to adjust the CPU frequency, along with some mild stability tests. Using this mode in IDE mode gave a 9% overclock, which is not too bad, but does not really probe the limits of the processor or the motherboard.
Using the BIOS, I set about adjusting the CPU frequency and settings. To be comparable to our previous Llano reviews, I applied a +0.1 V offset on the CPU voltage, and upped the frequency while keeping the memory frequency in check. The board was able to manage 130 MHz without issue, but not 135 MHz, which was disappointing. I modified the BIOS to ASUS’ recommended settings, and manually set the memory to 9-11-9 2T, and as a result I achieved a maximum of 137 MHz (3.562 GHz total), a 37% overclock.
Memory Overclocking
For memory overclocking, ASUS have a DOCP mode in the BIOS which provides the user with automated settings for certain memory speeds. The kit I was using for this test was a 2x2GB Patriot kit, rated at 2133 9-11-9 @ 1.65V.
The DOCP settings include 1866, 2133, 2200 and 2400. At the outset, only the settings up to 1866 worked. In order to achieve the others, I had to adjust the sub-timings to 9-11-9-27 2T, and then 2400 MHz memory worked flawlessly. In order to achieve this, the board puts a 29% overclock on the CPU, which is pretty near what I was able to achieve.
Overall
In my eyes, the overclock applied by the memory at 2400 MHz which sets the CPU at 129 MHz (3.354 GHz) is a very good 24/7 overclock for a Llano system, and the one I would suggest that users utilize.
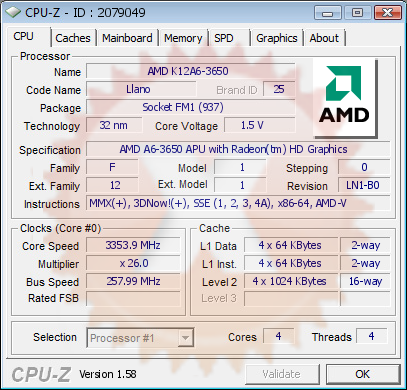
(Note, CPU-Z does not display the Llano Bus Speed accurately.)
Board Features
| ASUS F1A75-V Pro | |
| Size | ATX |
| CPU Interface | FM1 |
| CPU Support | Llano - AMD A series and E2 series |
| Chipset | AMD A75 |
| Base Clock Frequency | 100.0 MHz |
| DDR3 Memory Speed | 1866 9-9-9 |
| Core Voltage | Auto, offset and manual, 0.8 V to 1.7 V |
| CPU Clock Multiplier | Auto, 8x to CPU limit |
| DRAM Voltage | Auto, 2.30 V to 1.35 V |
| DRAM Command Rate | Auto, 1T or 2T |
| Memory Slots |
Four DDR3 DIMM slots supporting up to 64 GB Dual Channel Support for DDR3, 2400/2200/1866/1333/1066 MHz |
| Expansion Slots |
1 x PCIe x16 (runs at x16/x0 or x16/x4) 1 x PCIe x4 2 x PCIe x1 3 x PCI |
| Onboard SATA/RAID | 6 x SATA 6 Gbps, Support for RAID 0, 1, 10 |
| Onboard |
7 x SATA 6 Gbps 4 x Fan Headers 1 x Front Panel Header 1 x Front Panel Audio Header 1 x S/PDIF Out Header 4 x USB 2.0 Headers 1 x USB 3.0 Header 1 x COM header 1 x TPU Switch 1 x EPU Switch |
| Onboard LAN | Realtek RTL8111E chip (10/100/1000 Mbit) |
| Onboard Audio | Realtek® ALC892 |
| Power Connectors |
1 x 24-pin ATX connector 1 x 8-pin 12V connector |
| Fan Headers |
1 x CPU Fan Header 2 x CHA 1 x PWR |
| IO Panel |
1 x PS/2 port 1 x D-Sub 1 x DVI-D 1 x HDMI 1 x DisplayPort 1 x Optical S/PDIF Out Connector 2 x USB 2.0 4 x USB 3.0 1 x eSATA 6 Gbps 1 x Gigabit Ethernet Audio Jacks |
| BIOS Version | 0902 / 1501 |
| Warranty Period | 3 Years |
As with the Gigabyte board, we see a Realtek NIC+Audio combination, although this is the ALC892 rather than the ALC889 on the Gigabyte. Also of note is that there is no Firewire here.
One of the big things to note is that the second PCIe x16 lane actually only runs at x4. This should put severe limitations on throughput if CrossFireX is planned between to discrete GPUs - however our GPU testing later shows that for some titles, it's not that much of a bottleneck.
In The Box
Driver CD
User Guide
IO Shield
Q-Connector for Front Panel
2 x Locking SATA 6 Gbps cables, right angled.
As we are in the $120 region for motherboards, we do not expect anything spectacular in the box. It is a shame that there is nothing special in here, such as a USB 3.0 back panel connector.
Software
Driver installation is very easy from the driver CD, using an ‘Install All’ option to do everything, or drivers can be picked from a list then installed at once. The same goes for the software, though ASUS’ software has focused primarily on the AI Suite application, which we have covered on various ASUS boards before, so I will only cover it briefly here.
The AI Suite is designed to cover everything—overclocking options, energy efficiency options, fan controls, sensors for monitoring, and BIOS updates. Over the iterations it has got quicker to use and works rather well.
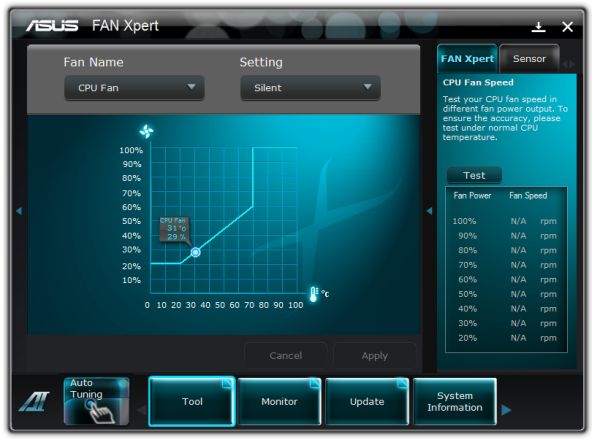
The fan controls are of importance here, allowing the user to control the CPU and Chassis fans, in terms of a double gradient speed profile.
One flaw to mention is the saving of overclock profiles. When a profile is saved, if you have changed the voltage in the software, saving the profile does not save the current voltage. It saves the voltage to which the board was booted at. Hopefully this will be corrected in future iterations.
Overview of the Gigabyte GA-A75-UD4H
After having this board on the review test bed for a few days now, nothing immediately strikes me from the Gigabyte board. The overclock capability was quite good, despite the lack of overclock options.
The PCIe layout is a good one from which some other motherboard manufacturers can learn, and the IO panel is nicely full of USB ports. The position of the SATA port sticking out of the board, and the fan header next to it, is such that a second GPU will not hinder them. This also shows that some thought has gone to this area of the board!
I am quite disappointed by the fan control, especially compared to the ASUS board, which on this GA-A75-UD4H is limited in the BIOS and not expanded thoroughly by software in the OS. The BIOS is also still the old non-graphical style, and we’ll have to wait until X79 to get our hands on what Gigabyte has done in that respect.
At $115, the GA-A75-UD4H represents a board of good design, a three year warranty, but is let down by the options offered by software.
Visual Inspection
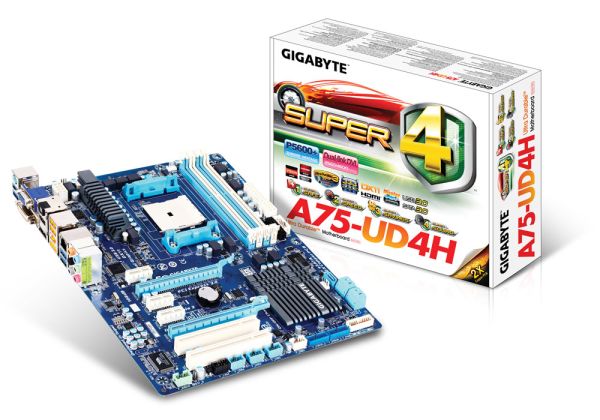
In terms of visuals, the GA-A75-UD4H sports a blue and white livery indicative of Gigabyte’s non-high end motherboards.
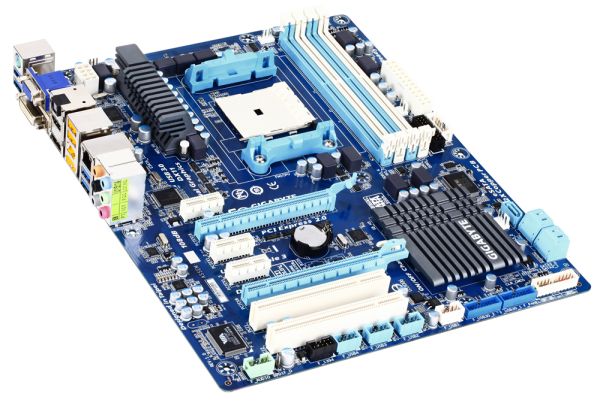
The 8+2 PWM design powers the large AMD socket, with VRM heatsinks which rock fairly easily under pressure. Around the socket are three fan headers, a SYS fan on the top left, a CPU fan in the top right and a PWR fan to the right of the DIMM slots. The socket area is fairly clear, allowing for large air coolers as required.
The GA-A75-UD4H sports a TPM header, and five SATA 6 Gbps ports. Four of these ports are at 90º to the board, and the other sticks out of it. The position of this port is such that if the user has two large PCIe cards in the board, this port is still accessible, as well as the SYS fan next to it.
The PCI/PCIe slot layout is a good choice for this board, with a PCIe x1 at the top, then a PCIe x16, two PCIe x1, another PCIe x16 (down to x8/x8 in dual GPU mode), and two PCI slots at the bottom. This allows sufficient space between dual GPU setups, as well as the top PCIe x1 for a first x1 card.
The IO panel is full of ports, namely 4 USB 3.0 (blue), two USB 2.0 (yellow), a PS/2 port, VGA, DVI-D, HDMI, DisplayPort, a S/PDIF optical output, an eSATA 6 Gbps port, FireWire, a Realtek gigabit Ethernet port, and typical audio jacks. I would have liked to see a Clear CMOS button, but with the IO this packed, I do not think there is space for it, unless they removed some features. It should be noted that, according to the Gigabyte website, the DVI-D does not support D-Sub by adaptor, and that when on integrated graphics, the connector cannot be changed while the motherboard is powered up.
BIOS
Gigabyte is still adhering to the old-fashioned BIOS look. We will not get any graphical interface until X79, as Anand showed us previously. This is positive and negative—positive in the sense that it should be very stable, easy to use and users should recognize the standard layout; however this should mean it is perfect, or users would prefer something more easily readable.
First of all, I had a love-hate relationship with the BIOS. Getting into it was tricky—normally I hold down DEL during post. When I did that with this board, the cursor would just blink at me and nothing would happen—this occurred both with the F4 and F6 BIOSes. A response from Gigabyte indicates this is known issue on some USB keyboards being mounted late in the POST sequence.
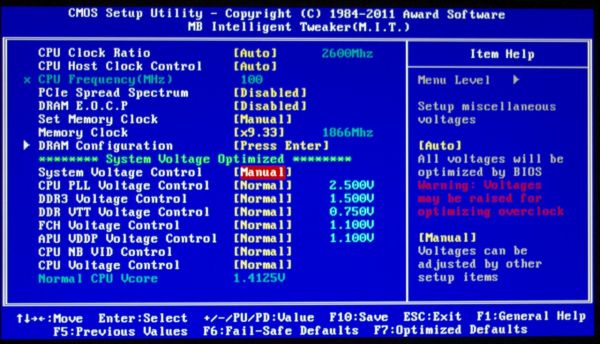
The BIOS itself is recognizable from the moment you go into it. Overclock options are at the top, followed by the others. Inside the OC options are simple to understand, but there are no auto-OC options in the BIOS for users. Though in terms of the memory, Gigabyte utilizes a system to implement XMP profiles, or preset values of memory speed. However, on selecting non-XMP high memory frequencies, the board would have serious issues.
On my Patriot kit, on selecting 1600 MHz memory, the board would auto the subtimings to 6-11-11, which are very unbalanced. 1866 MHz would not boot, unless I manually put the timings to something like 11-11-11. Using my G.Skill kit, 1333 MHz defaults to 8-8-8, 1600 MHz defaults to 9-9-9, but 1866 MHz would not boot unless I set the timings (when 9-9-9 worked). This means that perhaps the auto settings in the memory are either tight, or not properly configured for optimal compatibility. This was even with the F6 BIOS, which states to improve compatibility.
Despite all this, there is an E.O.C.P option, which applies a memory overclock while attempting to keep the CPU at a similar speed through multiplier reductions and frequency changes. These options actually work well, as noted in the OC section below.
CPU OC is straightforward—up the Frequency when you cannot play with the multiplier, and adjust the voltage. The voltage adjust is in terms of an offset rather than a value, but the expected value is also given beside your offset.
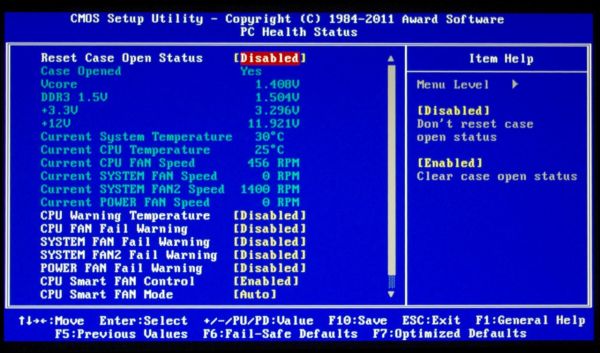
In terms of BIOS fan options, we are quite limited. The CPU fan can be adjusted to be dependant on CPU voltage, or the state of the PWMs. There is no movement for temperature here, or much control over the system fan headers—either Smart FAN Control is enabled or disabled. There are slightly more options in the OS Software, but not many.
There is no simple one-click boot override in the BIOS, and no information about the system provided on the front page. Both of these are given by ASUS and other vendors who have adopted a graphical interface.
Overclocking
Overclocking on the GA-A75-UD4H was a mixed bag. I’m a big fan of automatic OC options on boards (even on non-performance oriented products), but Gigabyte have not provided any for the CPU—all users must do this manually by adjusting the CPU Multiplier (if a Black Edition processor is being used) or the CPU frequency. There are some automatic memory overclock options, however.
CPU
Given previous successful overclocks with this processor, I jumped in straight at 26x130 MHz (+30%) overclock on automatic settings. This booted fine into Windows.
In order to get 26x140 MHz working, I had to provide a +0.1 V offset to the CPU, resulting in 1.5125V going through the power plane. At this level of voltage offset, both 143 MHz and 145 MHz gave various stability issues, leaving a 26x140 MHz = 3.64 GHz (+40%) overclock, which is perfectly respectable.
Memory
One thing I like about this board is the memory OC options. The BIOS gives two modes of memory overclock—through DRAM E.O.C.P. or Memory Clock. The Memory Clock option allows the user to select the multiplier for the memory. I found this option fairly flaky at 1866 MHz on my two sets of memory. However, DRAM EOCP works a charm.
It offers using the XMP profile on my memory, then gives options from 1866 MHz to 2400 MHz on the memory, supplying voltage and sub-timings as required. At the 2400 setting, the CPU multiplier, CPU frequency, and Memory strap were adjusted to achieve 2388 MHz, without pushing the CPU much further (2.688 GHz). On booting into windows, it applied 9-11-9 sub-timings on the memory.
I was able to push the memory further to 2500 MHz @ 9-11-9 without too much difficulty. Note the memory I was using is rated for 2133 MHz @ 9-11-9, 1.65 V, suggesting good application by the board.
Combined
In terms of a combined CPU/Memory overclock, I put the memory at the EOCP 2400 MHz setting, adjusted the CPU multiplier to 26x128 MHz (3.328 GHz) which required a +0.1 V CPU voltage offset, giving a good overall overclock on this board.
Board Features
| Gigabyte GA-A75-UD4H | |
| Size | ATX |
| CPU Interface | FM1 |
| CPU Support | Llano - AMD A series and E2 series |
| Chipset | AMD A75 |
| Base Clock Frequency | 100.4 MHz |
| DDR3 Memory Speed | 1866 9-9-9 |
| Core Voltage | Auto, +0.4 V to -0.6 V offset |
| CPU Clock Multiplier | Auto, 8x to CPU limit |
| DRAM Voltage | Auto, 2.135 V to 1.025 V |
| DRAM Command Rate | Auto, 1T or 2T |
| Memory Slots |
Four DDR3 DIMM slots supporting up to 64 GB Dual Channel Support for DDR3 2400/1866/1333/1066 MHz |
| Expansion Slots |
1 x PCIe x16 (runs at x16/x0 or x8/x8) 1 x PCIe x8 3 x PCIe x1 2 x PCI |
| Onboard SATA/RAID | 5 x SATA 6 Gbps, Support for RAID 0, 1, 10 |
| Onboard |
5 x SATA 6 Gbps 4 x Fan Headers 1 x Front Panel Header 1 x Front Panel Audio Header 1 x S/PDIF Out Header 4 x USB 2.0 Headers 1 x USB 3.0 Header 1 x Firewire/IEEE 1394a header 1 x Serial Port Header 1 x Trusted Platform Module (TPM) Header |
| Onboard LAN | Realtek RTL8111E chip (10/100/1000 Mbit) |
| Onboard Audio |
Realtek ALC889 codec Support for Dolby Home Theater, up to 7.1 channel |
| Power Connectors |
1 x 24-pin ATX connector 1 x 8-pin 12V connector |
| Fan Headers |
1 x CPU Fan Header 2 x SYS 1 x PWR |
| IO Panel |
1 x PS/2 port 1 x D-Sub 1 x DVI-D 1 x HDMI 1 x DisplayPort 1 x Optical S/PDIF Out Connector 2 x USB 2.0 4 x USB 3.0 1 x Firewire/IEEE 1394a 1 x eSATA 6 Gbps 1 x Gigabit Ethernet Audio Jacks |
| BIOS Version | F6 |
| Warranty Period | 3 Years (from date of manufacture) |
As expected on a board of this price, the Realtek combo of NIC/Audio is used. I am still amazed that GB put a TPM on their boards whereas no-one else does. I am unsure if demand for such a feature is required on a board like this—I will get in contact with GB and see if there is an official response.
Edit—Apparently GB see a lot of demand for a TPM from those who use it, and they say it is fairly cheap to implement to cover those users.
In The Box
4 x Locking SATA cables (2 right angled)
IO Shield
User Manual
Driver CD
As with most Gigabyte products in this range, we do not see a lot in the box. Focus is more on what is on the board and the warranty it seems.
Software
The driver CD is standard Gigabyte fare, with drivers and programs easily installable with a click each. On the CD, both Norton Internet Security and Firefox 3.5.4 are available for install as well (note, previous ASUS CDs offer Norton and Chrome). The main focus of the software is on @BIOS, a way in the OS to update the BIOS, and EasyTune6, where fan options can be adjusted and the board can be overclocked.
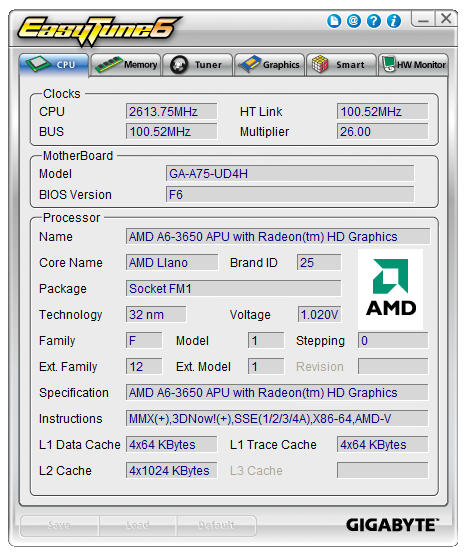
Normally, we would see an array of auto OC options on the main screen of ET6; however on this Llano system these are not available. The tabs in the software are pretty self explanatory, showing CPU, memory and overclock options.
The fan controls are very basic, as they are in the BIOS. Under user mode, the ramp can be adjusted, though there is no applicability for hysteresis or multi-gradient ramping.
Similar to the ASUS board, when using the EasyTune6 software with its sensor capabilities, we see a spike in DPC Latency, around 380 microseconds. With the software turned off, this reduced down to 170 microseconds.
Test Setup
| Processor |
AMD Llano A6-3650 4 Cores, 4 Threads, 2.6 GHz |
| Motherboards |
ASUS F1A75-V Pro Gigabyte GA-A75-UD4H |
| Cooling | Corsair H50-1 |
| Power Supply | Silverstone 1000W 80 PLUS Silver |
| Memory |
G.Skill RipjawsX DDR3-1866 9-10-9 28 2x4GB Kit 1.5V Patriot Viper Xtreme DDR3-2133 9-11-9 27 2x4 GB Kit 1.65V |
| Memory Settings | DDR3-1866 |
| Video Cards |
XFX HD 5850 1GB ECS GTX 580 1536MB |
| Video Drivers |
Catalyst 11.8 NVIDIA Drivers 280.26 |
| Hard Drive | Micron RealSSD C300 256GB |
| Optical Drive | LG GH22NS50 |
| Case | Open Test Bed - CoolerMaster Lab V1.0 |
| Operating System | Windows 7 64-bit |
| SATA Testing | Micron RealSSD C300 256GB |
| USB 2/3 Testing | Patriot 64GB SuperSonic USB 3.0 |
Comparison to Other Reviews
Where applicable, the results in this review are directly compared to the following chipsets and boards which we have reviewed previously.
Power Consumption
Power consumption was tested on the system as a whole with a wall meter connected to the power supply, while in various configurations. This method allows us to compare the power management of the UEFI and the board to supply components with power under load, and includes typical PSU losses due to efficiency. These are the real world values that consumers may expect from a typical system (minus the monitor) using this motherboard.
IGP:


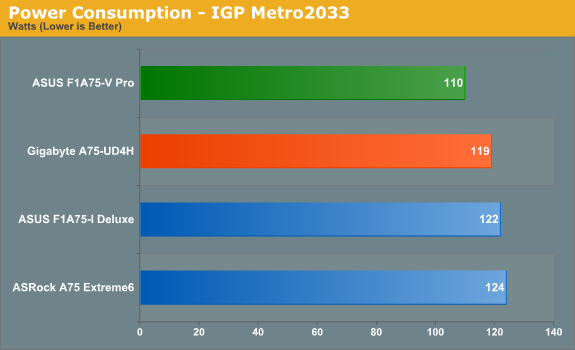
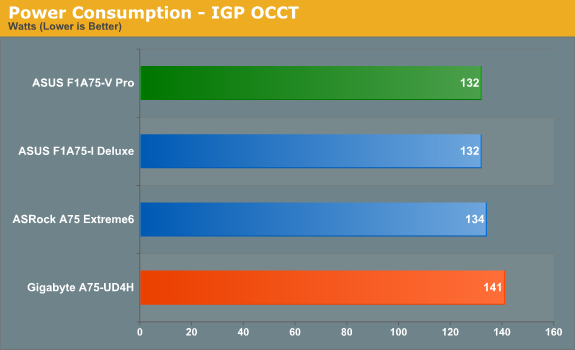
In terms of power usage while in IGP mode (power supply efficiency aside), we see that the ASUS commonly draws less power than the Gigabyte board in all scenarios..
Two 5850s:


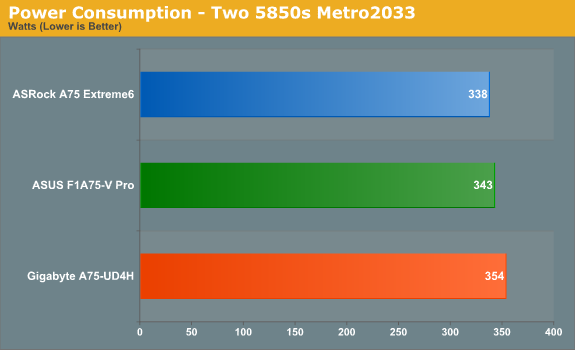
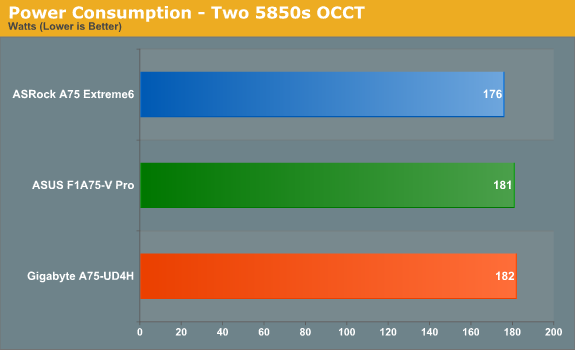
When two 5850s are used in the system, we see peak power numbers around 350W when gaming. Neither board stands out here against the other.
CPU Temperatures
With most users’ running boards on purely default BIOS settings, we are running at default settings for the CPU temperature tests. This is, in our outward view, an indication of how well (or how adventurous) the vendor has their BIOS configured on automatic settings. With a certain number of vendors not making CPU voltage, turbo voltage or LLC options configurable to the end user, which would directly affect power consumption and CPU temperatures at various usage levels, we find the test appropriate for the majority of cases. This does conflict somewhat with some vendors' methodology of providing a list of 'suggested' settings for reviewers to use. But unless those settings are being implemented automatically for the end user, all these settings do for us it attempt to skew the results, and thus provide an unbalanced 'out of the box' result list to the readers who will rely on those default settings to make a judgment.
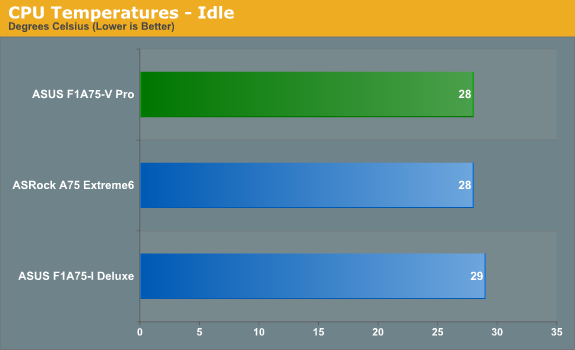
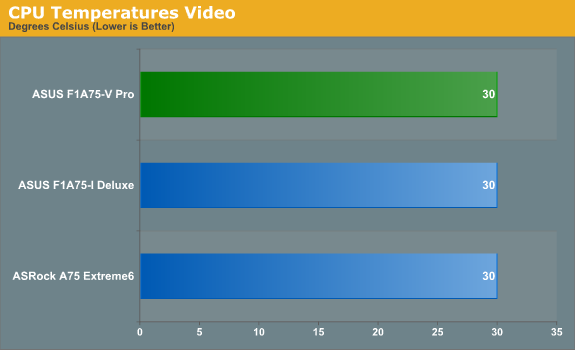
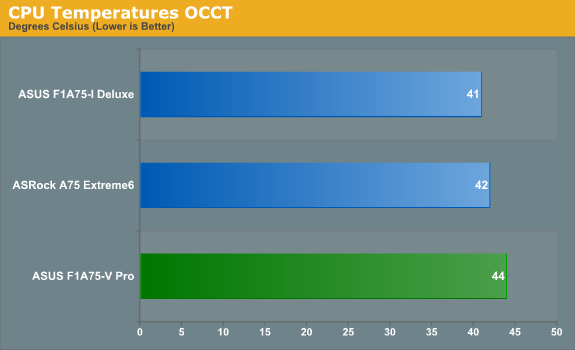
Unfortunately, the Gigabyte board did not provide proper numbers for us to work with. The system stated the CPU was idling at 14 C, while the room was ambient at around 19 C. I am awaiting a response from Gigabyte on the issue.
USB Speed
For this benchmark, we run CrystalDiskMark to determine the ideal sequential read and write speeds for the USB port using our 64GB Patriot SuperSpeed USB 3.0 drive. Then we transfer a set size of files from the SSD to the USB drive, and monitor the time taken to transfer. The files transferred are a 1.52 GB set of 2867 files across 320 folders—95% of these files are small typical website files, and the rest (90% of the size) are the videos used in the Sorenson Squeeze test.
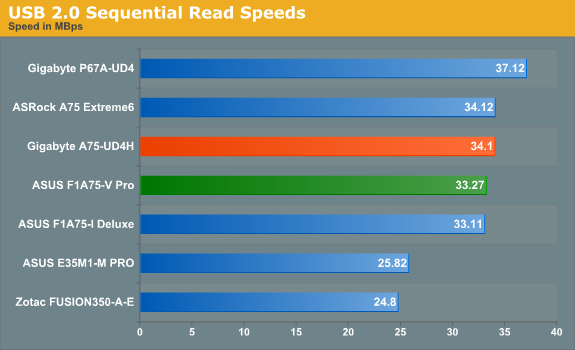
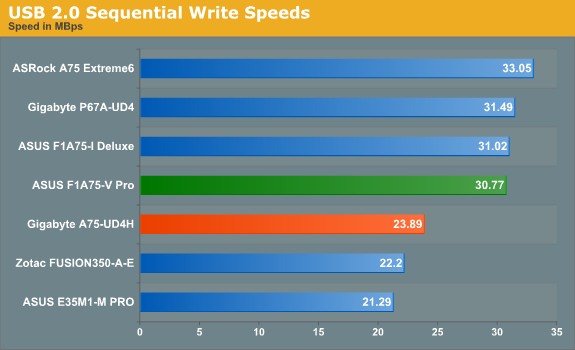
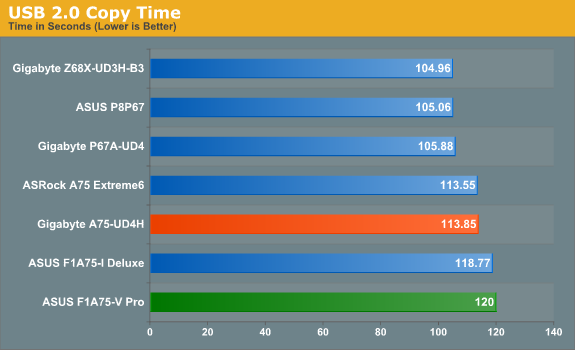
In the USB 2.0 world, while the Gigabyte board gives a lower sequential value (after repeated tests), it performs better in our copy test.
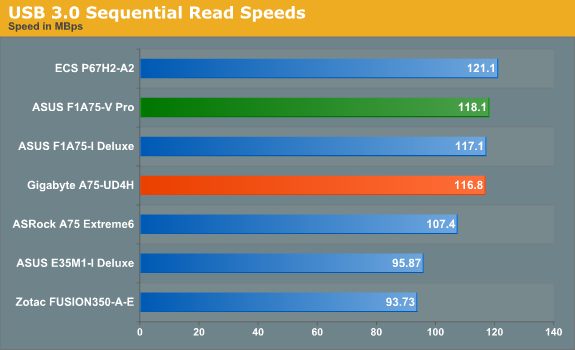
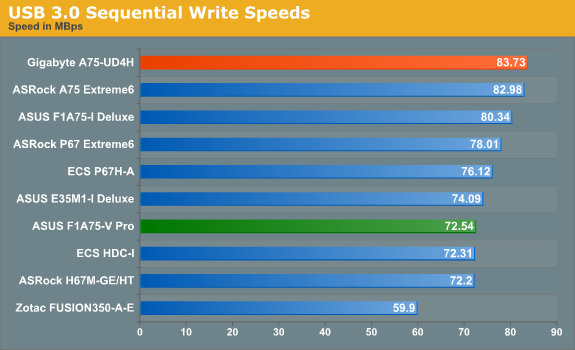
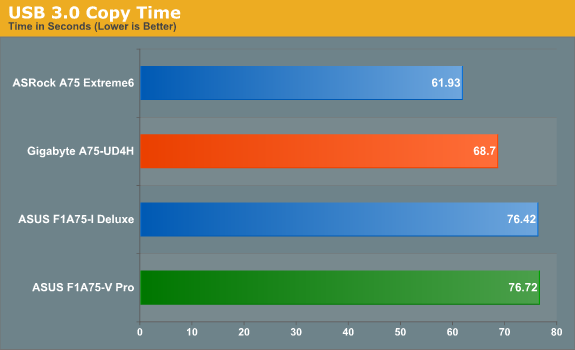
The Gigabyte board wins again in our USB 3.0 testing.
SATA Testing
We also use CrystalDiskMark for SATA port testing. This test probes the efficiency of the data delivery system between the chipset and the drive, or in the case of additional SATA ports provided by a third party controller, the efficiency between the controller, the chipset and the drive.


We see the Gigabyte board also excel in pure SATA testing.
DPC Latency
Deferred Procedure Call latency is a way in which Windows handles interrupt servicing. In order to wait for a processor to acknowledge the request, the system will queue all interrupt requests by priority. Critical interrupts will be handled as soon as possible, whereas lesser priority requests, such as audio, will be further down the line. So if the audio device requires data, it will have to wait until the request is processed before the buffer is filled. If the device drivers of higher priority components in a system are poorly implemented, this can cause delays in request scheduling and process time, resulting in an empty audio buffer—this leads to characteristic audible pauses, pops and clicks. Having a bigger buffer and correctly implemented system drivers obviously helps in this regard. The DPC latency checker measures how much time is processing DPCs from driver invocation—the lower the value will result in better audio transfer at smaller buffer sizes. Results are measured in microseconds and taken as the peak latency while cycling through a series of short HD videos - less than 500 microseconds usually gets the green light, but the lower the better.
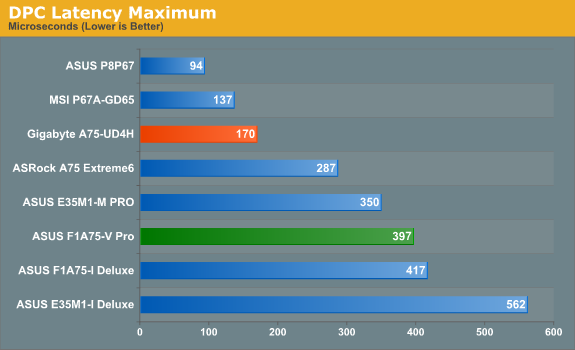
Initially, I had trouble with both boards here. It turns out that when monitoring software is available (EasyTune6, AI Suite), this causes spikes to occur in the DPC Latency. The spikes were considerably worse on the ASUS board (3000+) compared to the Gigabyte board (~400), but the values we're looking at are with these softwares switched off. In this case, both boards fall within acceptable levels, but the Gigabyte board has less than half the latency.
3D Movement Algorithm Test - link
The algorithms in 3DPM employ both uniform random number generation or normal distribution random number generation, and vary in various amounts of trigonometric operations, conditional statements, generation and rejection, fused operations, etc. The benchmark runs through six algorithms for a specified number of particles and steps, and calculates the speed of each algorithm, then sums them all for a final score. This is an example of a real world situation that a computational scientist may find themselves in, rather than a pure synthetic benchmark. The benchmark is also parallel between particles simulated, and we test the single thread performance as well as the multi-threaded performance.
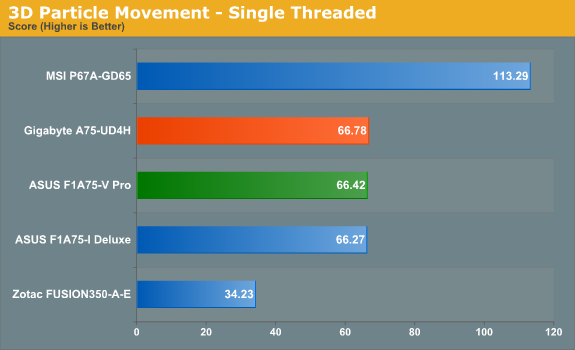
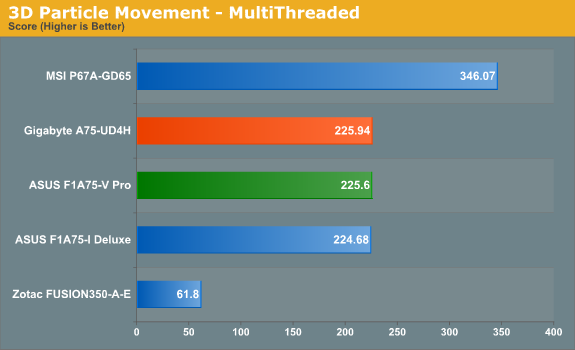
As expected with a pure CPU test, we see almost no difference between the boards, both within statistical limits. For comparison is an i5-2500K on the MSI board and an E-350 Fusion on a Zotac board.
WinRAR x64 3.93 - link
With 64-bit WinRAR, we compress the set of files used in the USB speed tests. WinRAR x64 3.93 attempts to use multithreading when possible.
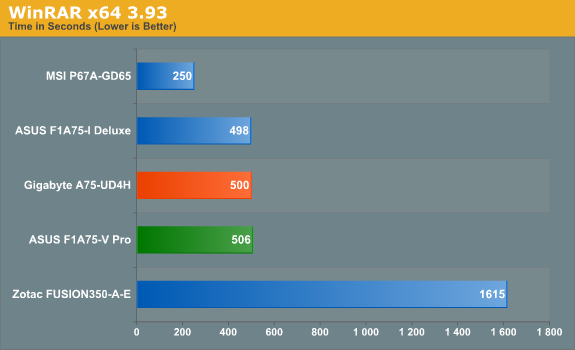
The Gigabyte outperforms the ASUS board here, by 6 seconds (~1%). This isn't much difference in the scheme of things, but worth noting.
FastStone Image Viewer 4.2 - link
FastStone Image Viewer is a free piece of software I have been using for quite a few years now. It allows quick viewing of flat images, as well as resizing, changing color depth, adding simple text or simple filters. It also has a bulk image conversion tool, which we use here. The software currently operates only in single-thread mode, which should change in later versions of the software. For this test, we convert a series of 170 files, of various resolutions, dimensions and types (of a total size of 163MB), all to the .gif format of 640x480 dimensions.
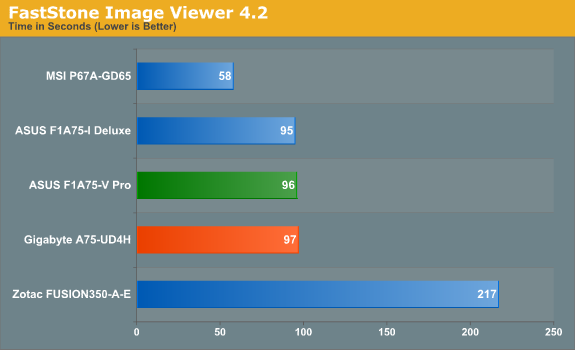
Again, no real difference in terms of the FastStone image processing test between the boards.
Sorenson Squeeze 6.0 - link
Sorenson Squeeze is a professional video encoder, complete with a vast array of options. For this test, we convert 32 HD videos, each a minute long and approximately 42 MB in size, to WMV 512KBps format. Squeeze can encode multiple videos at once, one for each thread.
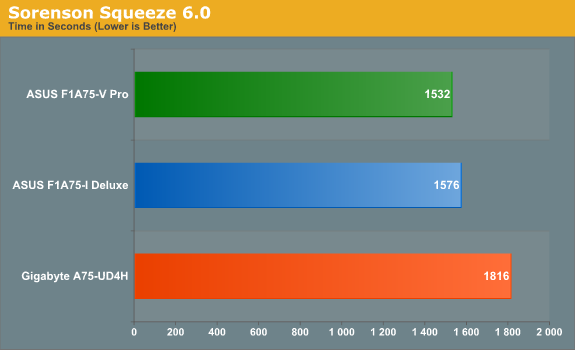
Despite the fact that the boards have been the same through the CPU tests, the Gigabyte loses out on our video transcoding test by 284 seconds (~ 18%). This test was checked twice more due to this difference, but the result was consistent.
Aliens vs. Predator Benchmark
Aliens vs. Predator is a DirectX 11 science fiction first-person shooter video game, developed by Rebellion Developments. Available as a standalone benchmark, on default settings the benchmark uses 1920x1080 with high AF settings. Results are reported as the average frame rate across 4 runs.
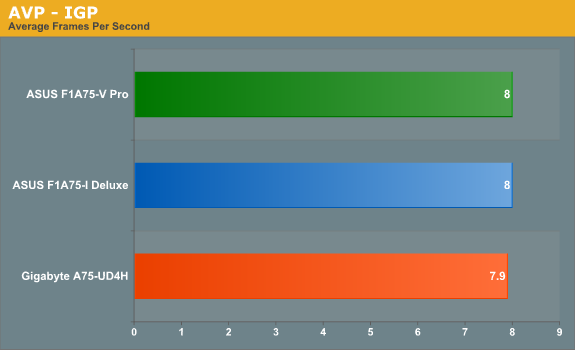
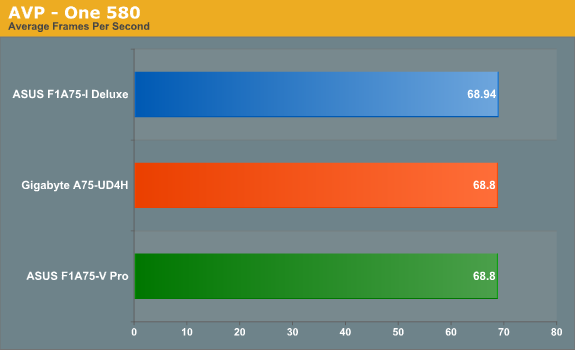
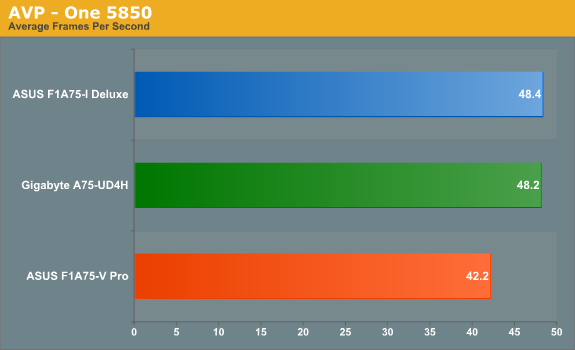
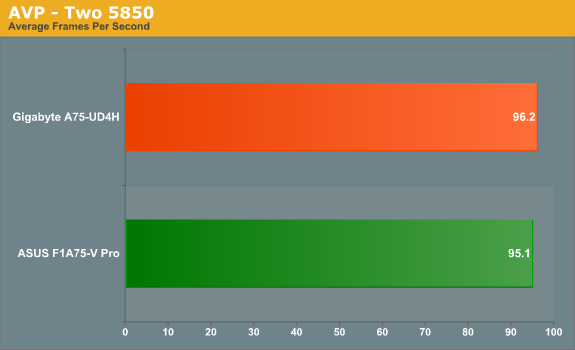
Both boards perform similarly for AVP in all the formats, except with a single 5850 in the Gigabyte board. The reasons are unknown for this. Also of note is that the ASUS board, despite the x4 PCIe slot, does not suffer a significant frame drop in dual dGPU mode.
HAWX 2
Tom Clancy's H.A.W.X. 2 is an arcade-style flight action game developed by Ubisoft Romania and published by Ubisoft. Using the standalone benchmark, HAWX 2 is run at 1920x1080 with full graphical settings. Results are reported as the average frame rate across 4 runs.
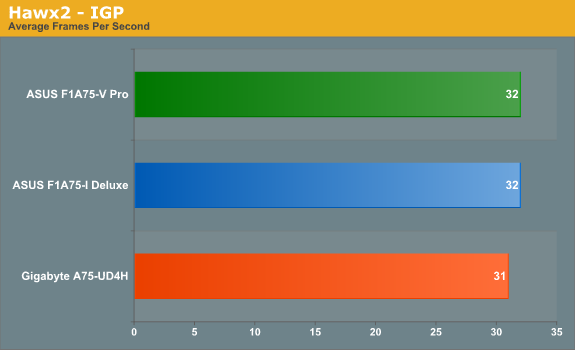
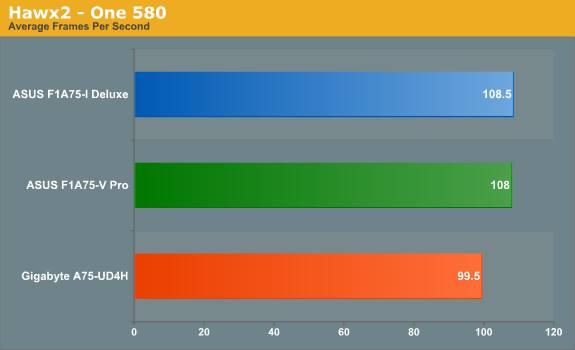
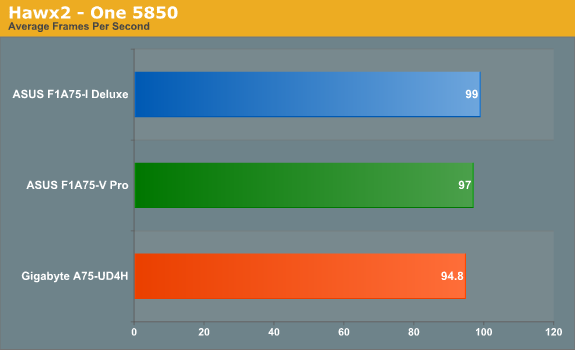
All the Hawx tests put the Gigabyte board below in performance to the ASUS board, by up to 8 FPS when using a single 580.
Company of Heroes
Company of Heroes is a real-time strategy computer game developed by Relic Entertainment. Using the in game benchmark, CoH is run at 1920x1080 with full graphical settings. Results are reported as the average frame rate across 4 runs.
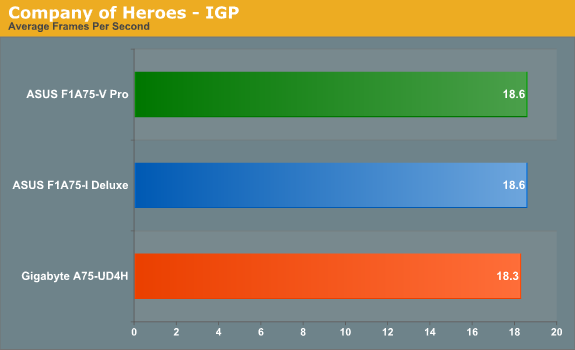
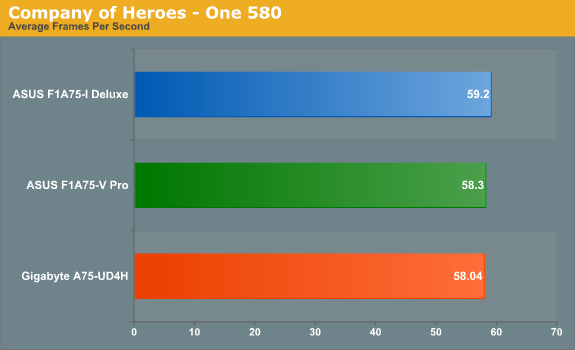
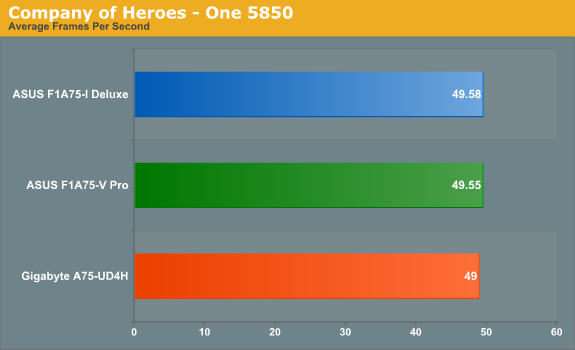
Not much splits the boards in Company of Heroes either, suggesting this is more a CPU limitation than a GPU one. However, the ASUS board does come on top again.
Dirt 3
Dirt 3 is a rallying video game and the third in the Dirt series of the Colin McRae Rally series, developed and published by Codemasters. Using the in game benchmark, Dirt 3 is run at 1920x1080 with full graphical settings. Results are reported as the average frame rate across 4 runs.
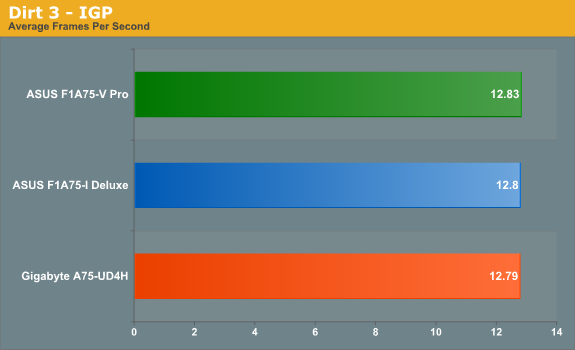
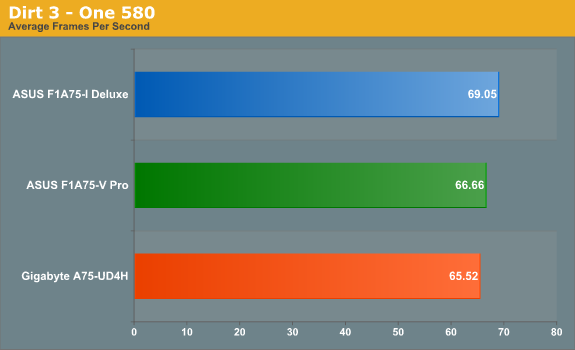
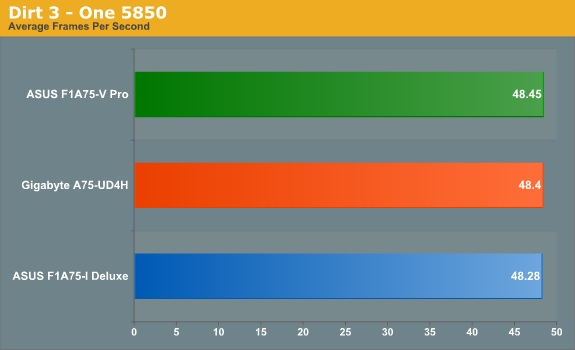
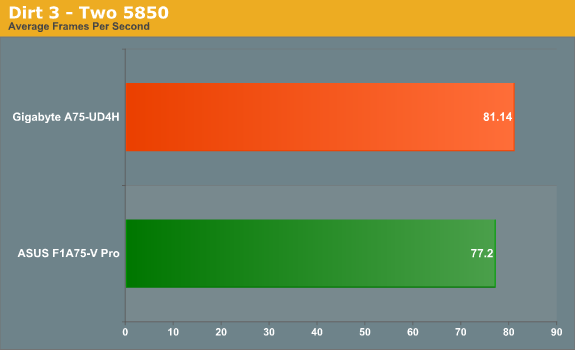
Again, not much to separate them here either - the ASUS board still takes top spot, except in a dual GPU configuration where the x4 port seems to provide a small bottleneck.
Metro2033
Metro 2033 is a challenging DX11 benchmark that challenges every system that tries to run it at any high-end settings. Developed by 4A Games and released in March 2010, we use the inbuilt DirectX 11 Frontline benchmark to test the hardware at 1920x1080 with full graphical settings. Results are given as the average frame rate from 10 runs.
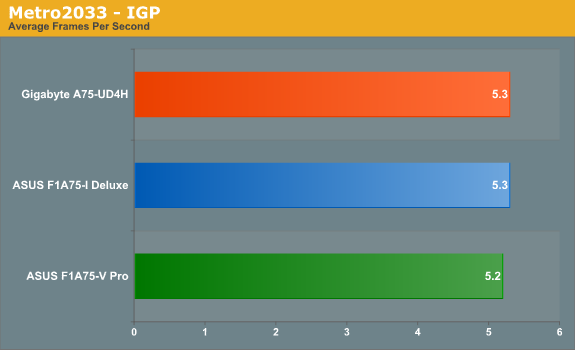
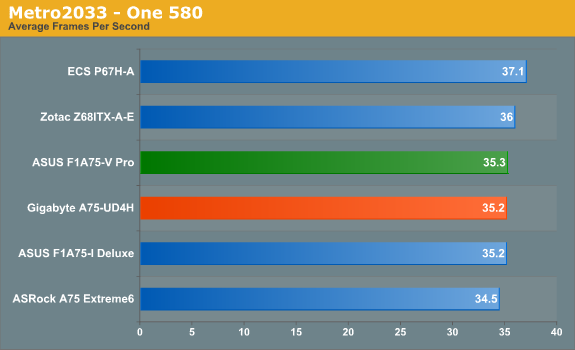
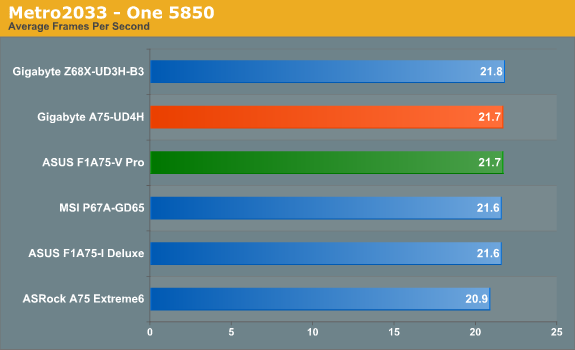
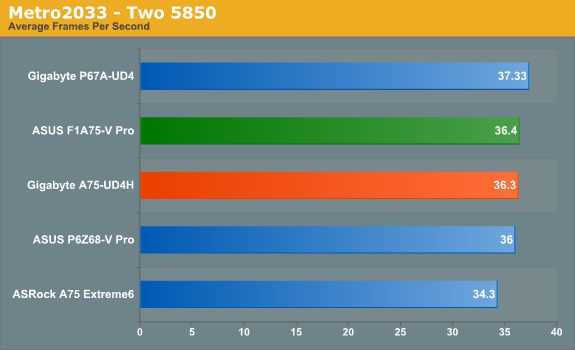
Again, not much difference between the boards for Metro2033.
Both ASUS and Gigabyte are well known for their large ranges of motherboards in all chipsets—ASUS tends to go from the standard to Pro, Evo, Deluxe, TUF and ROG, whereas Gigabyte usually from the UD2 to the UD5/7/9, both depending on the enthusiast level of the chipset. Both the A75-UD4H and F1A75-V Pro here are near the top end for A75 and Llano, being fully featured ATX boards, and only the mini-ITX A75 boards cost substantially more.
ASUS F1A75-V Pro
Overall, there is not a lot wrong with this ASUS board. The benchmarks on a whole perform relatively well with one exception, DPC Latency, but it falls within recommended levels as long as the AI Suite software is not running.
The ASUS uses all six SATA 6 Gbps from the FCH internally, as well as another from an ASMedia controller. Unfortunately, this other SATA 6 from the controller gets blocked by a full length GPU. In terms of layout, the second PCIe x16 is actually limited to x4, giving any dual-GPU CrossFireX users a bottleneck in certain scenarios.
The fan control software is some of the best we have seen, and the BIOS is top notch in terms of usability and features. This is all wrapped in a three year warranty, and the board is available for under $120.
Gigabyte GA-A75-UD4H
There are arguably more concerns with the Gigabyte board in our tests, initially resulting in memory issues with our kits of memory. With the Gigabyte board you do not get a graphical BIOS implementation, any serious fan control, or auto overclock options; it also has fewer SATA ports, but there is a Firewire port, a TPM header, and x8/x8 support for dual discrete GPU systems (despite this being an APU platform).
Over our whole range of graphics tests, the Gigabyte, on average, does not perform as well as the ASUS board, but on our CPU tests it does edge ahead in almost all areas, except the video transcoding test.
The Gigabyte board does sport their DualBIOS technology in case of BIOS corruption, and they had more SATA cables included in the media sample I was sent. As with the ASUS board, Gigabyte gives their product a three year warranty.
Conclusion
When talking about motherboards in this price range, there is usually very little to separate them in terms of hardware. One or the other may sport a single different controller, or use different implementations to get better results. Ultimately, each of the ASUS and Gigabyte boards, inter alia, has their pros and cons:
| ASUS F1A75-V Pro | Gigabyte GA-A75-UD4H | |
| PCIe Lanes | x16/x4 | x8/x8 |
| Dual BIOS | No | Yes |
| Firewire Header | No | Yes |
| Better DPC Latency | 397 | 170 |
| Better OC Results | No | Yes |
| Auto CPU OC Options | Yes | No |
| Better Fan Controls | Yes | No |
| Graphical BIOS | Yes | No |
| SATA 6 Gbps | 6 + 1 (ASMedia) | 5 |
With a lot of users wanting a lot of options, for $120 it seems you are not going to cover everything in the A75 market from the two largest motherboard manufacturers, so it is hard to give a nod either way. Personally, if it were between these two boards (users should note that A75 ATX boards from other manufacturers are available), if I were a single GPU gamer (or looking to CFX with the APU), or looking for a quiet system with enough HDDs, I would go for the ASUS board for its functionality. If I were a dual AMD discrete GPU gamer, an overclocker, or wanting to work with onboard audio, I would splash for the Gigabyte board.

