Original Link: https://www.anandtech.com/show/5224/bitfenix-outlaw-when-inexpensive-doesnt-mean-cheap
BitFenix Outlaw: When Inexpensive Doesn't Mean Cheap
by Dustin Sklavos on December 23, 2011 5:00 PM EST- Posted in
- Cases/Cooling/PSUs
- mid-tower
- bitfenix
Introducing the BitFenix Outlaw
A lot of our case reviews lately have been for enclosures that hover around the $99 price point and then range below. The big, expensive ones are exciting and ultimately many of them are definitely worth your hard earned money, but what about the friend who's on an extreme budget? What if you're on an extreme budget? The case is often one of the easiest and safest places to cut money out of the cost of a custom build, and BitFenix has been diligently serving the cash-strapped for a while now. Today we have on hand the new Outlaw, and we'll show you just how much case you can get for fifty bucks.
From the moment the BitFenix rep showed me the Outlaw right up until I finished assembling it, all I could think was "I can't believe this thing is so cheap." Of course, when I say "cheap" I do mean "inexpensive," a distinction I made a few times during my recent review of the Rosewill Ranger. The Outlaw has a lot in common with my favorite Micro-ATX case, SilverStone's Temjin TJ08-E. The Temjin is a royal hassle to put together, but it does pay dividends: it runs cool and it runs quiet. BitFenix had to be a little more flexible in designing the Outlaw (and hitting a price point that's half the Temjin), but there's a lot to like here.
| BitFenix Outlaw Specifications | ||
| Motherboard Form Factor | ATX, Micro-ATX, Mini-ITX | |
| Drive Bays | External | 3x 5.25" |
| Internal | 4x 3.5", 1x 2.5" | |
| Cooling | Front | 2x 120mm fan mount |
| Rear | 1x 120mm exhaust fan | |
| Top | 2x 120mm fan mount | |
| Side | 2x 120mm/140mm fan mount | |
| Bottom | 1x 120mm fan mount | |
| Expansion Slots | 7 | |
| Front I/O Port | - | |
| Top I/O Port | 4x USB 2.0, mic and headphone jacks, power and reset buttons | |
| Power Supply Size | ATX | |
| Clearance | 10.5" (Expansion Cards), 170mm (CPU HSF), 180mm (PSU) | |
| Weight | 14.33 lbs. | |
| Dimensions | 7.09" x 18.82" x 17.24" (180mm x 478mm x 438mm) | |
| Price | MSRP $49 | |
As a $49 case you're stuck largely with the basics when it comes to the Outlaw; about enough room for garden variety configurations, a bunch of fan mounts with no fans installed, and strictly USB 2.0 connectivity in the enclosure itself. But there's a lot more going on with BitFenix's design than appears at first glance.
In and Around the BitFenix Outlaw
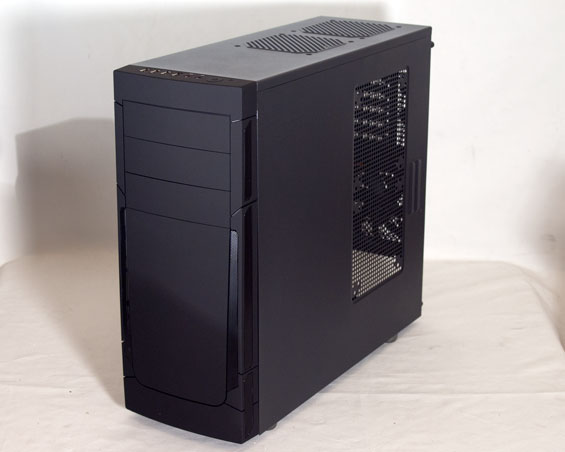
When you first look at photos of the BitFenix Outlaw, you could be forgiven for thinking the pictures are mirrored. That's not the case, though: the Outlaw uses an inverted design that orients the processor with the bottom of the enclosure and the expansion cards near the top while keeping the power supply mounted below the motherboard. It's an interesting gamble (similar in some ways to BTX), but more on that in a bit.
For the exterior, BitFenix continues to employ their "Soft Touch" plastic, and that plastic goes a long way towards making the case feel more expensive than it really is. It's a fantastic improvement on the more traditionally used garden variety SECC steel or glossy plastic, as it's both aesthetically appealing, nicer to the touch, and at least feels a bit more practical. There are three external 5.25" drive bays with very simple, clean drive shields that pop out in the traditional fashion (pressure from the back), and then the left and right sides of the fascia are ventilated to allow the intake of cool air into the enclosure. BitFenix also smartly places the quad of USB 2.0 ports, audio jacks, and power and reset buttons on the top front of the case.
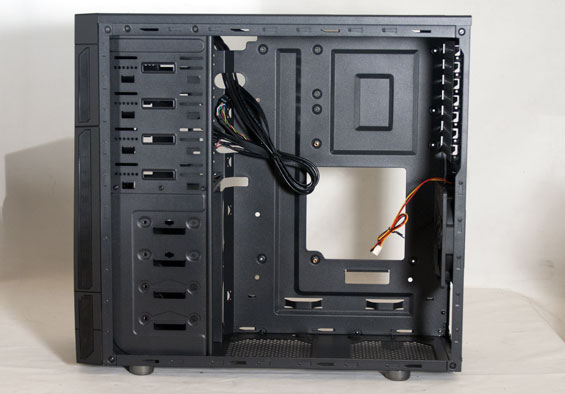
Since the motherboard is inverted in the Outlaw, the left side of the case is flat while the right side is ventilated with space for a pair of intake fans. Meanwhile, the back looks like any modern enclosure, just mirrored, with a single 120mm exhaust fan (the other fans being casualties of the price point). The top has space for two 120mm fans, and there's also room in the bottom for another 120mm fan. Hidden behind the front fascia are also mounts for two more fans. If you're willing to invest just a little, the Outlaw can probably go a long way.
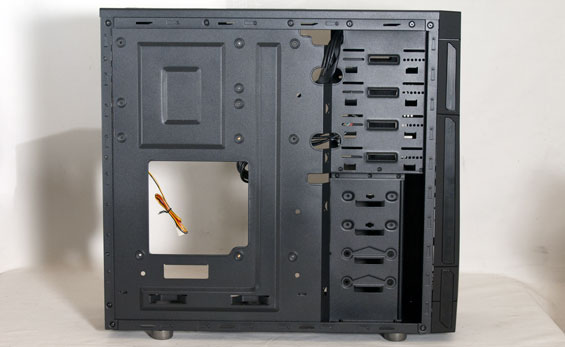
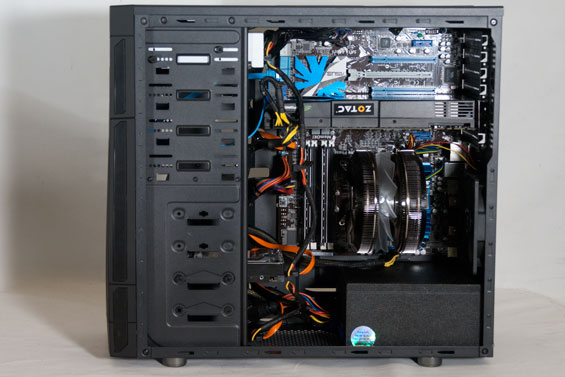
When we pop the Outlaw open, we get a better look at how everything comes together. It reminds me a lot of the interior of the Rosewill Ranger, with the space behind the optical drives and hard drive bays designated for cable management, but BitFenix's design here is much smarter. The hard drive bays aren't oriented laterally, which does complicate matters a little, but in the Outlaw the more old-fashioned front-to-back alignment does make more sense. By doing this and lining the drive bays up against the right panel, there's a substantial amount of space behind the drive cage for stashing cables, and the mounting holes in the motherboard tray and beneath the cage are ideal for it.


I'm honestly quite fond of the Outlaw's design. While the interior feels like one large machined piece of steel, it's organized in a sensible fashion. BitFenix's engineering inside is clean and at least appears to be functional (though we'll have to get to assembly to see for sure). I also just like the aesthetics overall; it's a $50 case, but it's not chintzy looking or gaudy.
Assembling the BitFenix Outlaw
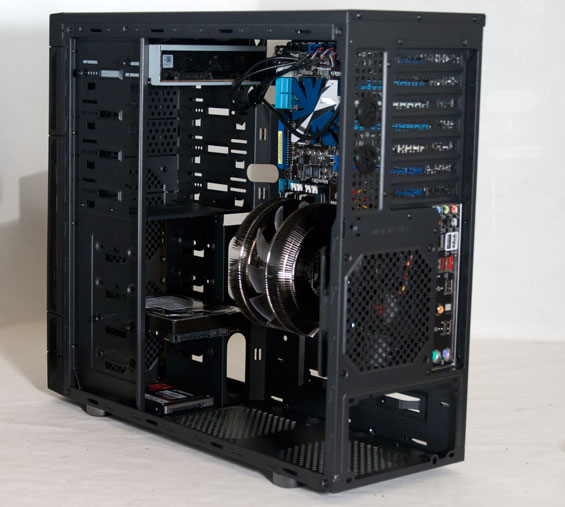
Installing our testbed into the BitFenix Outlaw was at least a little bit involved, but that's due more to the cramped quarters stemming from the smaller enclosure design than anything else. What's important is that BitFenix makes the most of the Outlaw's relatively small real estate (at least, small for a full ATX case).
Slotting the motherboard in was easy enough, though I'm finding the I/O shield for our testbed has seen better days. BitFenix has a couple of motherboard standoffs already installed. Our CPU cooler doesn't quite line up with the 120mm exhaust fan, though I'm not sure I know of any that would; the fan's placement is a bit low. The mounting holes surrounding the board are remarkably small but surprisingly good for keeping cable clutter contained.
Since the case is inexpensive, the "tool-less" drive installation really just boils down to thumbscrews. BitFenix includes thumbscrews designed for the smaller threading of optical drives as well as larger ones designed to fit into the rubber-grommeted bottom two hard drive bays (they'll also fit in the top bays). Our Blu-ray drive is on the long side and does overlap the side-mounted SATA ports a little, though, and the hard drive encroaches a bit over the bottom fan mount.
Honestly I'm not a big fan of bottom fan mounts anyhow; with rare exception (SilverStone's rotated enclosure designs like the FT02) I don't see these getting any use as most cases just aren't designed to sit high enough off of the floor (usually carpet). Compounding that is the fact that they're usually not far enough from the power supply; our 180mm power supply actually encroaches enough on the mount to prevent you from putting a fan there, and 180mm isn't an unusual or excessive length for a power supply. But I digress; installing the drives was easy enough to do, although the 2.5" SSD needs to be mounted to the bottom of the case as it has no "bay" of its own (or you'll want to buy a 2.5" to 3.5" adapter sled). Not a big deal, but it warrants mentioning.
Expansion cards require popping out the slot covers cut from the frame of the Outlaw. The steel used here is especially thin and fragile, pointing to a place where costs are liable to have been cut in manufacture. Sometimes that's not all bad, though; twisting the slot covers out was a lot easier than it usually is. Finally, sliding the power supply in was also pretty easy.
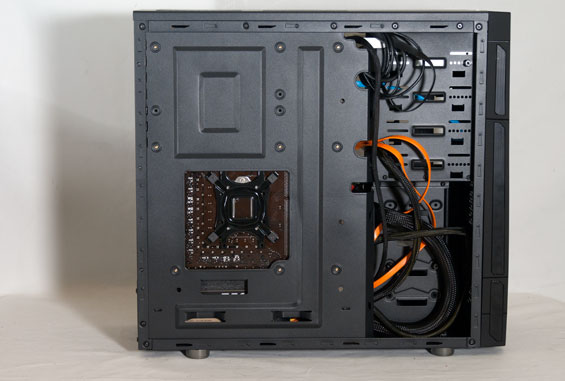
Wiring things up was a little bit trickier, though, and part of that is just due to the nature of a small case. Surprisingly, where Rosewill fouled things up with the Ranger, BitFenix gets the cable organization right; mostly it's just a matter of threading everything through the mounting holes in the motherboard tray. Having a modular power supply certainly helped (although AUX 12V clearance is at an all time low), but if you're spending $50 on a case chances are you're not up for splurging on modular kit either.


I'm mostly happy with the Outlaw's assembly. The interior winds up being impressively clean given the circumstances, as you can actually use the mounting holes under the hard drive cage to keep power cables pinned into place. There are certainly easier enclosures to build in, but very few of them are this inexpensive.
Testing Methodology
For testing ATX cases, we use the following standardized testbed in stock and overclocked configurations to get a feel for how well the case handles heat and noise.
| Full ATX Test Configuration | |
| CPU |
Intel Core i7-875K (95W TDP, tested at stock speed and overclocked to 3.8GHz @ 1.38V) |
| Motherboard | ASUS P7P55D-E Pro |
| Graphics Card | Zotac NVIDIA GeForce GTX 580 (244W TDP) |
| Memory | 2x2GB Crucial Ballistix Smart Tracer DDR3-1600 |
| Drives |
Kingston SSDNow V+ 100 64GB SSD Western Digital Caviar Black 1TB SATA 6Gbps Samsung 5.25" BD-ROM/DVDRW Drive |
| CPU Cooler | Zalman CNPS9900 MAX with Cooler Master ThermalFusion 400 |
| Power Supply | SilverStone Strider Gold 750W 80 Plus Gold |
A refresher on how we test:
Acoustic testing is standardized on a foot from the front of the case, using the Extech SL10 with an ambient noise floor of ~32dB. For reference, that's what my silent apartment measures with nothing running, testing acoustics in the dead of night (usually between 1am and 3am). A lot of us sit about a foot away from our computers, so this should be a fairly accurate representation of the kind of noise the case generates, and it's close enough to get noise levels that should register above ambient.
Thermal testing is run with the computer having idled at the desktop for fifteen minutes, and again with the computer running both Furmark (where applicable) and Prime95 (less one thread when a GPU is being used) for fifteen minutes. I've found that leaving one thread open in Prime95 allows the processor to heat up enough while making sure Furmark isn't CPU-limited. We're using the thermal diodes included with the hardware to keep everything standardized, and ambient testing temperature is always between 71F and 74F. Processor temperatures reported are the average of the CPU cores.
For more details on how we arrived at this testbed, you can check out our introductory passage in the review for the IN-WIN BUC.
Last but not least, we'd also like to thank the vendors who made our testbed possible:
Thank You!
We have some thanks in order before we press on:
- Thank you to Crucial for providing us with the Ballistix Smart Tracer memory we used to add memory thermals to our testing.
- Thank you to Zalman for providing us with the CNPS9900 MAX heatsink and fan unit we used.
- Thank you to Kingston for providing us with the SSDNow V+ 100 SSD.
- Thank you to CyberPower for providing us with the Western Digital Caviar Black hard drive, Intel Core i7-875K processor, ASUS P7P55D-E Pro motherboard, and Samsung BD-ROM/DVD+/-RW drive.
- And thank you to SilverStone for providing us with the power supply.
Noise and Thermal Testing, Stock
I was intensely curious to see how the BitFenix Outlaw's inverted design would perform. A similar style worked like gangbusters in the more expensive Micro-ATX SilverStone Temjin TJ08-E, but there are some key differences here. BitFenix has opted for a negative pressure design instead of a positive pressure one, with the exhaust fan pulling air out of the back of the case instead of placing a fan in the front and letting the fan in the heatsink do the rest of the work.
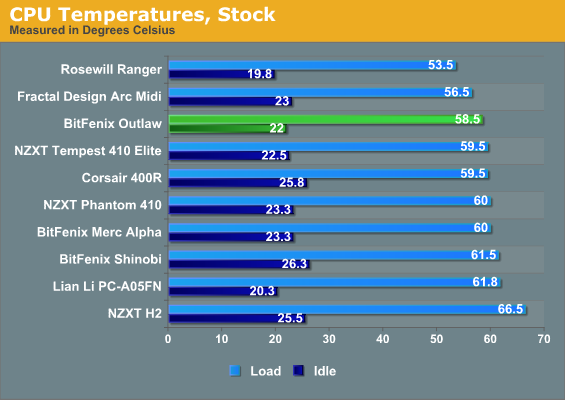
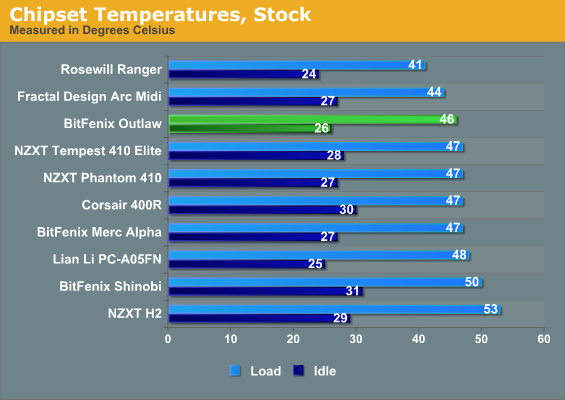
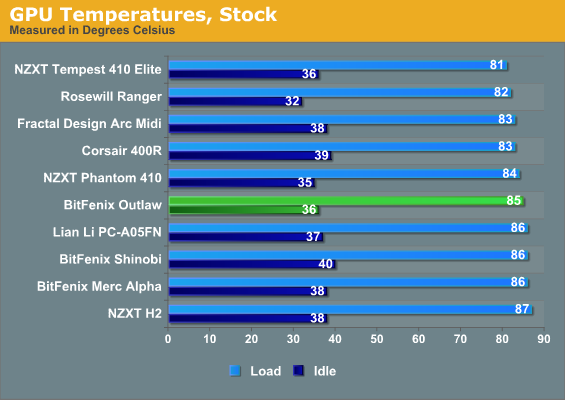
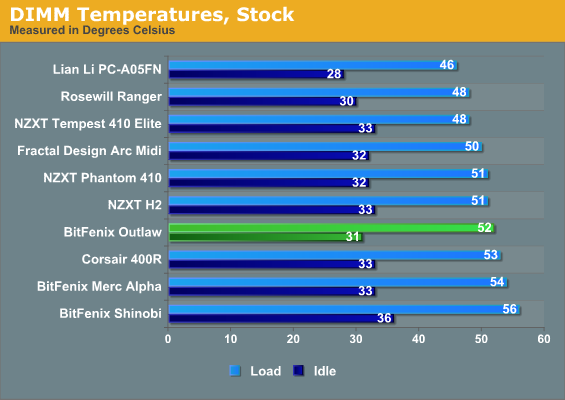
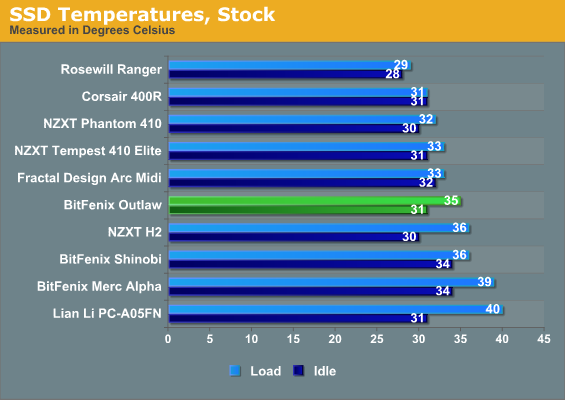
Thermals in the Outlaw aren't great, but it's also the second least expensive case in our lineup (behind BitFenix's own Merc Alpha). That said, they're at worst middle-of-the-road, and that's just fine. The major temperatures (the CPU and GPU) are both quite good, and there's still room for real improvement when it comes to adding fans.
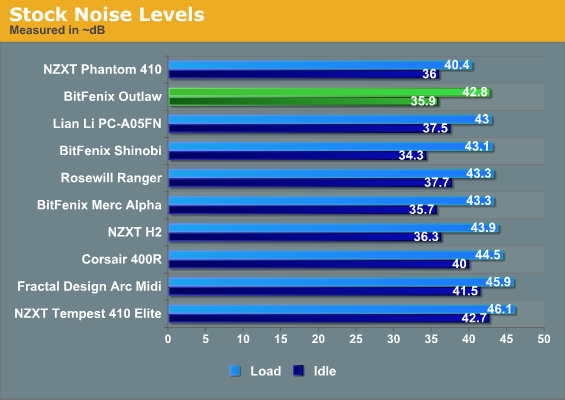
As far as I'm concerned, this is the Outlaw's big win. Normally getting something with good thermals and good acoustics requires spending a lot more money, but the level and character of the Outlaw's noise was surprisingly low and mellow. The major offender is actually the GeForce GTX 580's cooler, which has to be fed entirely through the case ventilation and is audible out of the top of the case. The kind of less expensive, quieter video card more apt to appear in this type of case (like a Radeon HD 6850 or GeForce GTX 560) will probably excel.
Noise and Thermal Testing, Overclocked
Our stock testing reveals the Outlaw as a case that produces adequate ambient temperatures along with a good CPU temperature and acceptable GPU temperature, and it's able to do all of this while keeping a reasonable noise profile. Overclocked testing is liable to be a lot more strenuous, though, especially with an enclosure this small. Realistically, overclockers are going to want to invest in another fan or two, but even then the Outlaw still winds up being the kind of good deal old school overclockers were interested in in the first place (when overclocking was about maximizing a small budget instead of setting records).
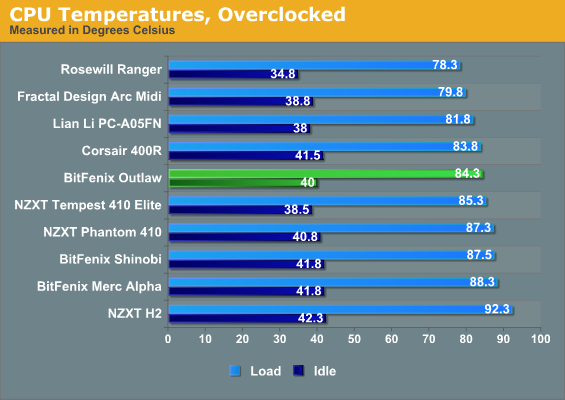
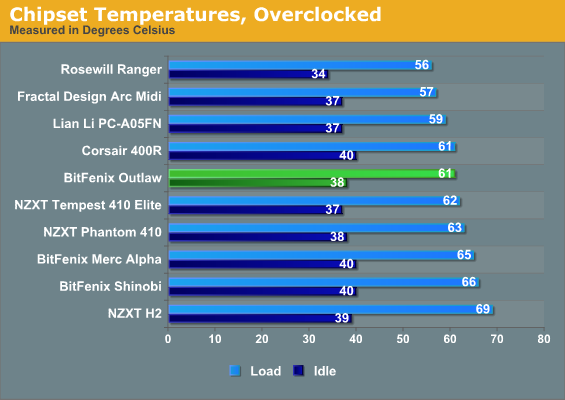
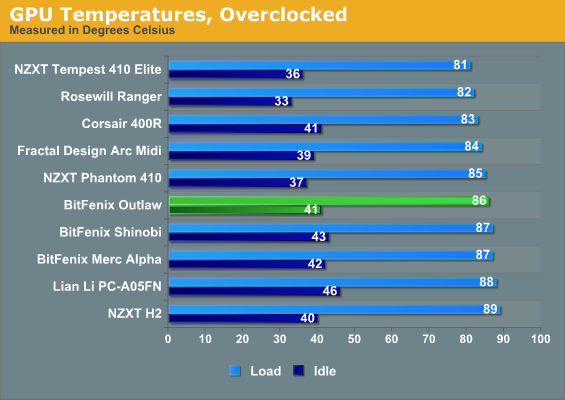
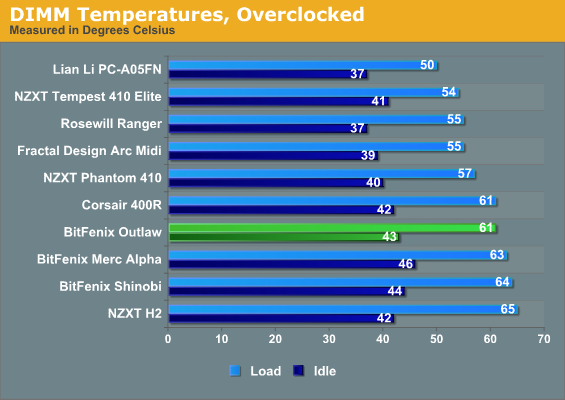

Overclocked thermals are still pretty good. They're not excellent, but they're good enough for a case of this size, and as mentioned before there's certainly room for improvement for the end user willing to modify the cooling a bit.
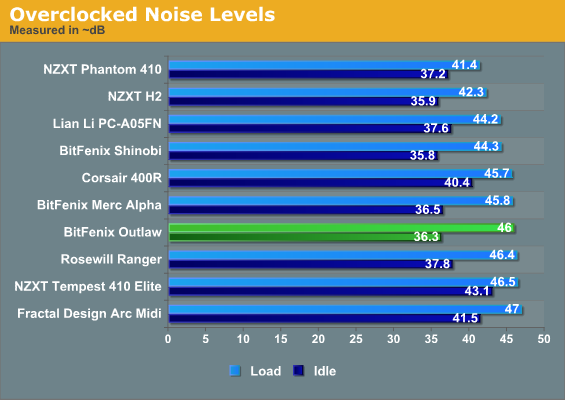
Unfortunately, while idle noise is good, load noise is still on the high side. That's pretty much to be expected when we start dealing with enclosures that are this cheap, since they're going to be largely devoid of any acoustic management features beyond the merits of their basic designs. The best thing you can do is tweak the cooling—a low-RPM fan or two would go a long way—to reduce overall noise to begin with.
Conclusion: Only What You Need
It's probably pretty evident from the preceding pages that I came away from my experiences with the BitFenix Outlaw as a fan. I've made mention in previous reviews of BitFenix as a hungry company: they're still small, their enclosures aren't available on NewEgg (yet) so you'll have to order them from MicroCenter or work some of that sweet Google Shopping voodoo, but their designs are worth actively seeking out. I still love the Shinobi, but BitFenix has outclassed their own Merc Alpha with the Outlaw. At just $10 more, it's totally worth the expense, even if you're on an extreme budget.
BitFenix's engineers have done some intelligent design and essentially culled everything that wasn't absolutely necessary in order to hit the $49 price point, and what we're left with is a small midtower with exactly enough space to produce a clean and modest build. The complaints I have are few. I would've moved the fan from the back to the front, and I would put the power supply in the top of the enclosure, inverted. It's hard to argue with the results SilverStone obtained with their Temjin TJ08-E, and the same principles could be applied easily enough to the Outlaw.
As things are, as an end user I'd probably add two fans: an intake at the top or side and an intake in the front of the case. Depending on whether or not your motherboard has good fan control, you should be able to find a decent  deal on a pair of 120mm fans...when you're ready. The Outlaw is quite capable on its own, but there's definitely room for an end user to spruce it up.
It's hard not to recommend the BitFenix Outlaw as an extreme budget enclosure. For a stock or mostly stock build, it's going to be one of the coolest and quietest enclosures you can find. Cable organization is remarkably clean, with BitFenix successfully executing what Rosewill only attempted in the Ranger, and doing so at $20 cheaper. With so few complaints and so much upshot for modest builds, it's easy to see why the Outlaw earns our Editor's Choice Bronze Award.


