Original Link: https://www.anandtech.com/show/9474/build-a-rig-round-1-the-build-logs
Build-A-Rig Round 1, Zotac vs. Corsair: The $1500 PC Build Logs
by Ryan Smith & Ganesh T S on July 30, 2015 3:00 PM EST- Posted in
- Corsair
- ZOTAC
- Build-A-Rig
In early July we introduced our new Build-A-Rig project. The aim of the project, with help from our partners Newegg, is to approach the companies that make up the personal computing industry roughly every quarter and ask them to create a list of components within a certain budget aimed at a particular user base. Aside from that there are no rules, and at the end of the day the systems would be built and tested by AnandTech to be given away to our readers.
For each build we would interviews the individuals from the companies who we work with about the state of the PC industry and their chosen components, critique the components used, write up build logs for each system and then provide performance numbers. This round is our first, and we spoke to Chinny Chuang from Zotac and Dustin Sklavos from Corsair to create a parts list for a $1500 single monitor gaming system. Zotac went more for style and ease of use, Corsair went more for pure power, and we carefully dissected each component chosen in our previous.
But before we get to the performance numbers, we had a look at just how easy these two systems were to build, in the form of build logs. Ganesh tackled Zotac's Hey Good Lookin', while Ryan built up Corsair's The Accelerator. Game on!
Building Zotac's Hey Good Lookin'
Build Log by Ganesh TS
| Zotac's Hey Good Lookin' | |||
| Component | Selection | Price as Chosen |
90-Day Average |
| Processor (CPU) | Intel Core i5-4460 | $189.99 | $189.85 |
| Motherboard | GIGABYTE GA-Z97X-UD3H-BK | $139.99 | $138.17 |
| Graphics Cards (GPU) | Zotac GTX 970 AMP! Extreme Core Edition | $369.99 | $369.99 |
| Memory (DRAM) | Corsair Dominator Platinum 2x4GB DDR3-1866 C9 |
$99.99 | $104.27 |
| Storage (SSD/HDD) | Crucial BX100 500 GB SSD | $189.99 | $188.39 |
| Power Supply (PSU) | Rosewill Quark 750W Platinum | $139.99 | $135.31 |
| Chassis | NZXT S340 Black Steel ATX Mid-Tower |
$69.99 | $69.99 |
| CPU Cooling | Corsair Hydro Series H100i GTX* | $109.99 | $119.99 |
| Operating System | Windows 8.1 Full Version | $119.99 | $119.99 |
| Extras | SilverStone Sleeved 6-pin to 6-pin x2 |
$14.98 | $14.98 |
| SilverStone Sleeved EPS12V 4+4-pin |
$7.99 | $7.99 | |
| SilverStone Sleeved 24-pin |
$12.99 | $12.99 | |
| Samsung USB 2.0 External DVD Drive |
$23.99 | $23.82 | |
| DEEPCOOL RGB LED Strip with Controller |
$16.99 | $16.99 | |
| Total | $1,506.85 | $1,492.58 | |
*In our first breakdown of parts, we mislabelled this part as the H100i.
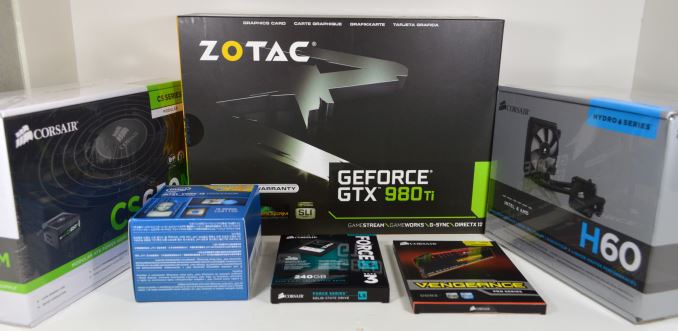
Zotac's big list of components came from Newegg in two shipments. The NZXT S340 case came in first. A big Newegg box with the rest of the components came in a couple of days later.
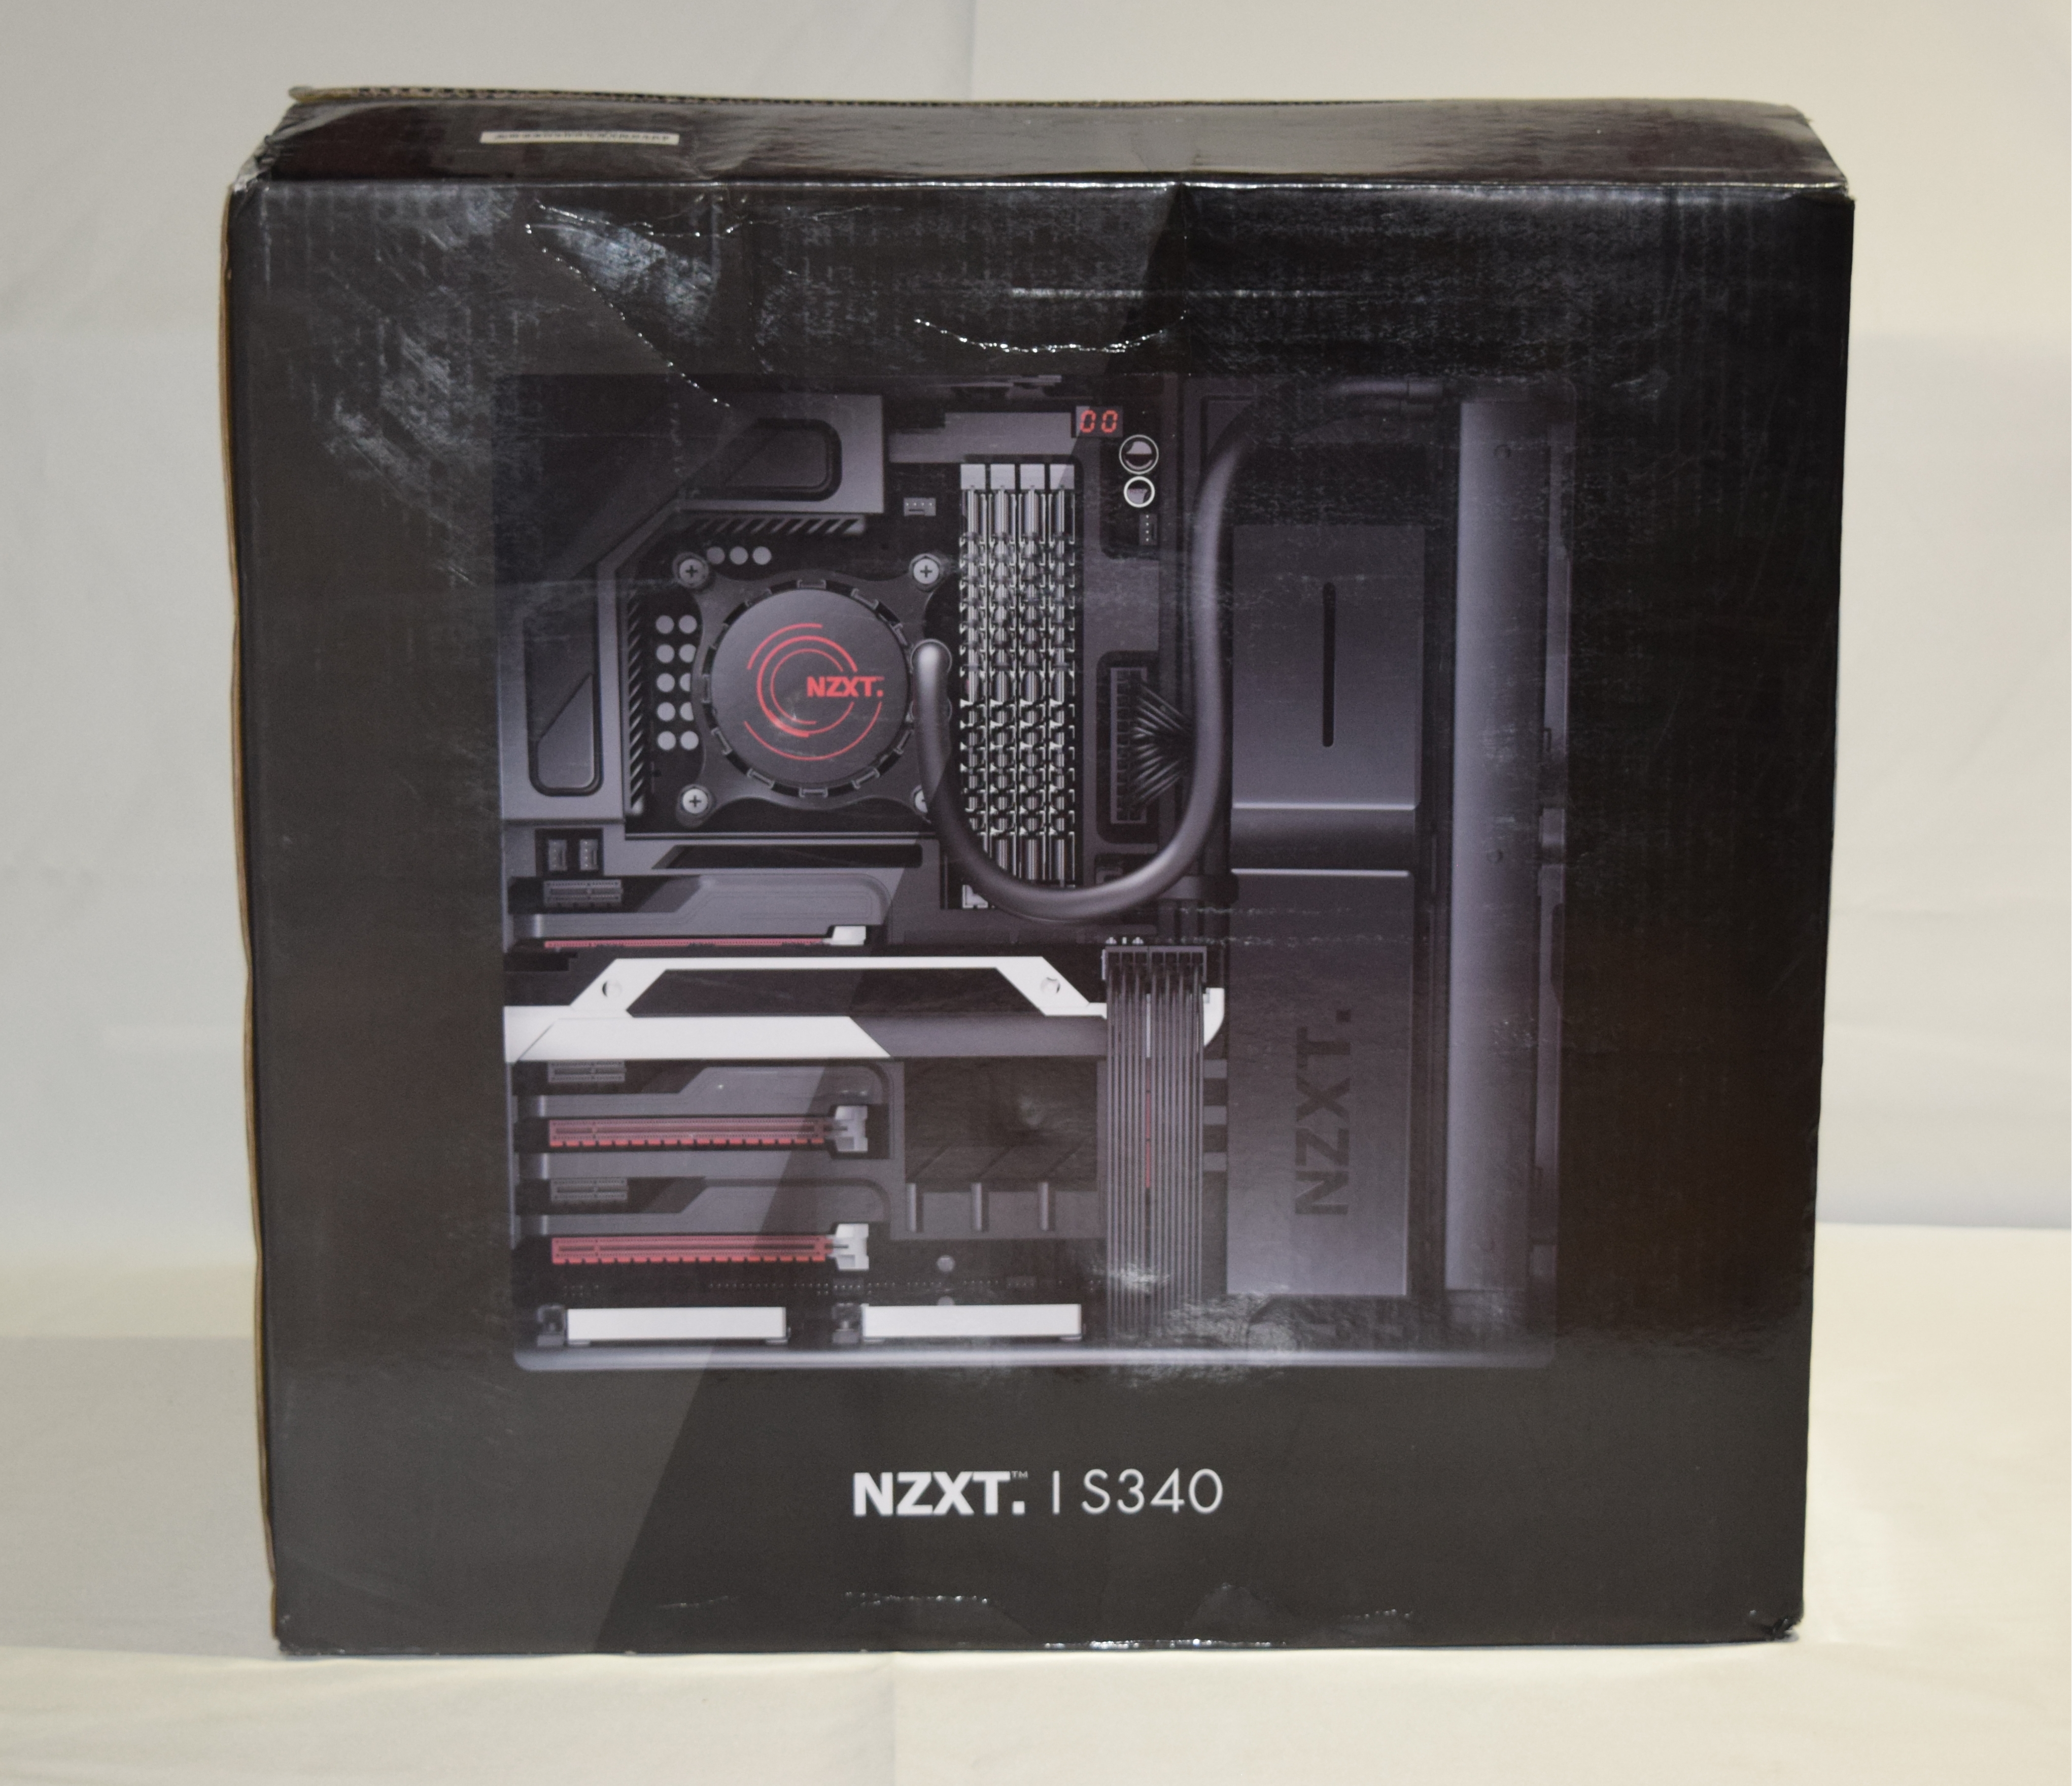

The NZXT S340 Black Steel ATX Mid-Tower chassis is a $70 case. Despite its low price, it offered a number of features aiding in easy assembly of the system.
- The side panels were easily removed without the aid of a screwdriver, thanks to the thumbscrews.
- The case was nicely divided into specific compartments for the installation of the motherboard, the PSU and the SATA drives.
- The case made it easy to manage the cables and keep them out of sight.
On the flip side:
- The case weighed in at slightly more than 7 kgs. when empty, and the sticky rubber feet made it a bit difficult to maneuver the case around when installing components.
- The sharp edges of the case had to be kept in mind while handling the case
- Though there was enough clearance between the edge of the motherboard area and the front panel for installing the fans of the liquid cooler in the build component list, readers contemplating the usage of the NZXT S340 and a liquid cooler would do well to research the fan / radiator dimensions (the clearance is 57mm)

The GIGABYTE GA-Z97X-UD3H-BK Z97 motherboard chosen by Zotac has all the features one would expect in a Z97 board, along with server-class burn-in testing. The board gave little cause for complaint during installation. It would have been nice to have a combo-connector to enable easy hook-up of the front panel cables to the motherboard pins, but, thankfully, the design of the internals of the case as well as the motherboard positioning alleviated the issue. In addition a USB key with the drivers for the post-build setup process would have been nice, but Zotac included an external DVD drive in the build list anyway. Having been accustomed to motherboards with Wi-Fi capabilities over the last few generations, I made the mistake of starting the build process away from a wired networking outlet. A temporary USB WLAN adapter helped in getting the updates processed once the OS was installed.
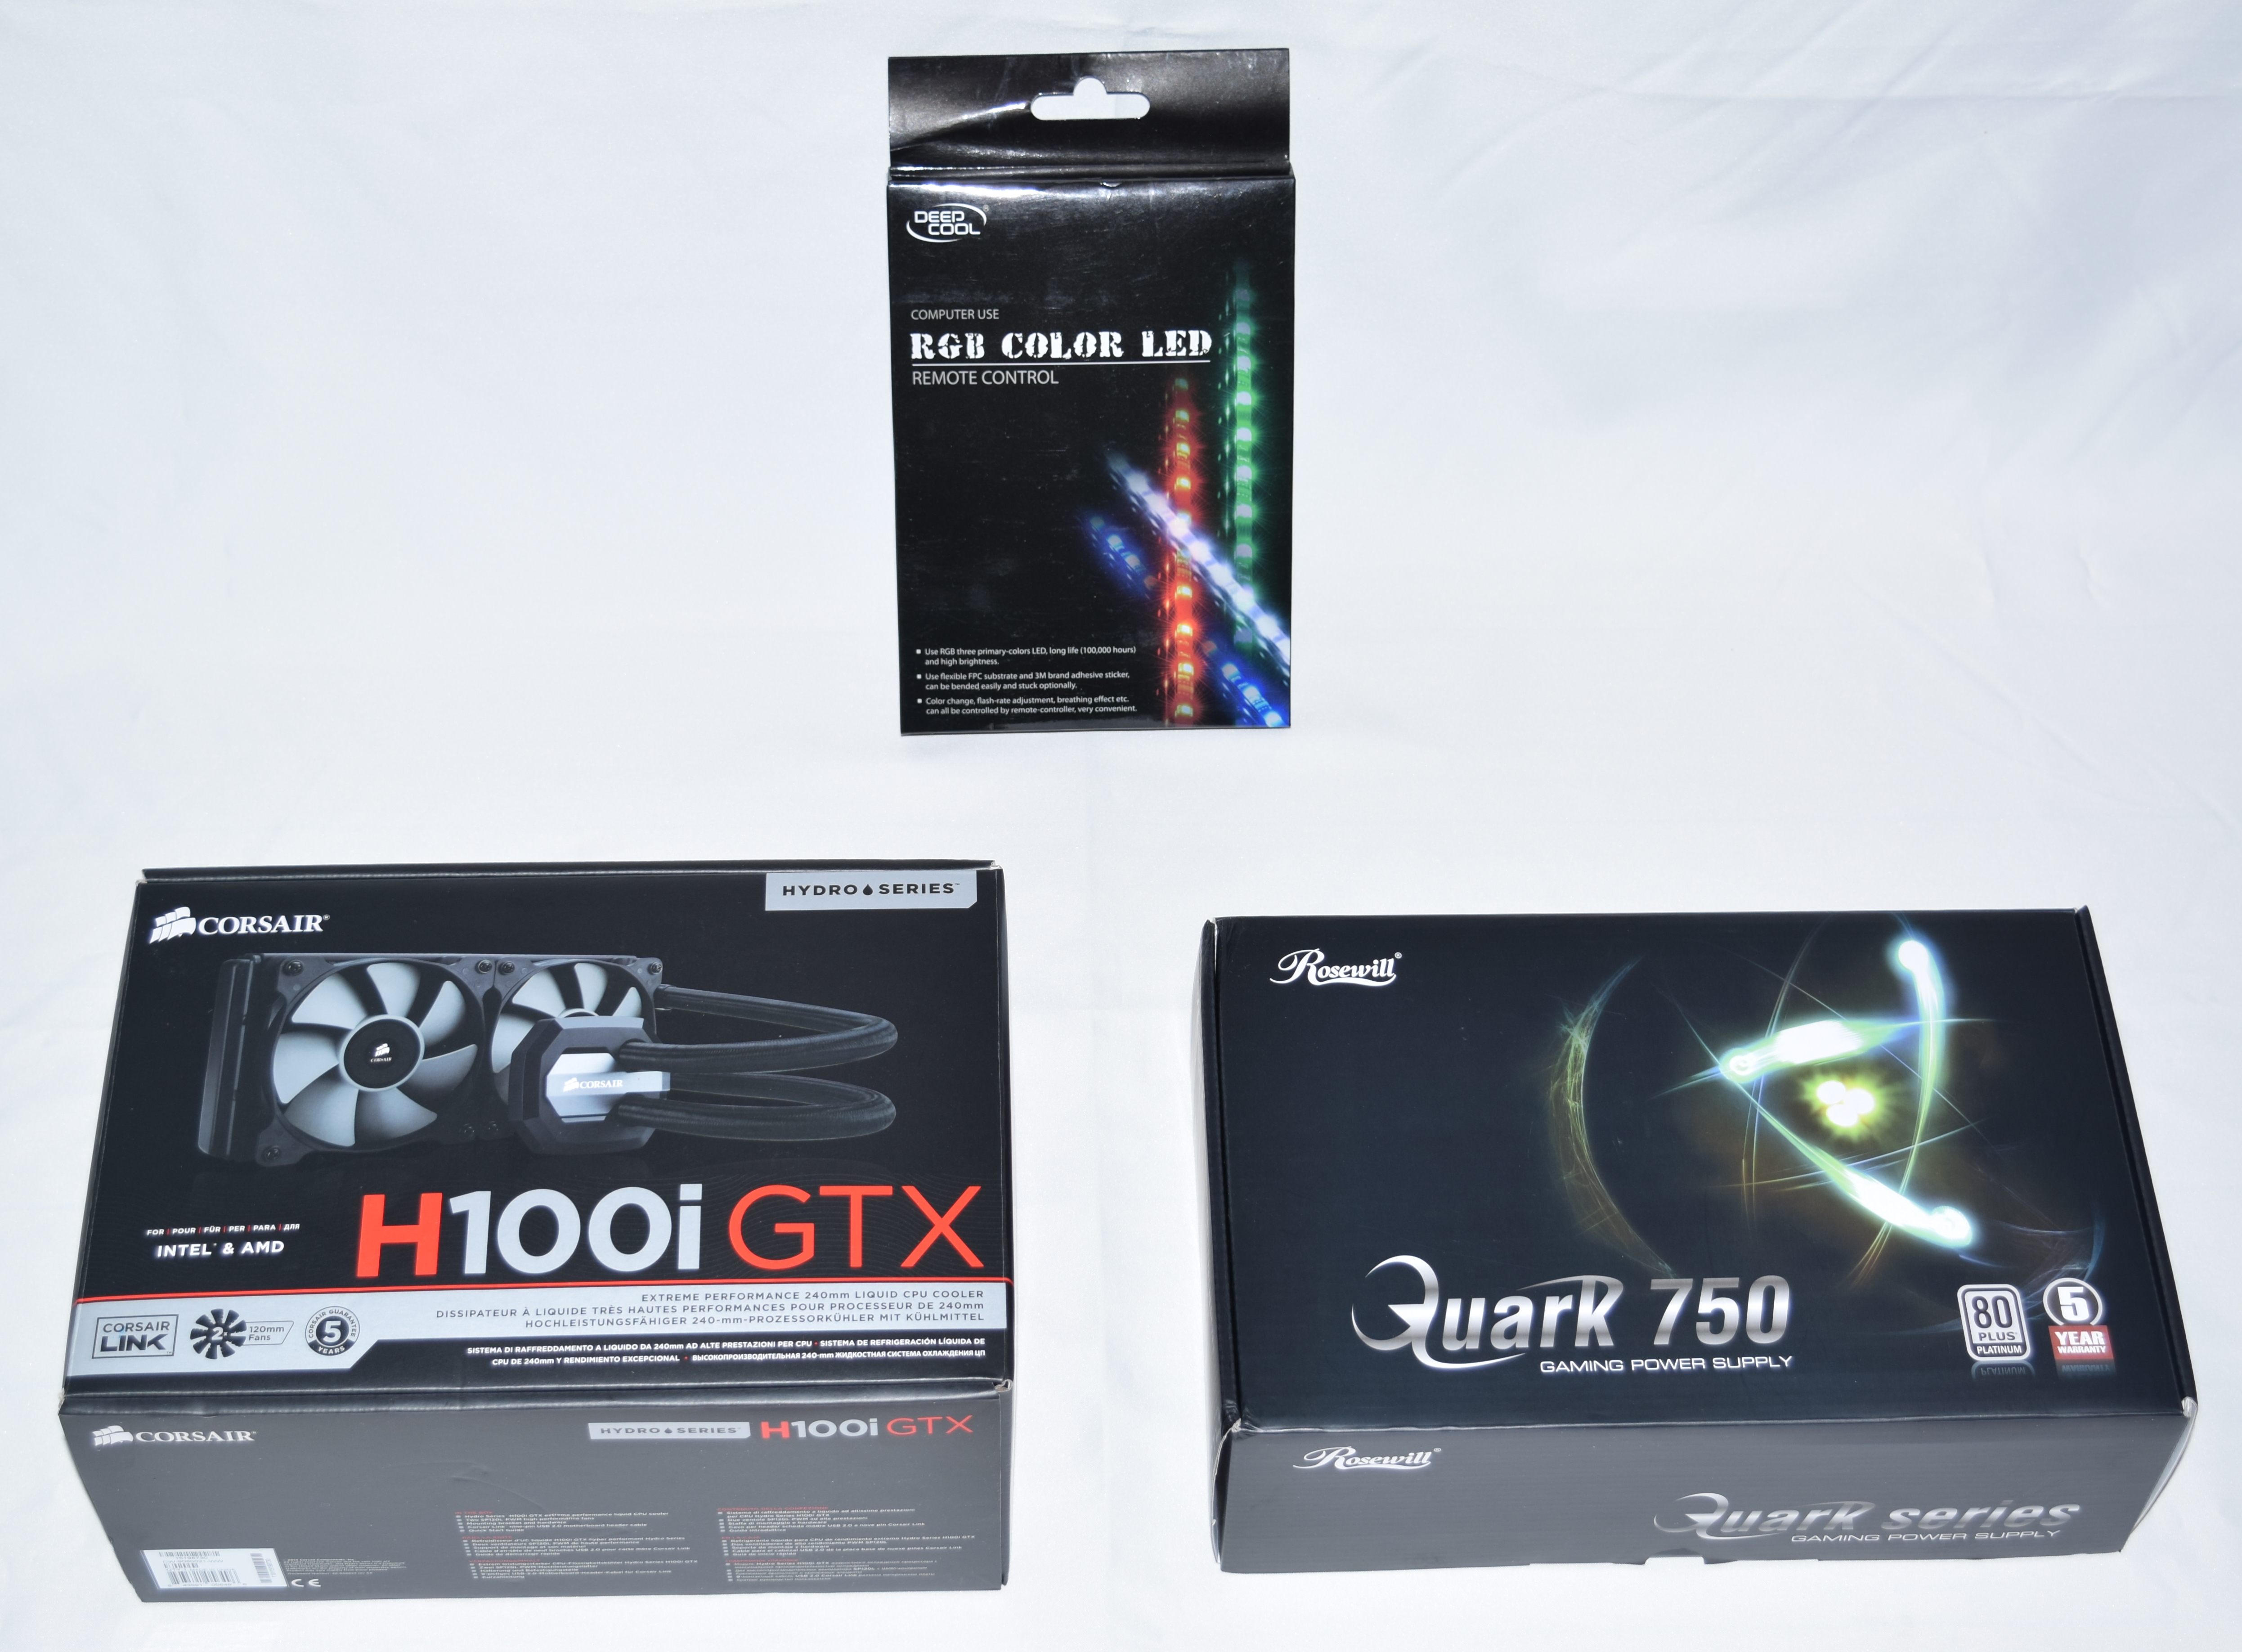
In my personal builds, I usually opt to go with the stock cooler that comes along with the CPU for cost. Zotac's build, however, use the Corsair H100i GTX liquid cooler for a couple of reasons - the fan noise is greatly reduced (thanks to the 120mm fans that mount on the front side of the chassis) and the CPU is able to keep a lower temperature under sustained loading compared to the stock cooler. In addition, the build process was also much simpler - there was no thermal paste to explicitly deal with, since the H100i GTX came with the thermal paste pre-applied. It was a simple matter of hooking up the cooler according to the directions provided and mounting the fans and the radiator. The thickness of the H100i GTX fans comes is 30mm, and that of the radiator is 25mm. There was no trouble mounting this in the 57mm clearance provided by the case. The Corsair H100i GTX also comes with the Corsair Link monitoring and control. The cable was connected to one of the free USB 2.0 ports on the motherboard.
The Rosewill Quark 750W Platinum PSU is modular in nature. Connecting cables to only the necessary outlets helped reduce clutter and made the installation / cable management much simpler. The yellow and red cables that came with the PSU unfortunately didn't go well with the rest of the colors on the motherboard side, and so the Silverstone sleeved cables that Zotac also included in the build came to the rescue. The PCIe power cables, 8-pin 12V connector as well as the 24-pin ATX power connector were terminated on the opaque side of the chassis and only the Silverstone sleeved cables were made to appear on the transparent side.
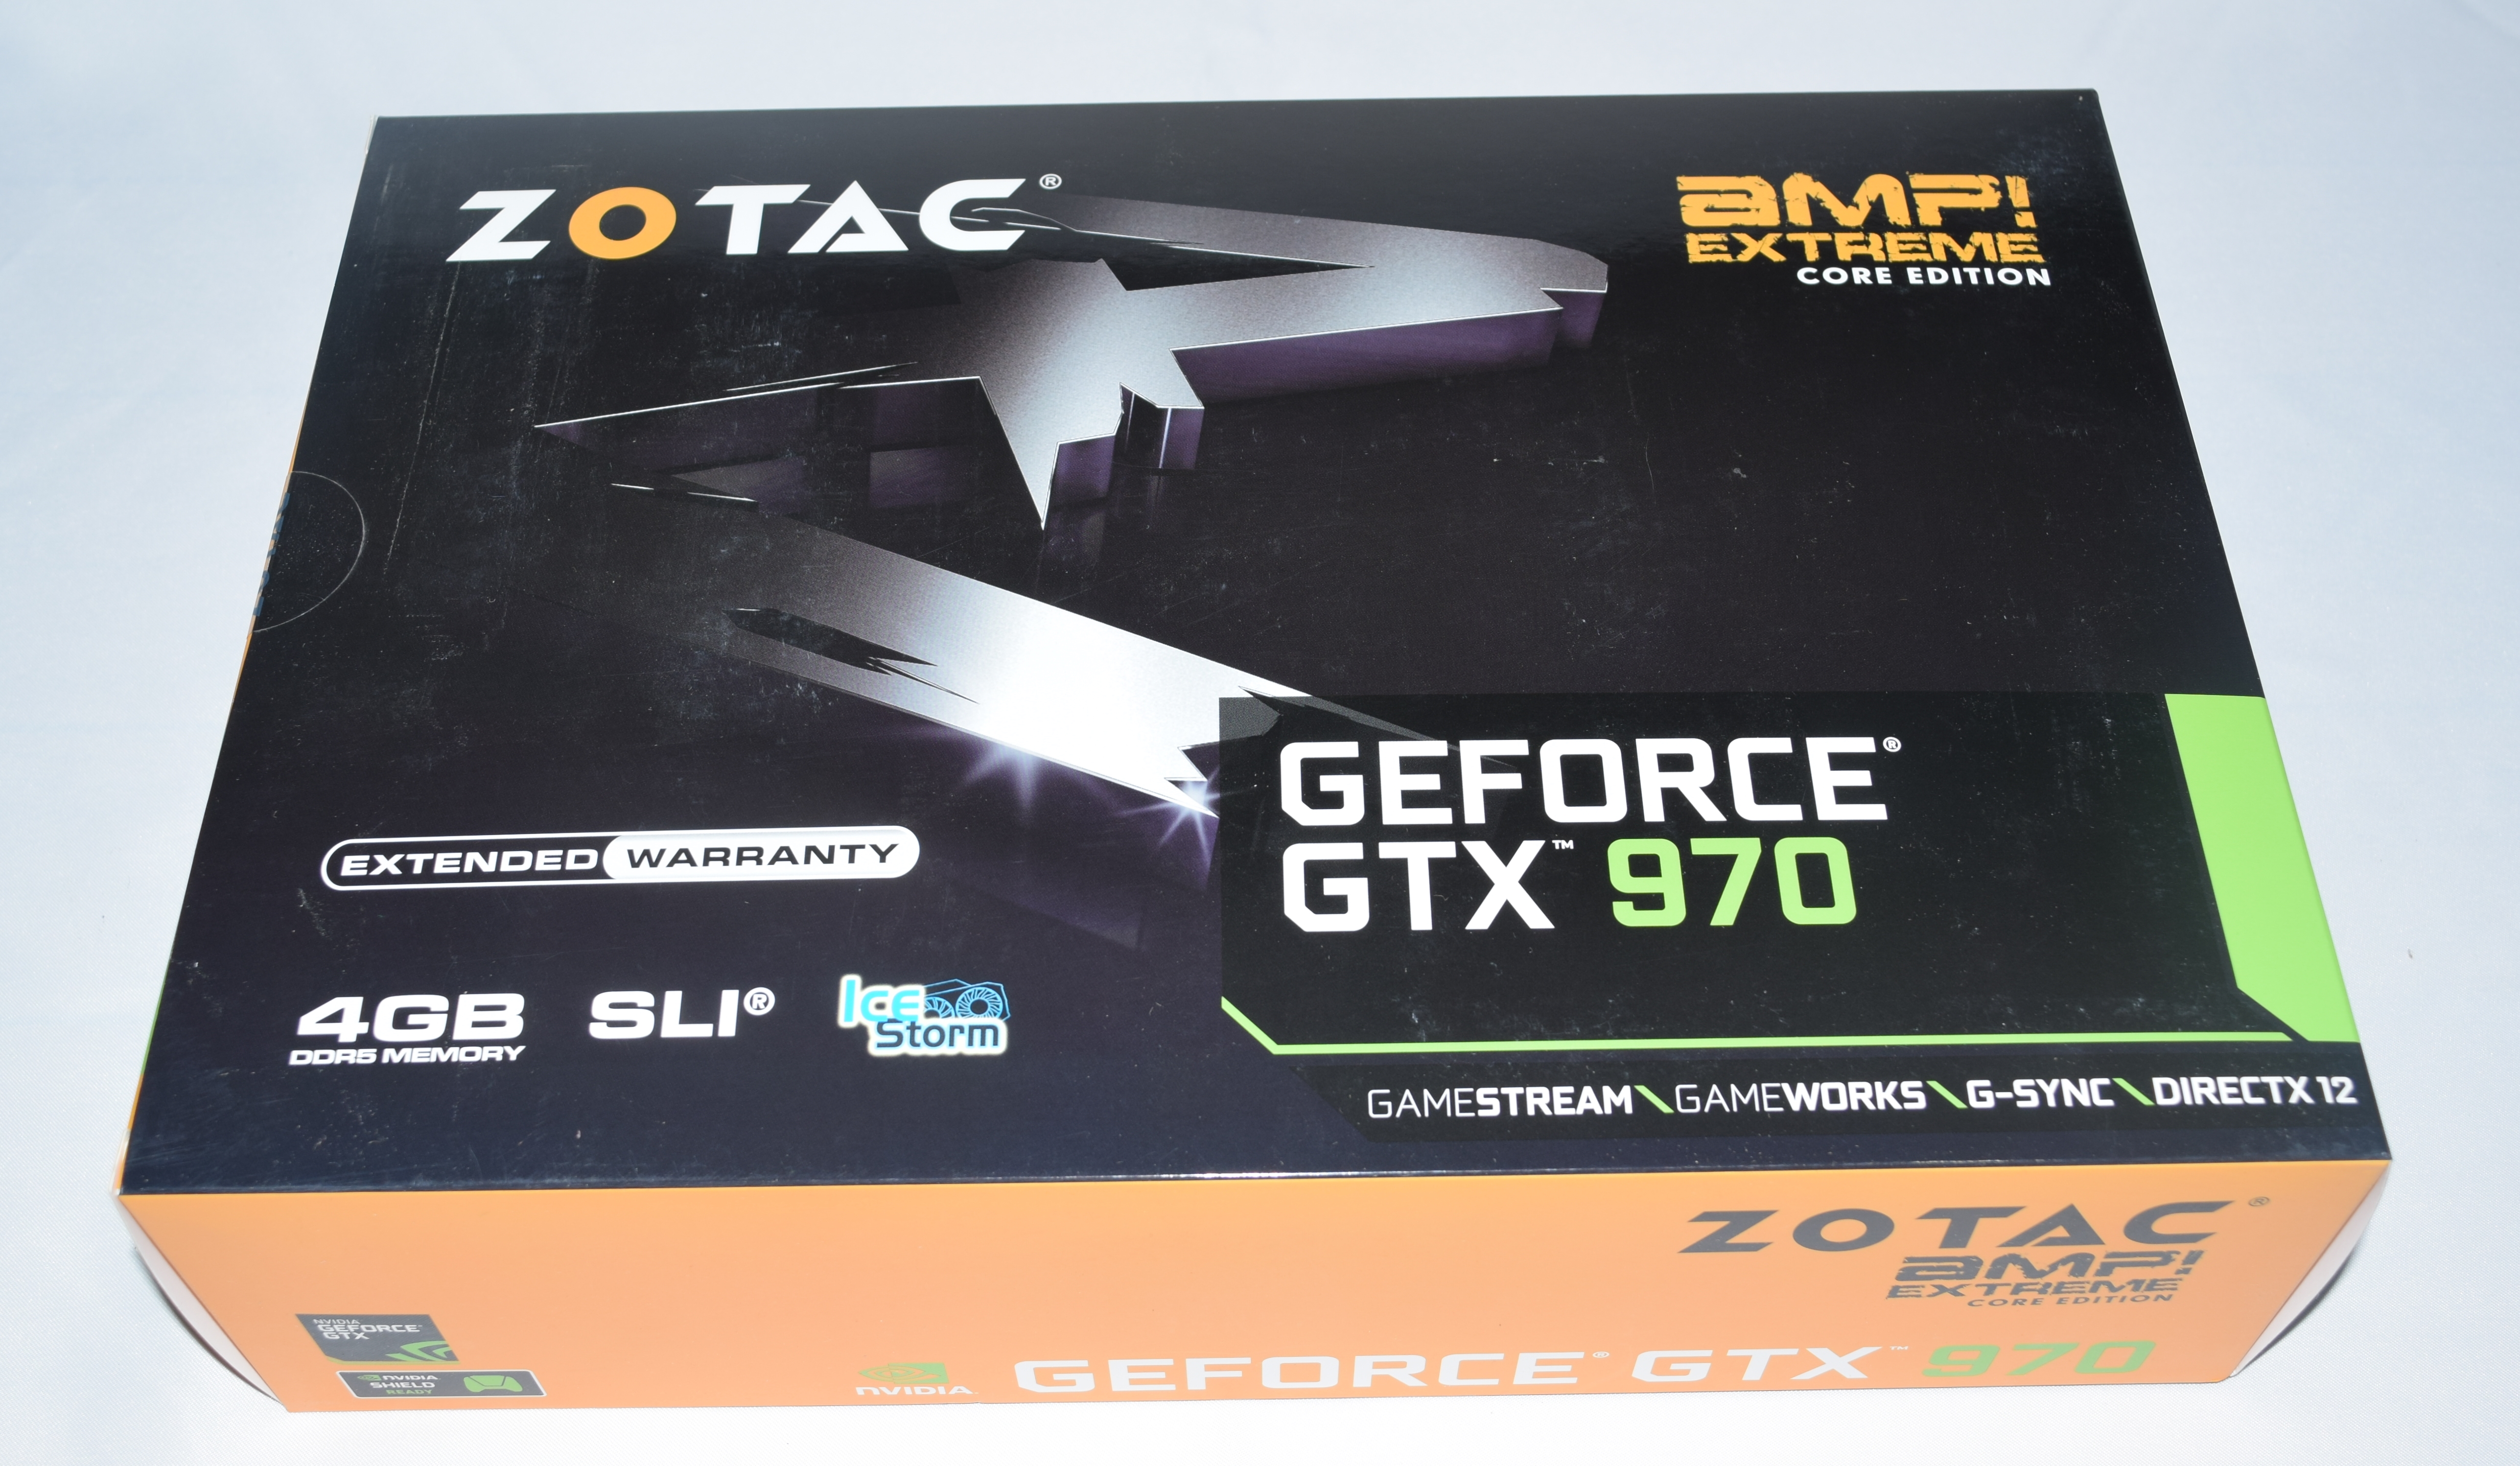
The Zotac GTX 970 AMP Extreme was installed in the PCIe 3.0 x16 slot closest to the CPU. The dual slot card also blocks one of the PCIe x1 slots in the board. The case itself has more than enough clearance to accommodate cards of this size, and the installation was a breeze. The top of the card has Zotac's logo that can be seen clearly through the transparent side of the case. The three fans cooling the GPU also point downwards and don't interfere with the look of the build.


Ian has already covered the details of the other component choices (Intel Core i5-4460, Crucial BX100 and the Corsair Dominator Platinum 8GB DRAM kit). There is not much to add, except that the looks of the Corsair Dominator Platinum and the light bar definitely enhance the visual appeal of the build during operation.
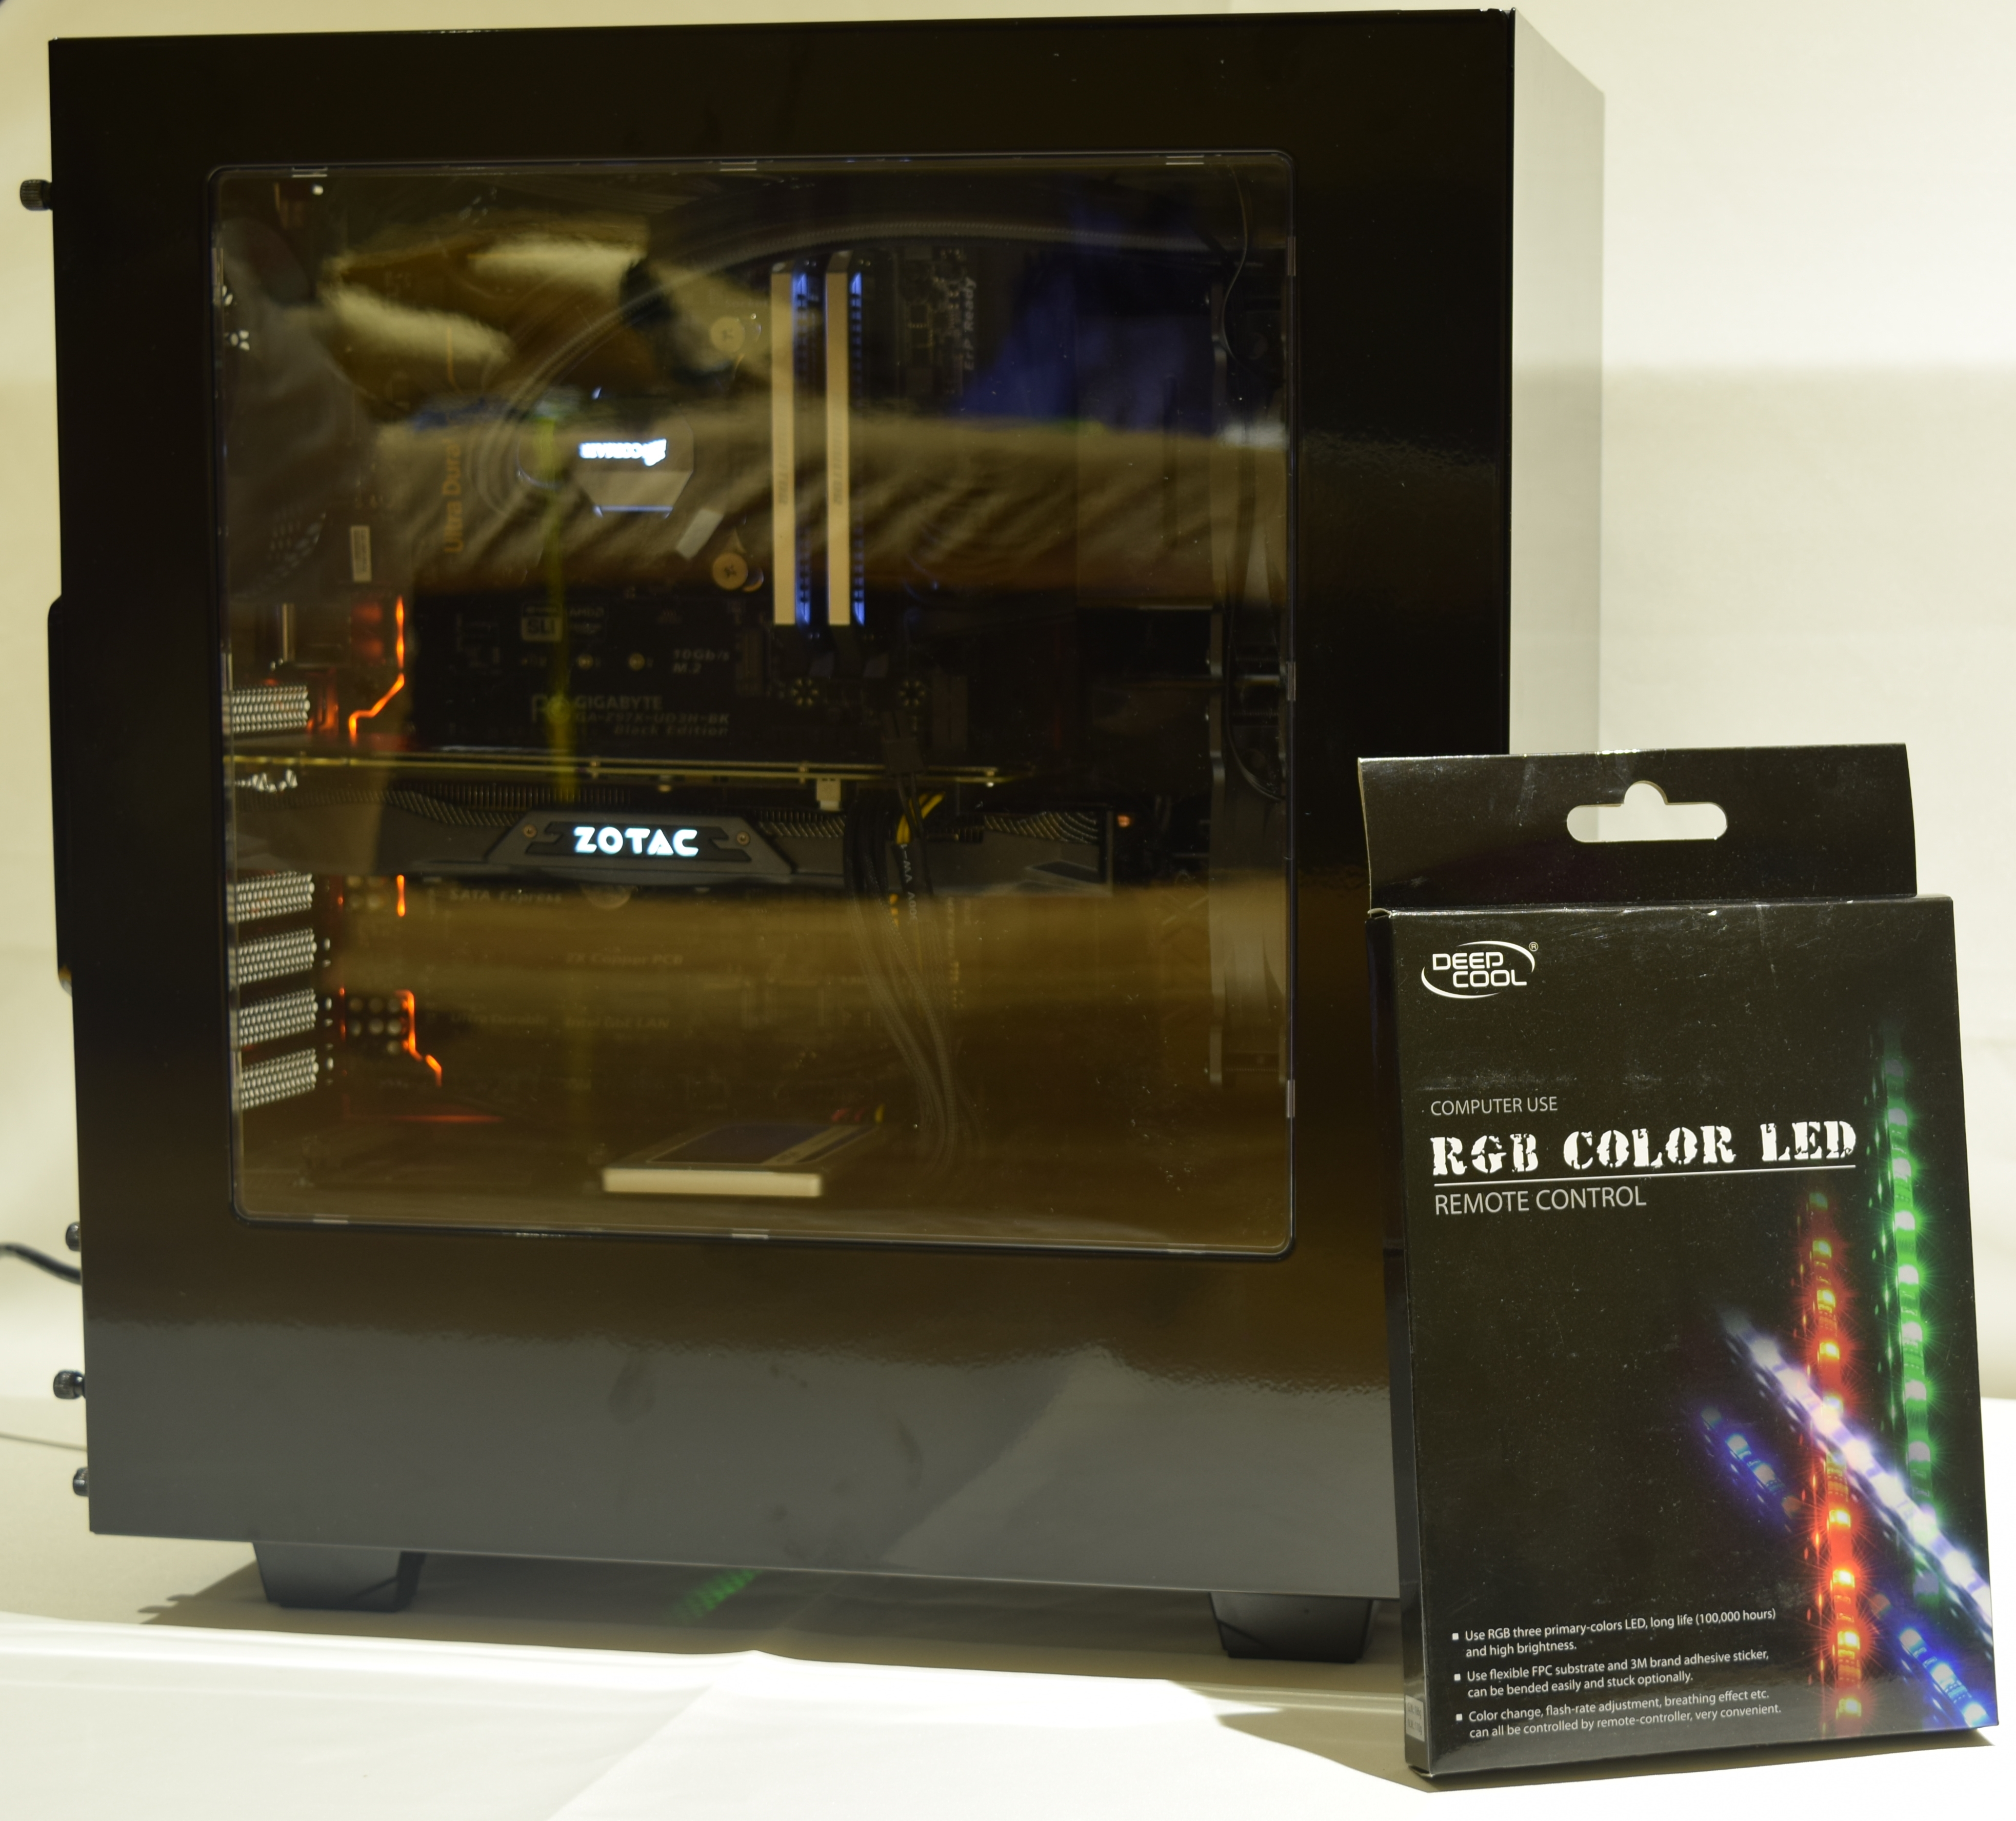
Zotac also included a DEEPCOOL RGB LED Strip with Controller in their build to spruce up the look of the system. There are multiple ways to mount it in the NZXT S340 chassis. We decided to leave it to the preferences of the eventual winner of the system to install it appropriately.
Building Corsair's "The Accelerator"
Build Log by Ryan Smith
Whereas Ganesh worked with Zotac’s Hey Good Lookin, I took Corsair’s build, The Accelerator. Designed by former AT staffer Dustin Sklavos, Corsair’s design is distinctly focused on performance over all else; the CPU, GPU, and RAM alone comprise nearly $1000 of the $1500 budget. What this means for performance we’ll see in our next article, the performance showcase, but as far as the build goes it means that The Accelerator is rather straightforward and simple.


Meanwhile, since Corsair makes almost every PC component short of CPUs and GPUs, The Accelerator is loaded with Corsair technology for this Build-A-Rig challenge. A Corsair case houses both a Corsair PSU and a Corsair SSD. Meanwhile providing cooling for the CPU is another piece of Corsair kit, a Corsair closed loop liquid cooler. Suffice it to say, this is truly a Corsair build.
| Corsair's 'The Accelerator' | |||
| Component | Selection | Price as Chosen |
90-Day Average |
| Processor (CPU) | Intel Core i5-4690K | $239.99 | $237.62 |
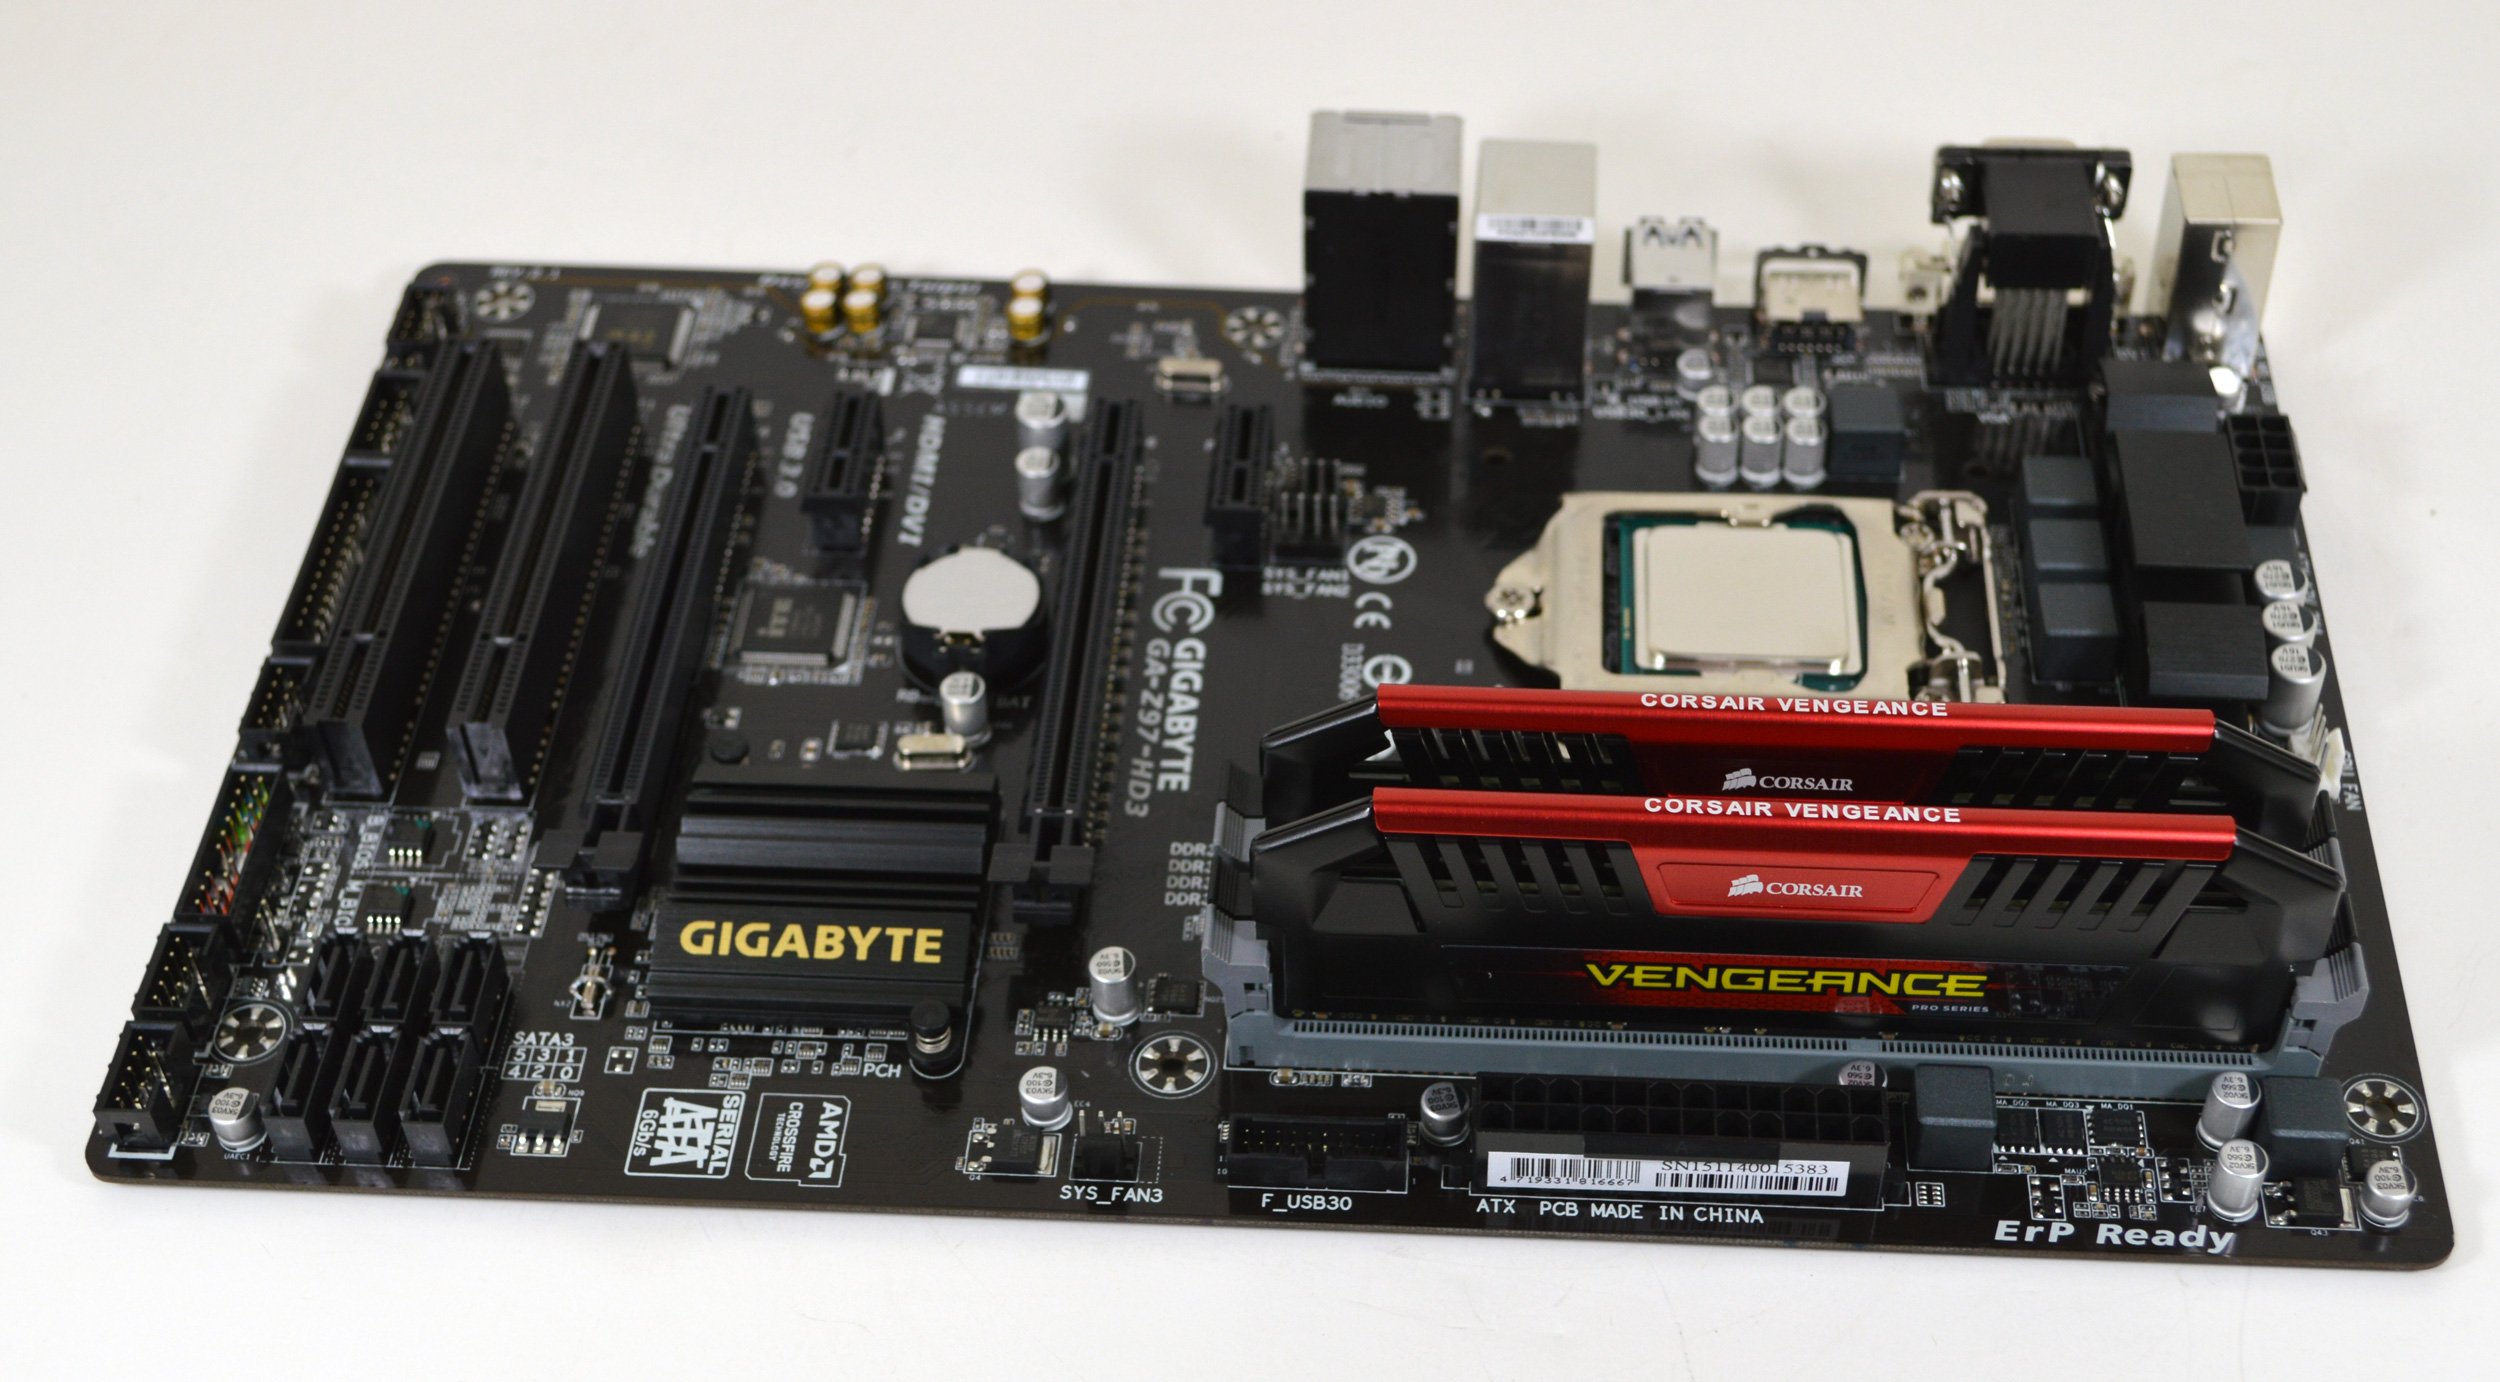
| Motherboard | GIGABYTE GA-Z97-HD3 | $89.99 | $97.99 |
| Graphics Cards (GPU) | Zotac GTX 980 Ti | $649.99 | $649.99 |
| Memory (DRAM) | Corsair Vengeance Pro 2x8GB DDR3-1866 C9 |
$104.99 | $118.36 |
| Storage (SSD/HDD) | Corsair Force LS 240 GB SSD | $94.99 | $99.51 |
| Power Supply (PSU) | Corsair CS650M Gold | $94.99 | $94.99 |
| Chassis | Corsair Carbide 200R | $59.99 | $59.99 |
| CPU Cooling | Corsair Hydro H60 | $64.99 | $64.33 |
| Operating System | Windows 8.1 64-bit OEM | $99.99 | $99.99 |
| Extras | None | ||
| Total | $1,499.91 | $1,522.77 | |

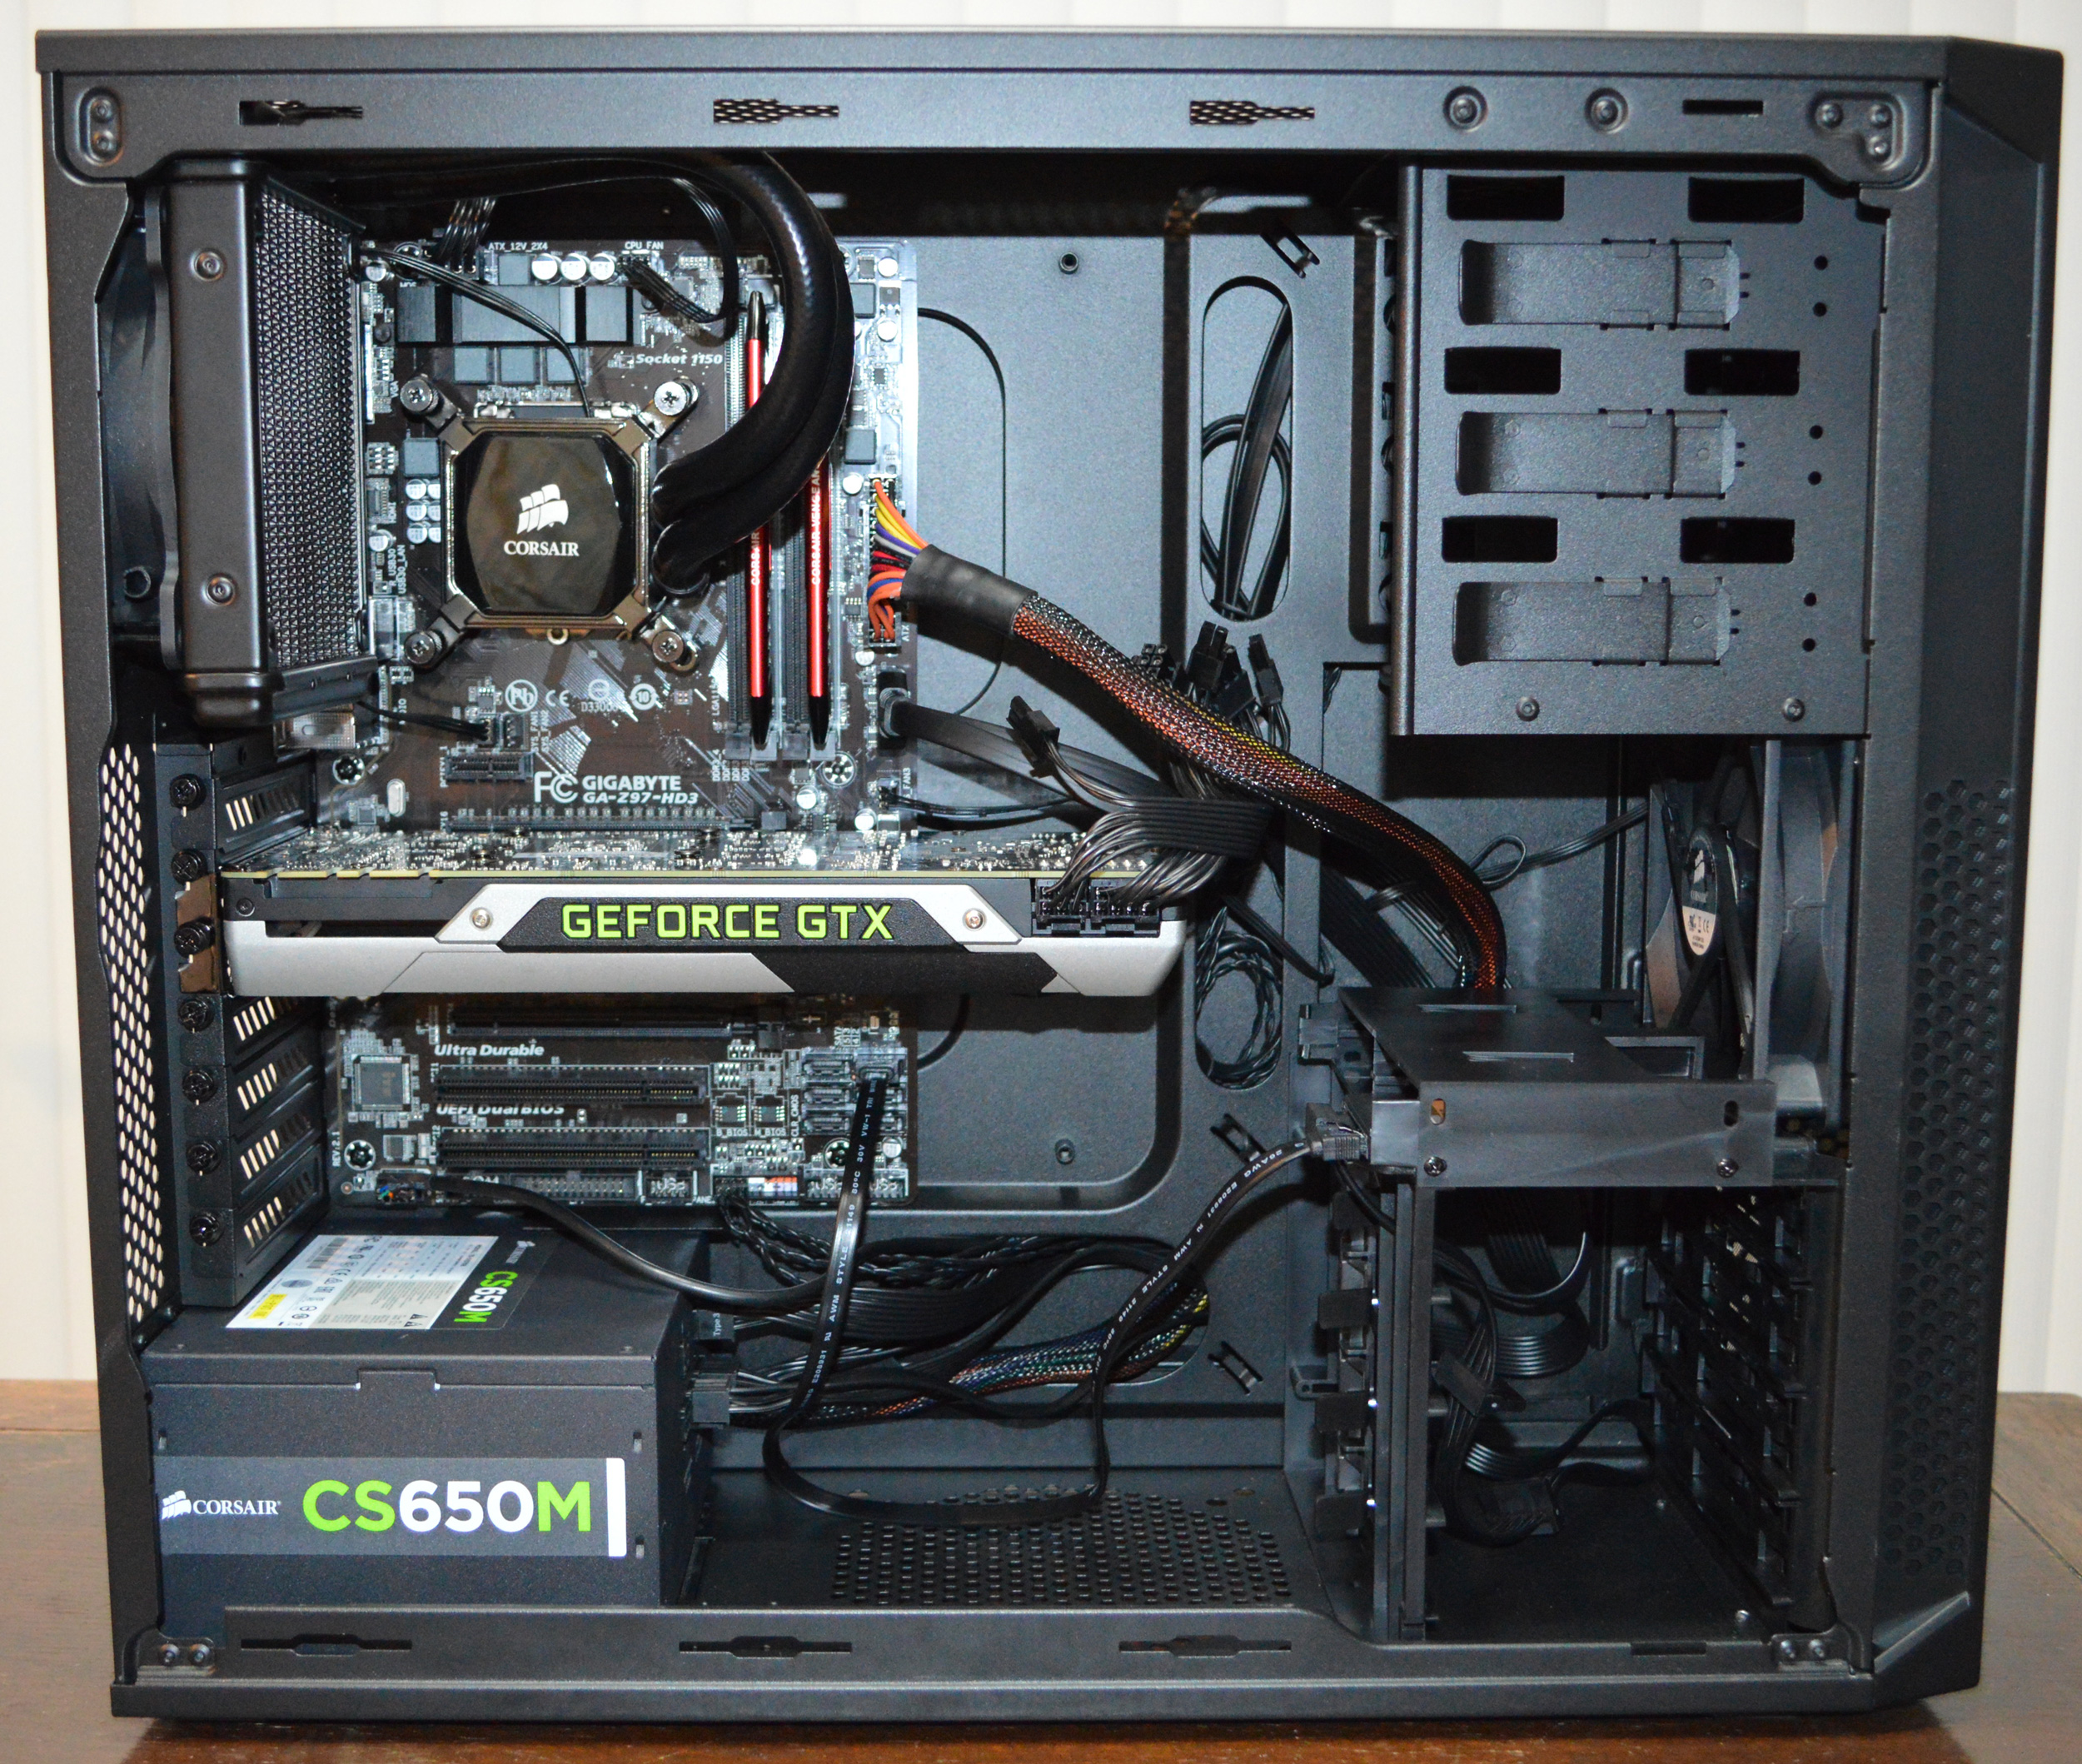
Starting with the case, The Accelerator uses Corsair’s Carbide 200R case. In keeping with Corsair’s focus on performance, Corsair has picked a simple, value-oriented mid-tower to hold their design. I don’t think the 200R qualifies as a no-frills case, but it certainly qualifies as a few-frills case. Among other things you’ll find plenty of mounting locations for fans, thumbscrews for almost everything, and even toolless mounting for the 3.5” and 5.25” drive bays. However beyond that the 200R doesn’t feature any extra frills such as advanced cable routing systems or a polycarbonate window. This is a basic case clearly meant for someone who just wants to throw together a computer that’s easy to work in and works well.
Speaking of being easy to work in, though it’s a mid-tower I’ve found the 200R convenient to work in despite my big hands. There’s plenty of space around the motherboard and I didn’t run into any sharp edges while working in it.
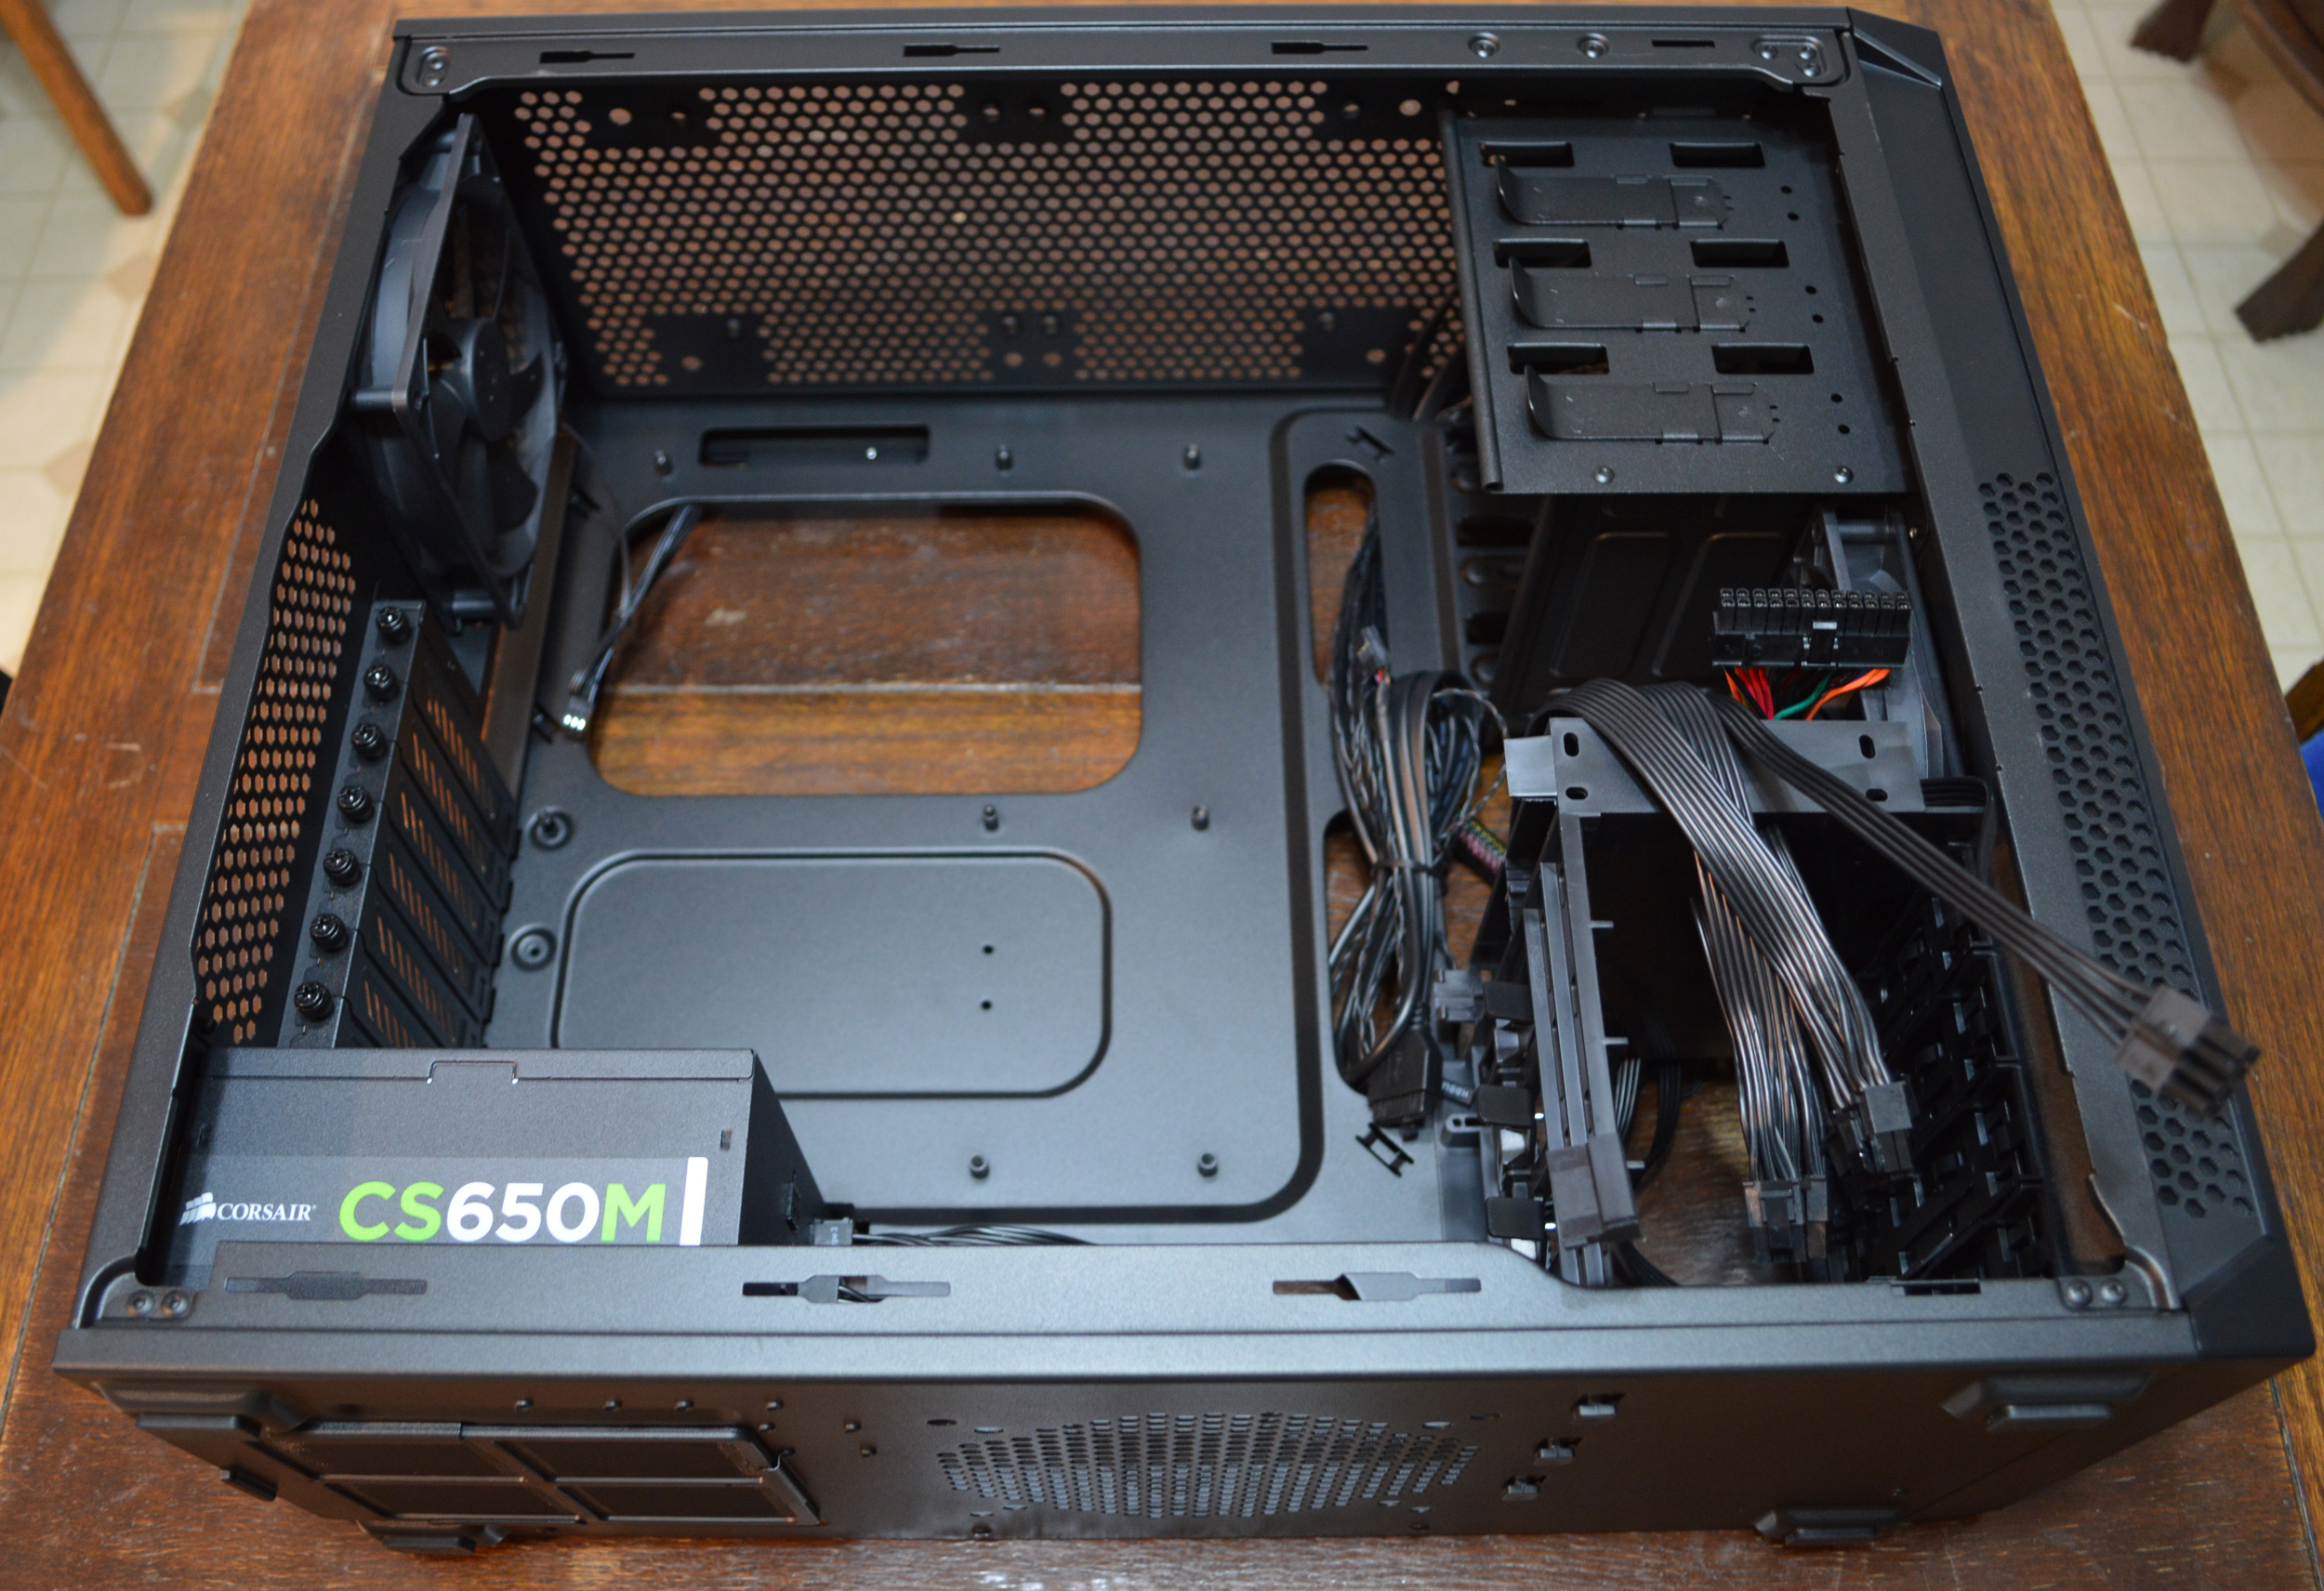
Powering The Accelerator is a Corsair CS650M PSU. This is a PSU that Corsair says is designed for basic and midrange systems, but don’t let that description fool you. The CS650M is a capable PSU for a straightforward gaming system and the Gold level efficiency means that it doesn’t sacrifice on efficiency even with its basic designation.
The CS650M is a semi-modular PSU, which makes it especially handy for this build. With only a CPU, video card, and a single 2.5” SSD to power, I only needed to install 3 of the PSU’s 5 modular cables, keeping down the amount of cable clutter and routing that I needed to do. For the purpose of this build I went ahead and installed both PCIe power cables, as video card best practices are that you want to use separate cables for each PCIe power socket when possible. Meanwhile the cables themselves are nothing fancy; there’s no sleeving on any cable besides the 24-pin ATX power cable, and the rest of the cables are the flat ribbon-type, making them both a bit easier to work with in the limited space behind the motherboard, and a bit harder to work with when laying them out for bending.
For The Accelerator build, I routed all of the cables behind the motherboard tray, routing them back to the front as necessary. There’s sufficient space behind the motherboard tray for cables without getting cramped, so this is pretty easy to pull off. However I am thankful that the CS650M’s 8-pin EPS power connector can be split up into a pair of 4-pin connectors. The Gigabyte board does use 8-pin EPS, however getting the combined connector through the cable routing hole at the top of the 200R case is a tight squeeze, which means it’s a lot easier to break up the cable and re-assemble it after pulling it through.
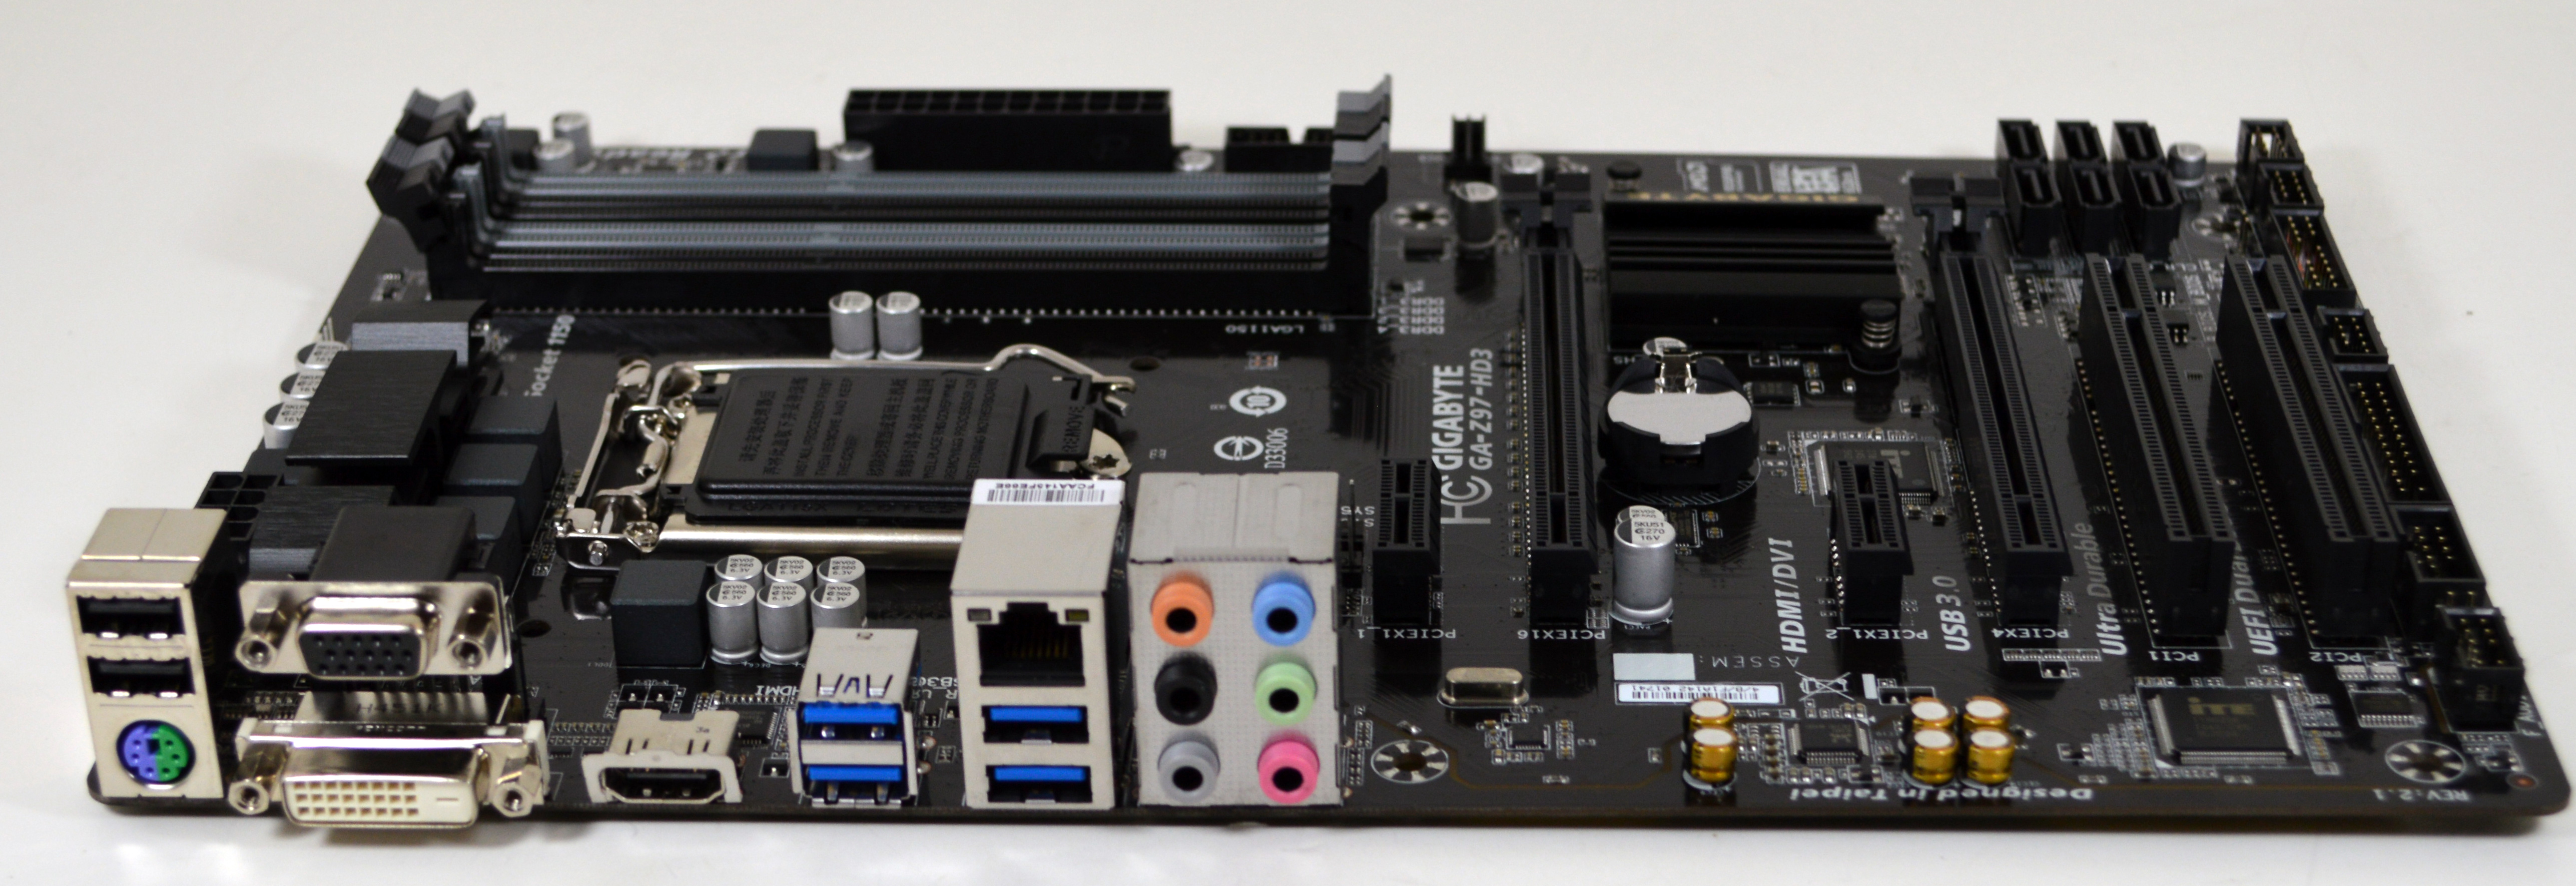
Moving on, Corsair picked out a Gigabyte GA-Z97-HD3 motherboard for their build. This is one of Gigabyte’s lower-end Z97 boards, enabling the overclocking that Z97 is known for but not bringing too much else in the way of frills. Only a single PCIe x16 slot is a true x16 slot, and is routed directly to the CPU. The other x16 slot is electrically an x4 slot being fed by the Z97 chipset, so while AMD’s Crossfire technology is supported, NVIDIA’s SLI tech is not.
Populating the GA-Z97-HD3 is Intel’s fastest 4th gen Core i5 processor, the 4690K. The i5 version of last year’s Devil’s Canyon refresh, this is Intel’s lower-cost enthusiast-level overclocking processor, featuring an unlocked multiplier, and the various overclocking enhancements that went into the chip packaging for Devil’s Canyon.
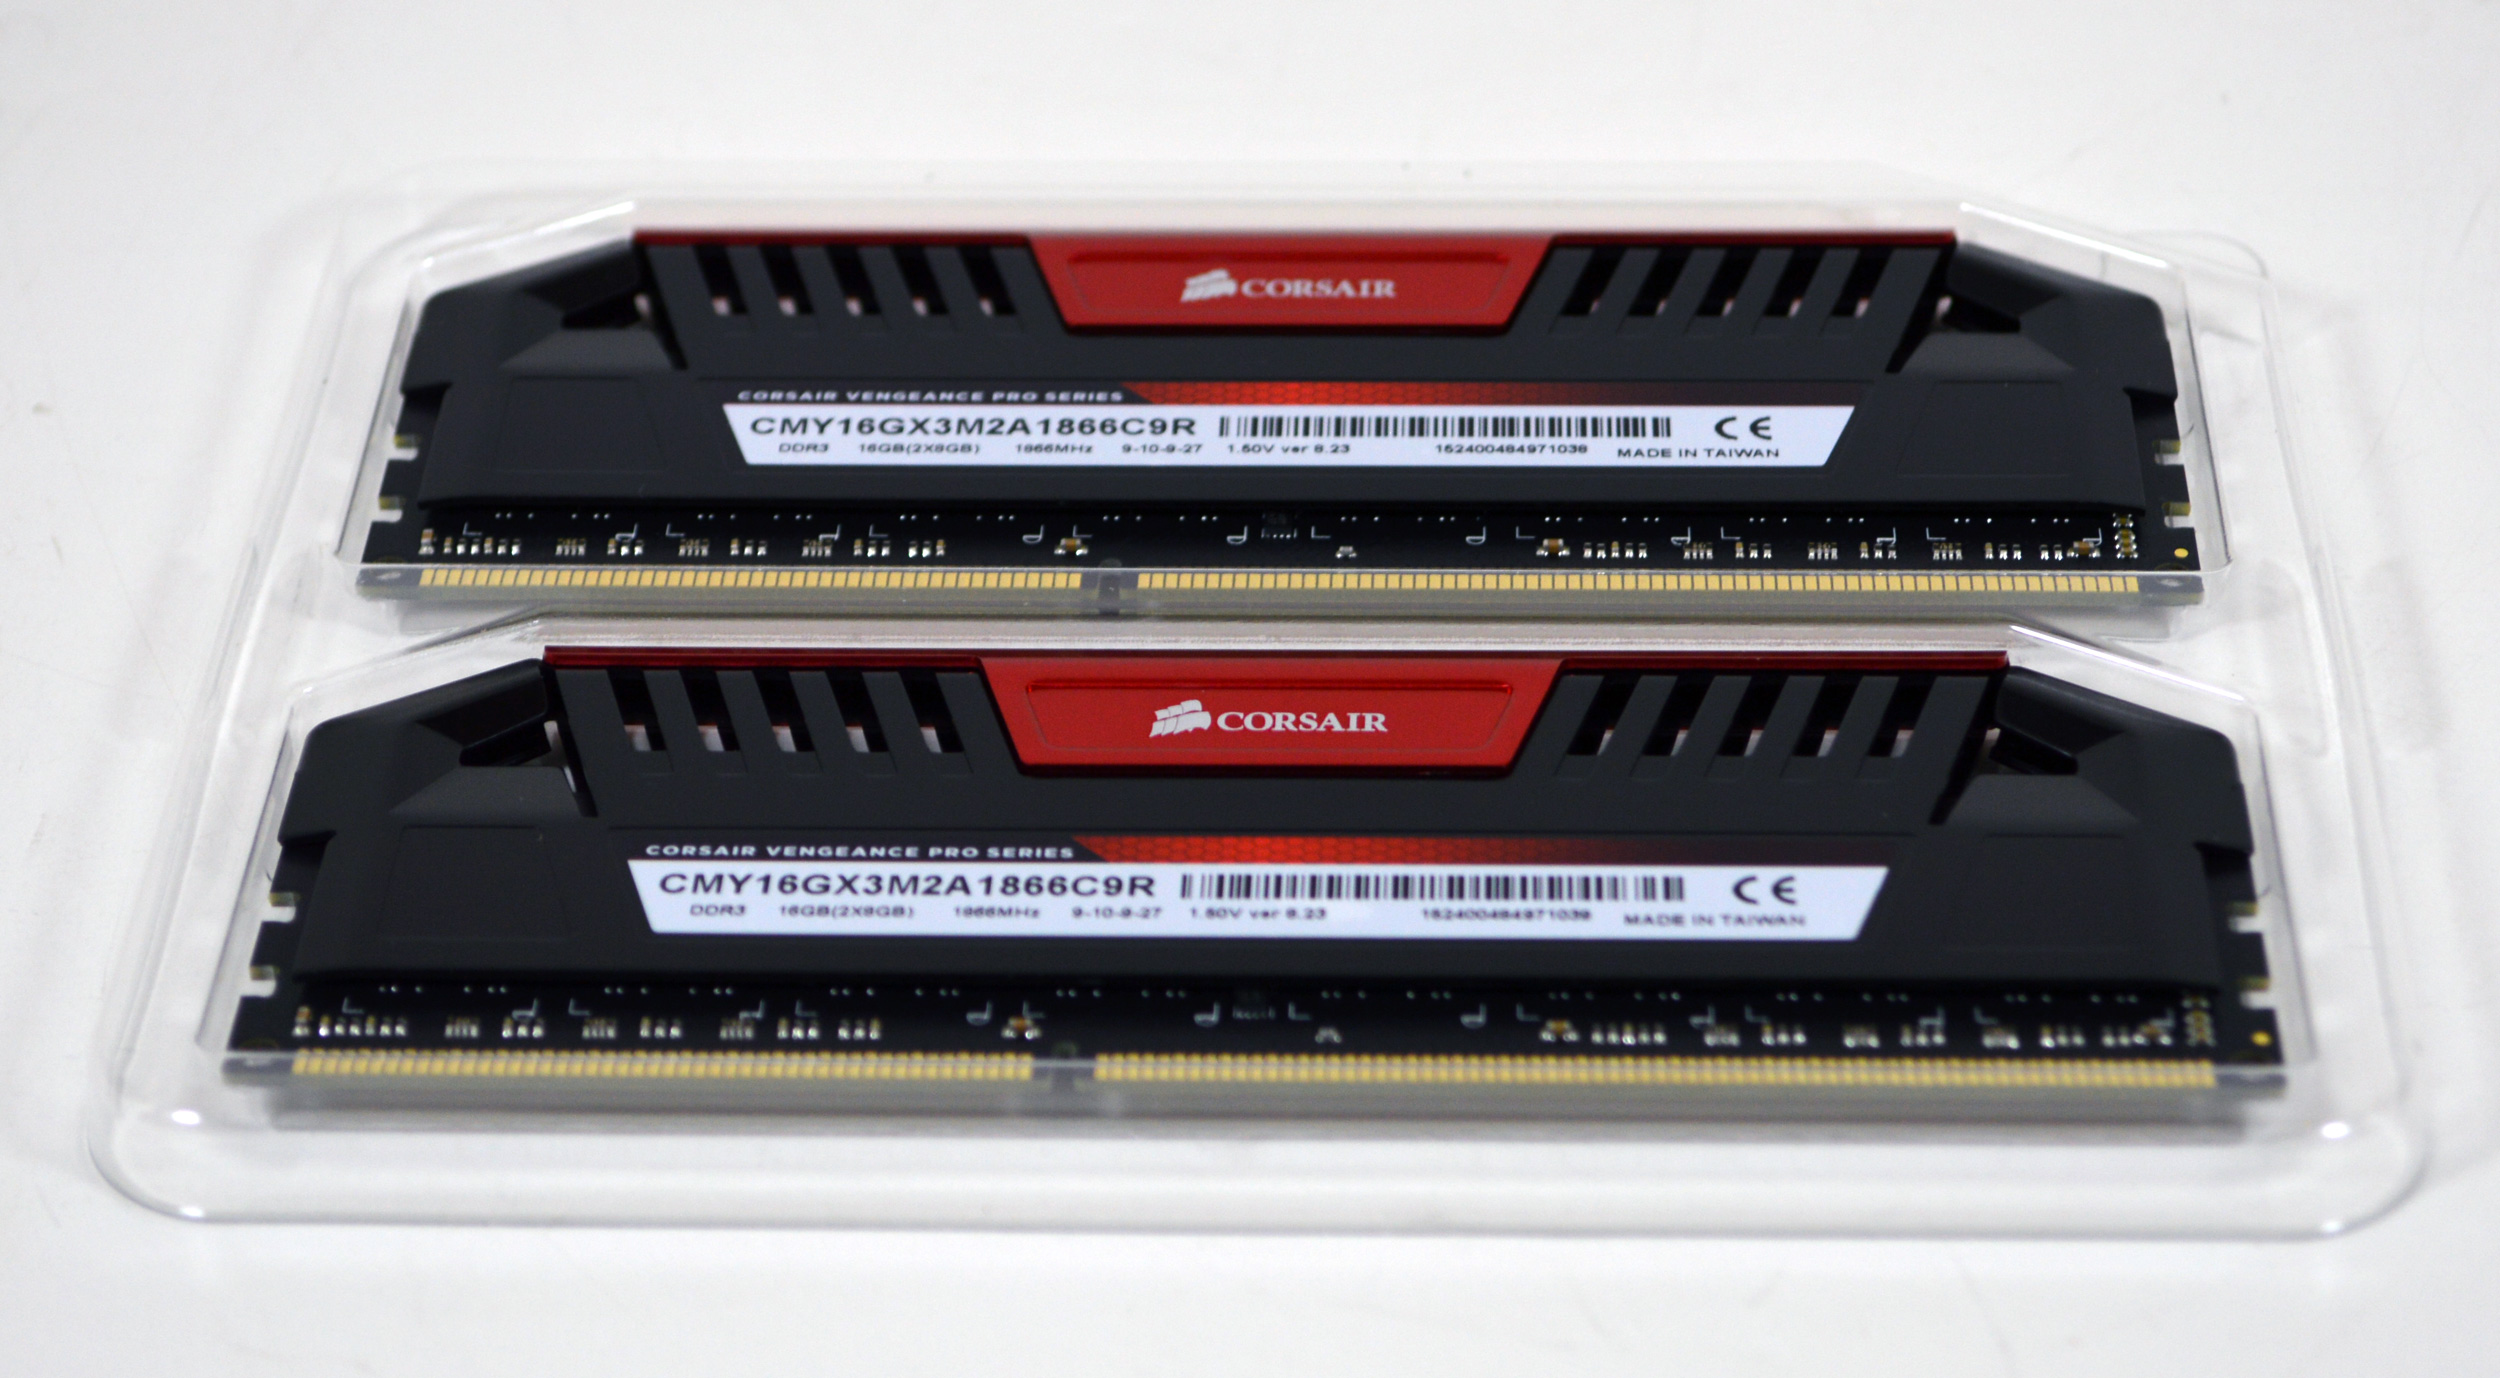
Meanwhile for memory we’re once again looking at a Corsair part, with a 2x8GB set of Corsair’s DDR3 Vengeance Pro memory. This memory does DDR3-1866 with CAS9 latency at 1.5v, hitting a nice balance of bandwidth and latency without needing any further voltage.
Since we’re using a Corsair closed loop liquid cooler, pre-assembly was a breeze here. After installing the Core i5 into the Gigabyte’s motherboard socket, a quick trip to the board’s manual pointed out that I should use the grey slots for the two sticks of RAM. These days it seems like about half of the motherboards I run into favor the slots closest to the CPU socket and the other boards favor the slots farther away from the socket, and in the case of the Gigabyte board it’s the latter. Which also makes this one of the few times where checking the manual really is necessary.
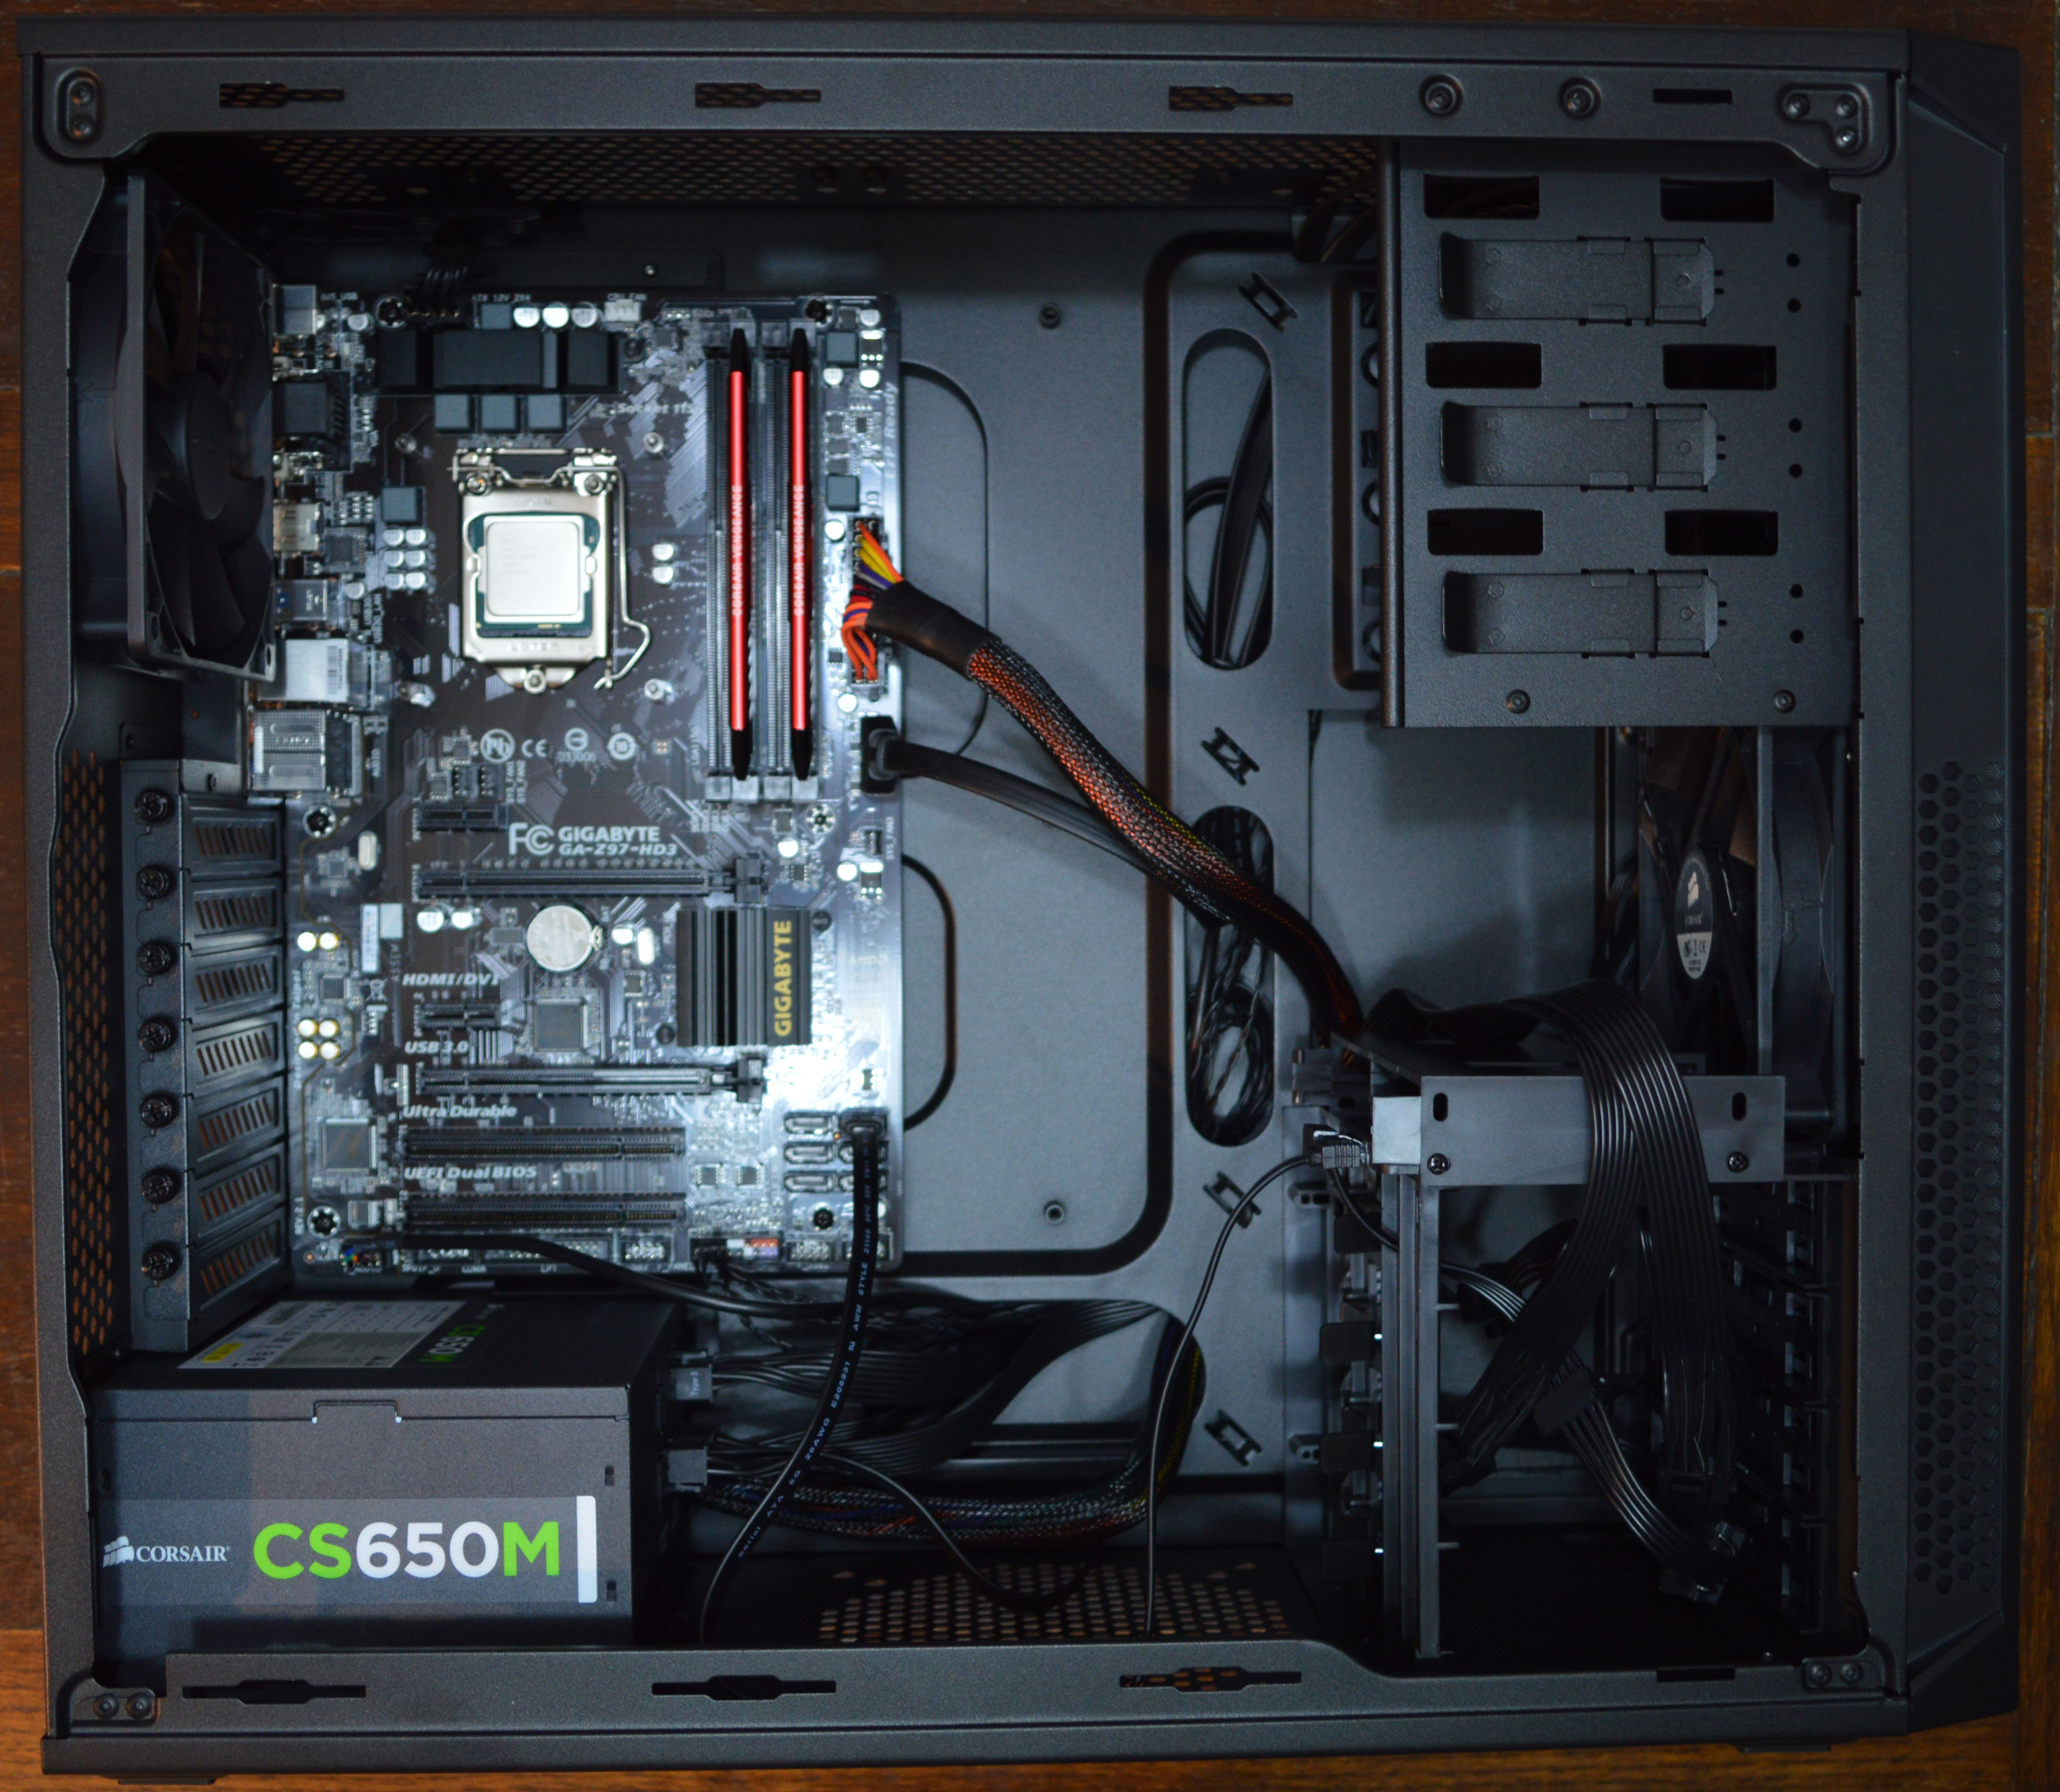
The GA-Z97-HD3 is actually a rather compact board, measuring about 7.5” wide, so it doesn’t end up taking up all that much space in the 200R case. This means the cables have to stretch out a bit more to reach the motherboard, but otherwise it’s not any harder to work with. And since this isn’t a windowed case, I don’t think anyone will mind seeing a bit of cable when it’s open.
I opted to install the motherboard second after installing the PSU first, so that I could already have some of the cable positions worked out. Plugging in various cables after the fact was about as easy as could be, with the front panel cables being easy to route over to the bottom left corner, while the USB 3.0 cable is routed to the right edge of the board, next to the ATX power cable.

Meanwhile with only a single SSD here, cable routing for drives isn’t too bad. The 200R has dedicated 2.5” bays, though they do face towards the motherboard rather than towards the back of the case. So there’s no real way to hide the cables here by routing them behind anything, meaning I had to run the cable in front of the motherboard. However the SATA power cable was easy enough to route through the empty 3.5” bays, allowing me to pull off a slightly cleaner look to the case.
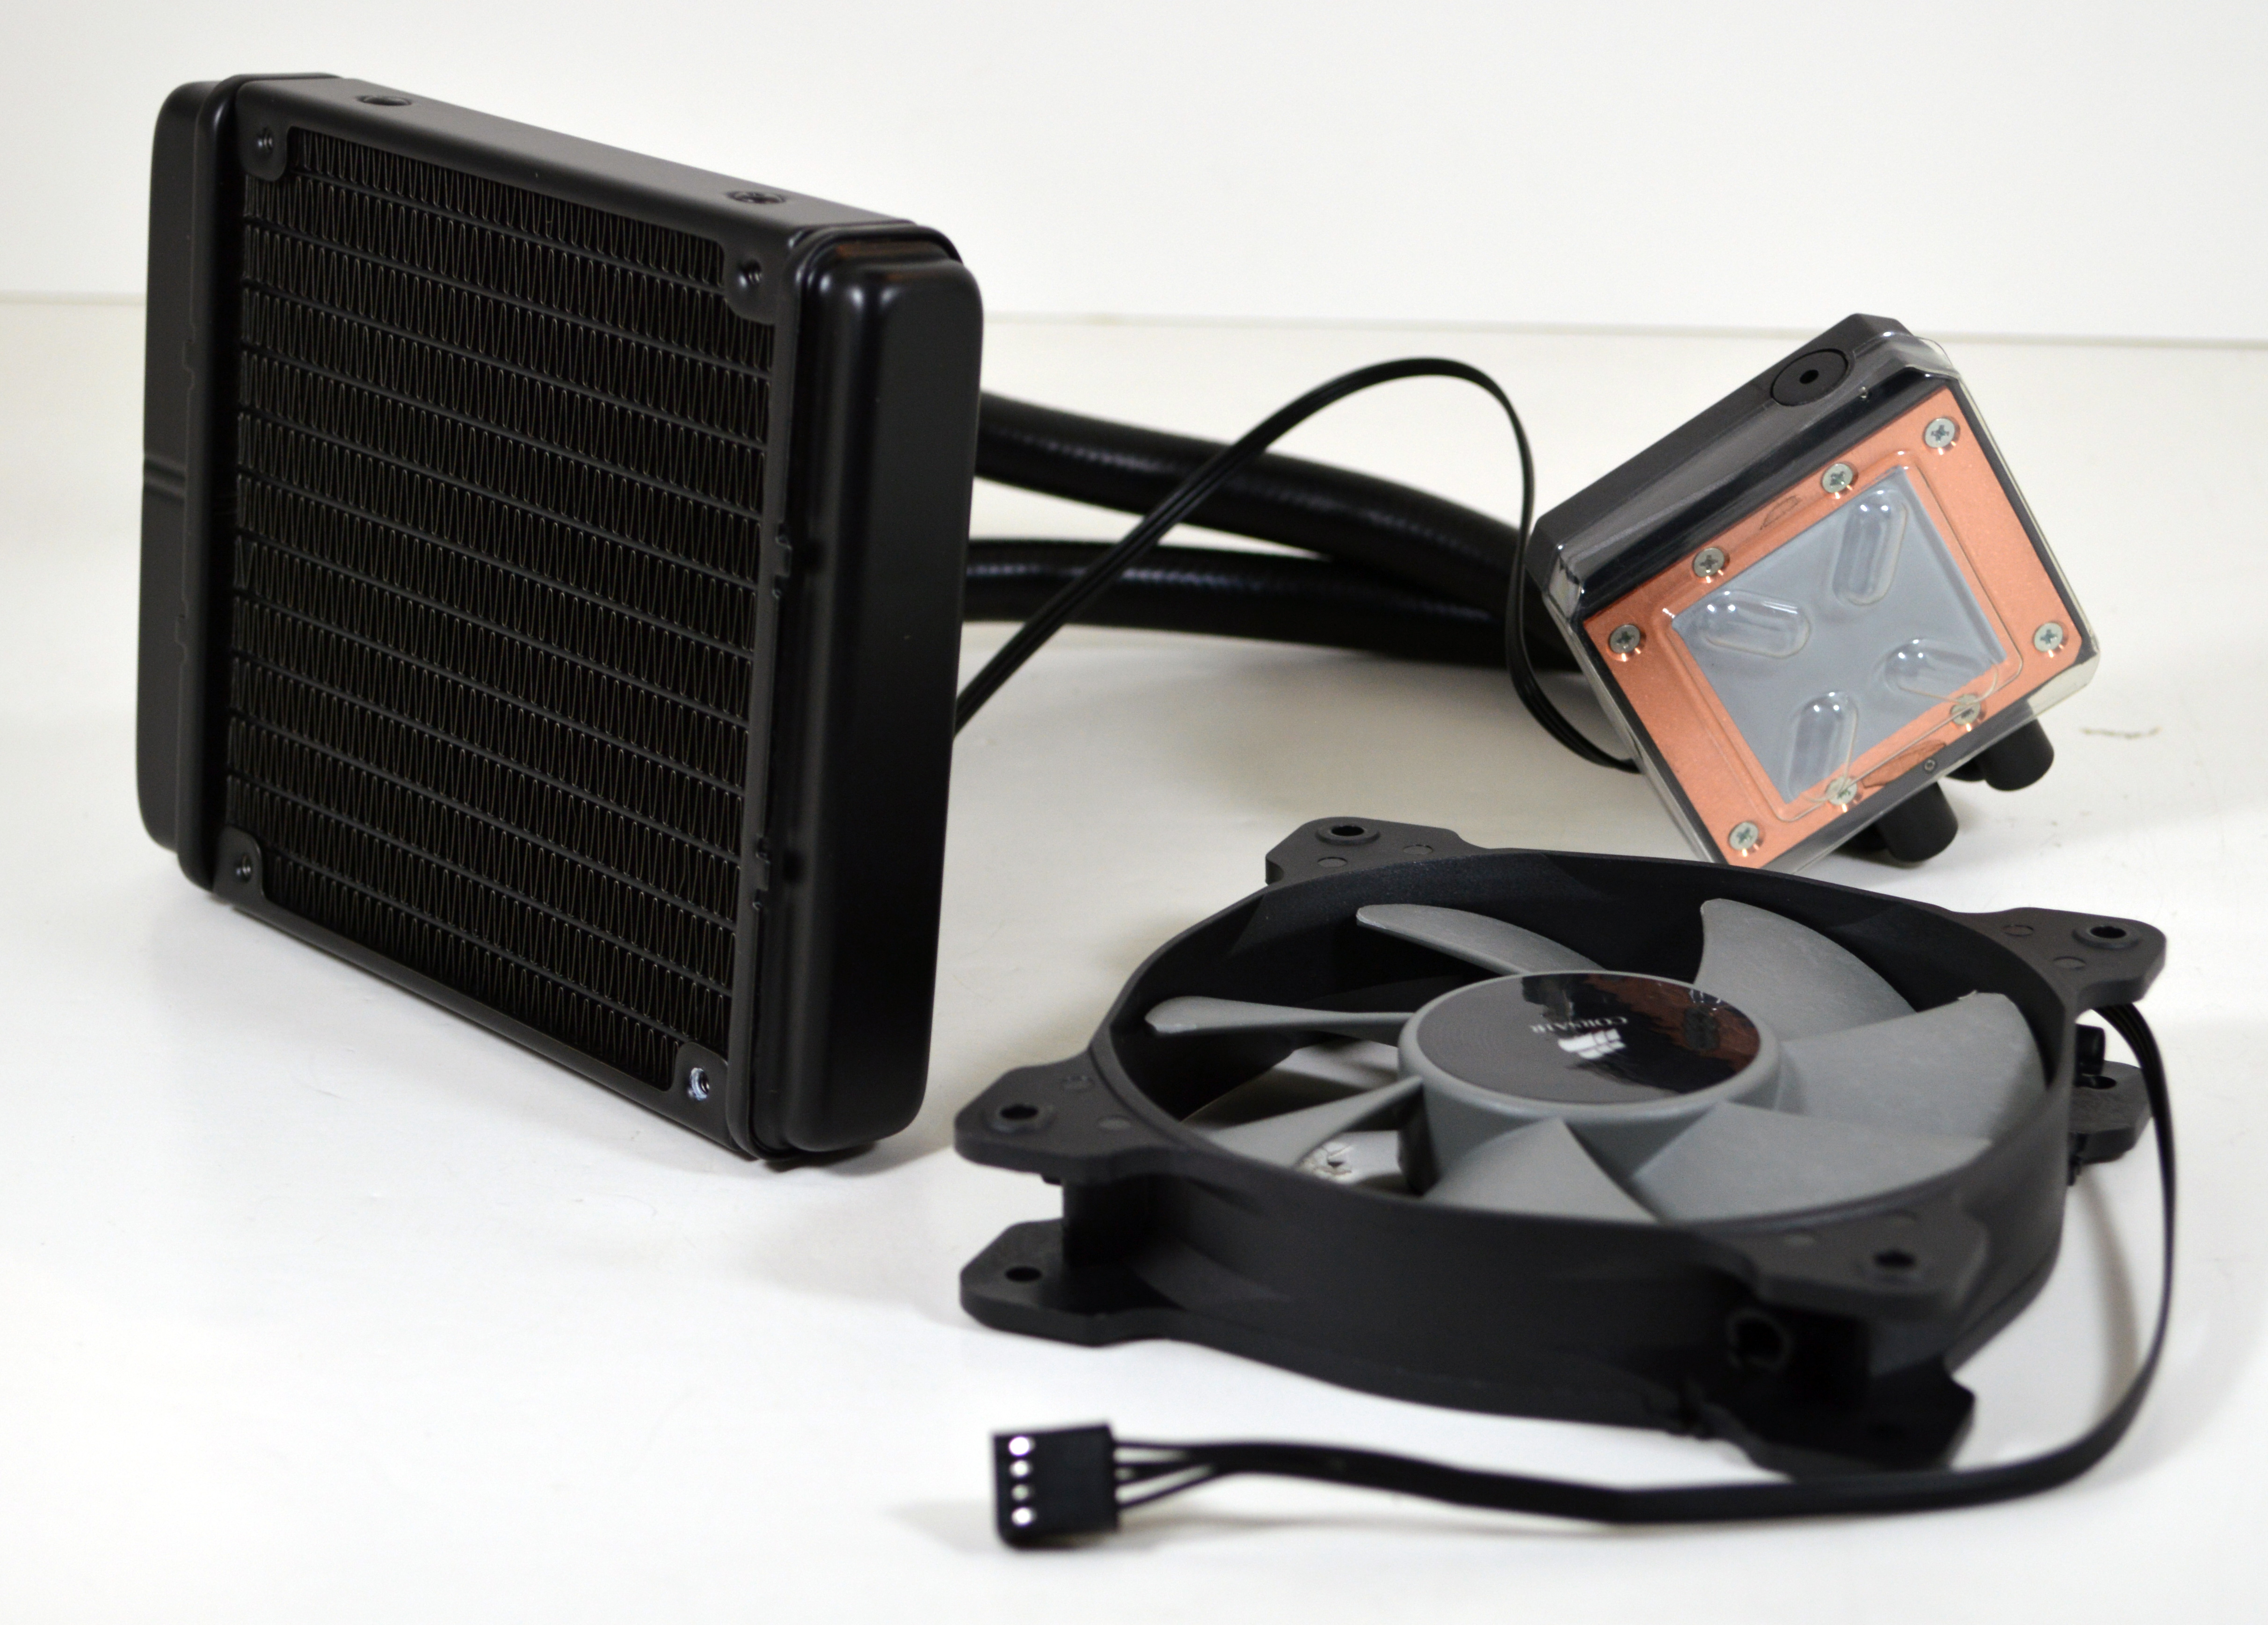
For cooling, Corsair’s build calls for the final Corsair component, the Hydro Series H60, one of Corsair’s closed loop liquid coolers. In Corsair’s now extensive lineup of CLLC’s this is one of the lower-end models, featuring a standard thickness 120mm radiator and a single accompanying fan. The H60 is still rated to move quite a bit of heat though, making it a good match for the 4960K CPU when overclocking.
Since this is one of the lower-end CLLC models, the pump block is a “dumb” block featuring no logic or settings of its own. The pump occupies a 3-pin fan header while the 120mm fan occupies a 4-pin CPU fan header.
When it came to installation, the 200R has a number of open 120mm+ mounting points that could have housed the H60. However since all of the other major components in The Accelerator are self-exhausting – the video card is a blower-type card, and the PSU is isolated as well – there aren’t any major sources of head in this build besides the CPU. Other than that what other heat there is will be what radiates off of the video card, and what little heat is produced by the mobo and SSD.
For that reason I opted to remove the 200R’s included 120mm exhaust fan and install the H60 in its place. The air coming into the H60 is still plenty cool due to a lack of other heat sources, and this keeps the case’s front-to-back airflow intact. More importantly it means I was able to keep the fan noise down, since again we don’t need much in the way of fans on this build with the blower-type video card.
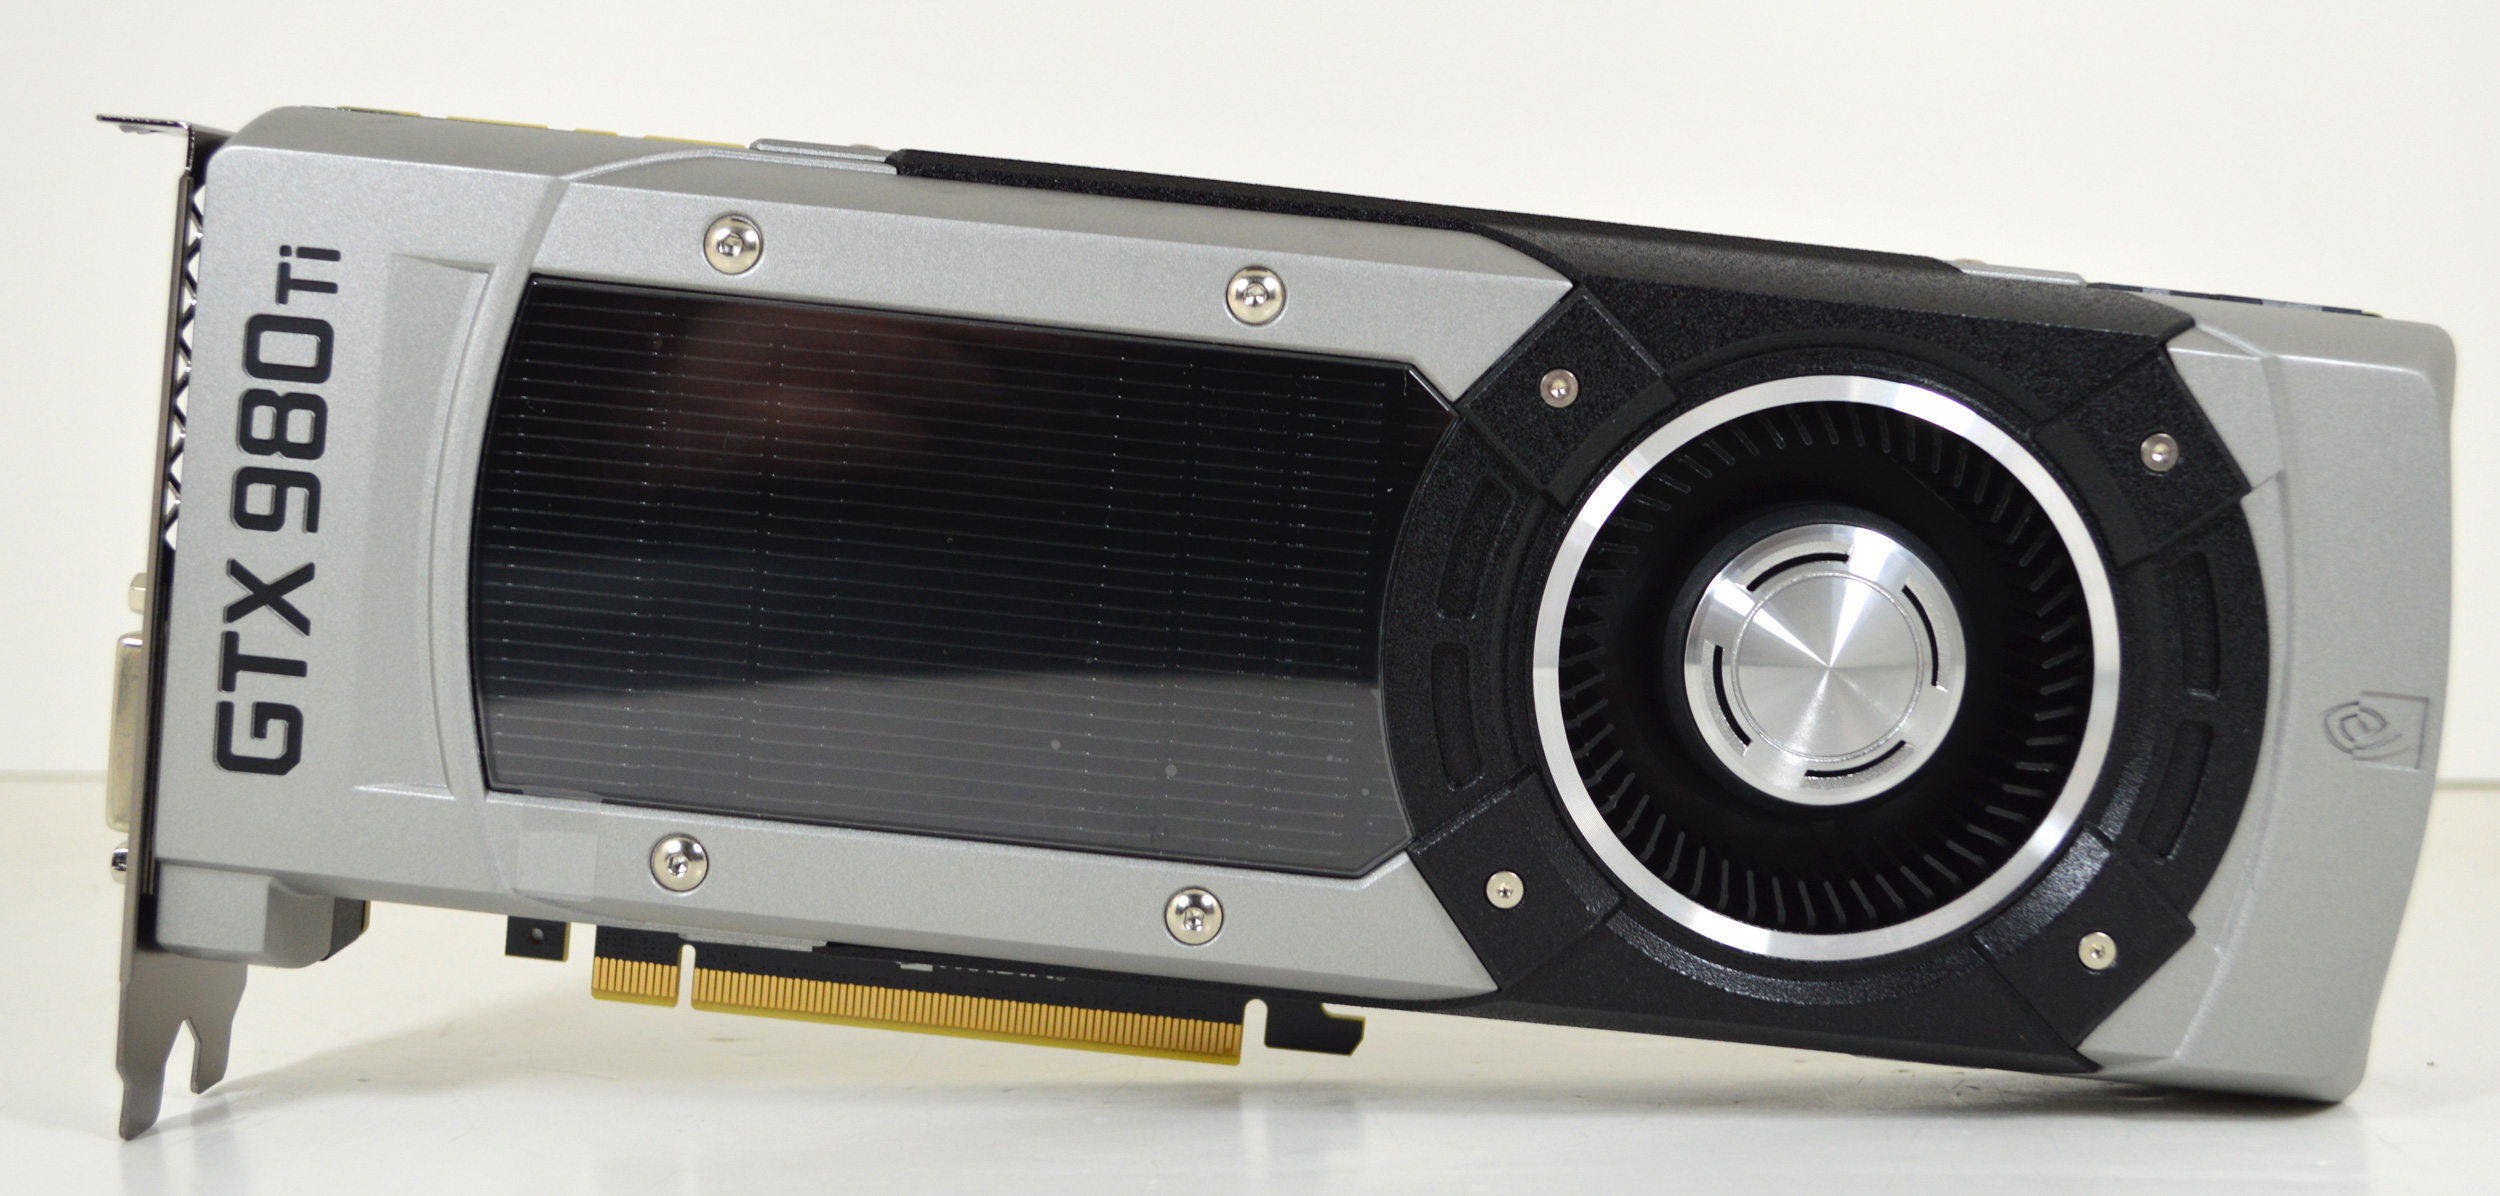
The final piece of the puzzle was installing The Accelerator’s video card, an aptly chosen Zotac-branded GeForce GTX 980 Ti. This is a reference model card featuring NVIDIA’s blower, so I already know from earlier experience that we should be in for a relatively quiet experience here. Meanwhile as far as performance goes, Corsair had to sacrifice in other areas to keep the build cost down, but the end result was that they were able to squeeze in what’s arguably NVIDIA’s flagship video card for this generation, the GTX 980 Ti. The GTX 980 Ti offers great performance and it means The Accelerator should handle 1440p with ease, while even 4K is within its reach for some games.
On a side note, the narrower than average profile of the Gigabyte motherboard means that the installed GTX 980 Ti makes for a humorous sight. At 10.5” the GTX 980Ti overhangs the board by 3”; this is the most expensive component in the build, and it shows.
Overall The Accelerator proved to be a fairly easy build, though it wasn’t without its last minute surprises. Upon booting the system and dropping into the UEFI configuration environment, I found the CPU operating at a toasty 70C. As it turns out Gigabyte has the GA-Z97-HD3 default to running the system fan headers at a lower voltage for noise purposes, which in this case is also where the H60 pump is plugged into. So a quick change to full speed mode on the right header brought the pump up to speed, and brought idle temperatures back down to around 30C.
Meanwhile for whoever wins this PC, I’ll be shipping it with the initial Windows 8 installation complete, and for good reason. Since Corsair skimped in other areas to get such a powerful CPU and GPU combination, the build doesn’t include an optical drive. This means that it’s not possible to install Windows 8.1 as it ships on an optical disk, as the system would need to load the OS off of a USB drive. Going forward Windows 10 will be shipping on USB flash drives for this precise reason, but it goes without saying that The Accelerator is built on the assumption that the builder already has another PC (or two) to help prepare everything it needs.
Much the same can be said of its storage. The 240GB SSD is speedy, but for a gaming system it’s not very big. With more recent games coming in at 50GB+, you won’t be able to hold very many games on the SSD. As a result this build also assumes that the builder will be bringing some additional storage as well, as it needs either another SSD or a HDD to really have enough space to hold a suitable number of games.
And with that, The Accelerator has been built and is ready for the last phase of the Build-A-Rig challenge: benchmarking. Be sure to tune in next time as we put The Accelerator through its paces and see just how much performance Corsair has been able to put together on their $1500 budget.
The End Result
Zotac
For looks and cleanliness, the Zotac system looks significantly better. Aside from the near-black internals accentuated by the lights from the GPU and the DRAM, cable management removes some of the more garish ends of the power supply should someone decide to shine a light in (or the eventual winner uses the LED kit also included in the bundle). A minor concern comes from the extra cable space behind the motherboard tray due to the large extension cables to improve the look, however once installed it becomes a relative non-issue.
Zotac's 'Hey Good Lookin' System (above)
Chinny Chuang and Buu Ly from Zotac (below)

Corsair
In contrast, the Corsair system is the quintessential black-box PC designed to be used, not seen or heard. It can be quite hard to argue with the performance components under the hood, and we expect to see monster performance results, but a box has nothing to show off if the winner wants to take it to LANs or ends up with it on their desk. The danger with a bland machine is putting it on the floor and forgetting about it, allowing dust to build up, whereas a windowed machine at least gets some obvious hint if it needs a cleaning.
Corsair's 'The Accelerator' Build (above)
Dustin Sklavos from Corsair Memory (below)

Performance results are inbound for the final part of Build-A-Rig Round 1, with both of these machines nearing the end of their testing and we will post those results soon.
How to Enter
For Build-A-Rig, we are posting the survey link on each piece so users can enter at any time. The final entry date is August 1st, as the Build-A-Rig challenge is quickly coming to a close..
For the purposes of the giveaways, we should state that standard AnandTech rules apply. The full set of rules will be given in the survey link, but the overriding implementation is that the giveaways are limited to United States of America (US50), excluding Rhode Island, and winners must be 18 years or older.

With apologies to our many loyal readers outside the US, restricting the giveaways to the US is due to the fact that AnandTech (and more specifically our publisher, Purch) is a US registered company and competition law outside the US is very specific for each nation, with some requiring fees or legal implementations to be valid with various consequences if rules aren’t followed. It’s kind of difficult for the rules of 190+ countries/nations worldwide to all be followed, especially if certain ones demand fees for even offering a contest or tax on prizes. We recognize that other online magazines and companies do offer unrestricted worldwide competitions, but there are specific rules everyone should be following in order to stay on the side of the law. That’s the reality of it, and unfortunately we cannot change on this front, even with the help of Purch.
The survey link is:
http://www.surveygizmo.com/s3/2209797/AnandTech-Newegg-Build-A-Rig-Challenge-Sweepstakes-Q2-2015


