Original Link: https://www.anandtech.com/show/7865/asrock-fm2a88x-extreme6-review
ASRock FM2A88X Extreme6+ Review
by Ian Cutress on March 19, 2014 11:59 AM EST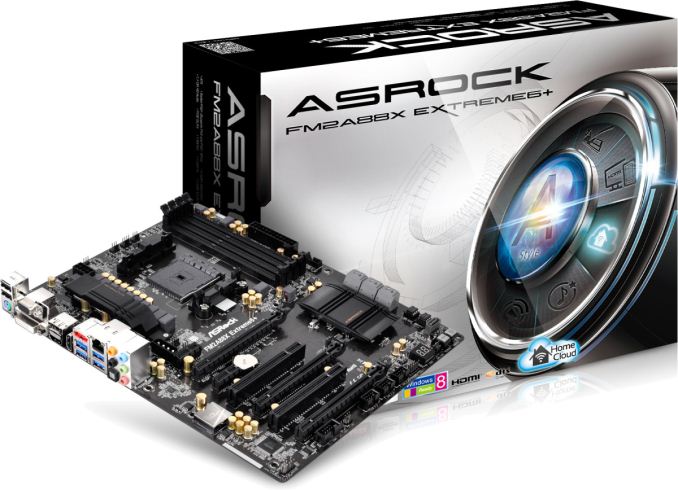
For the
ASRock FM2A88X Extreme6+ Overview
The AMD Kaveri launch was a bit of a mêlée – two weeks to test a dozen processors in our new benchmarking suite, both in terms of CPU and IGP performance, with the big write up at the end. At the time I used the FM2A88X Extreme6+ motherboard, and in order to avoid complications I put on some rock solid air cooling and it sailed through the process. When I removed the extra cooling, a heat-related issue started to occur. I noticed the VRM heatsink getting hot, and as a result the system was reducing frequencies after extended workloads. After checking everything in the software side was OK, I got an infrared thermometer to probe some of the components. When the VRM heatsink showed 88C after 5 minutes of encoding work, and 97C after an hour, I had found the culprit of the issue. 88C is a rather high temperature, despite these components are usually rated to 105C. Since I finished testing the motherboard, ASRock has launched several new BIOSes, which I tested after consulting ASRock. The final result was that the system till reached 80C after 10-15 minutes of hard CPU work (normal work rather than a power virus) and 92C after 25+ minutes.
This might be seen a stern start to a motherboard review, especially one that has won awards elsewhere and performed well in our high-end air cooled testing. The FM2A88X Extreme6+ is a full sized ATX motherboard using the A88X chipset, supplanted with an 8+2 power phase design. From the chipset we have eight SATA 6 Gbps ports (7 regular + 1 eSATA), 6 USB 3.0 ports, an x8/x8 + x4 PCIe layout and support for up to 64GB DRAM from four memory slots. ASRock's website states that this motherboard can be part of a system that supports 4096x2400 at 60 Hz via DP 1.2. Other video outputs are present as well (VGA, DVI-D and HDMI).
ASRock’s additions to the base chipset include support up to DDR3-2600 on the memory, a Realtek ALC1150 audio codec (rated at 115dB SNR) with a TI NE5532 headset amplifier, a Qualcomm Atheros AR8171 network interface, six fan headers, power/reset buttons, a two digit debug, an ASMedia ASM1042 for two additional USB 3.0 ports and the ASRock BIOS/Software ecosystem that is ever improving.
In our performance testing, the motherboard and CPU combination trades blows with another FM2+ motherboard we are currently testing, winning in a few CPU and gaming tests. The system scores under 10 seconds for a Windows 7 POST time, although the DPC Latency is matching that of our Intel 8-series results oddly enough.
ASRock is often very aggressive on pricing, and the FM2A88X Extreme6+ comes in at $105, near other motherboards from ASUS, GIGABYTE and MSI. ASRock is continually building an ecosystem around the BIOS utilization and software functionality in order to make their products more desirable, though additional cooling on this model might be recommended.
Visual Inspection
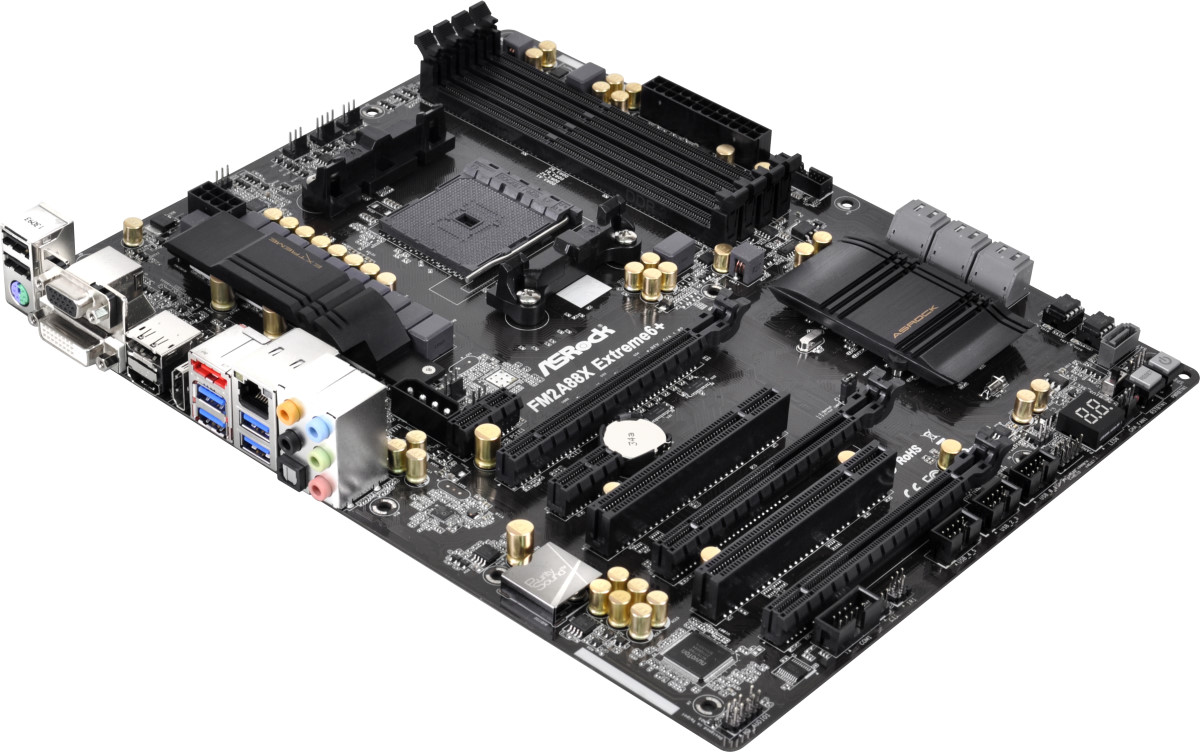
ASRock’s 2013 livery moves to 2014 with the higher end chipset SKUs bathed in black and gold colors – the FM2A88X Extreme6+ is no exception.
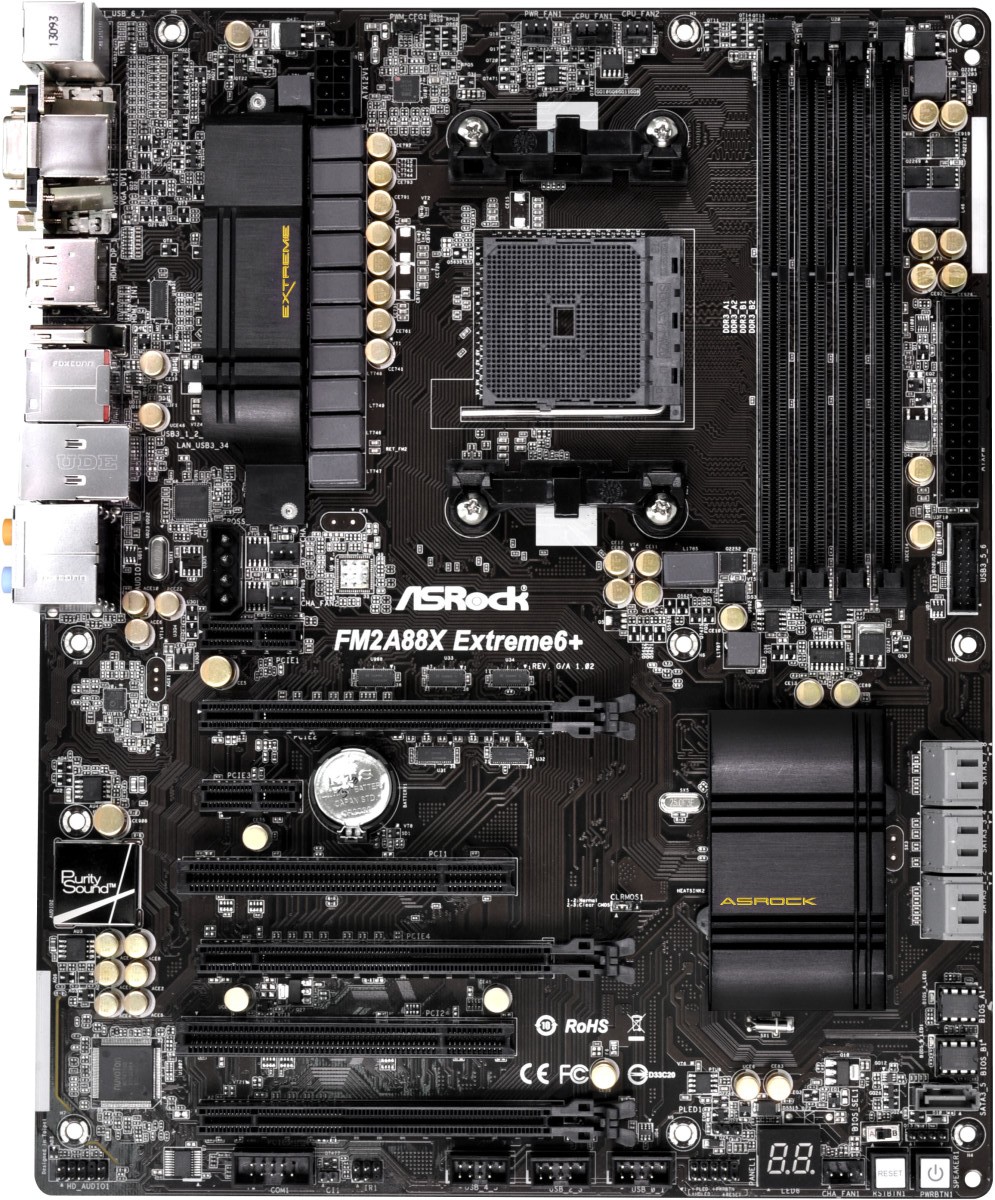
The socket area has no obvious outline, but opens up the AMD socket to large coolers in all directions. The power delivery to the left of the socket gives the 8+2 configuration, although the heatsink provided is quite small with no extension or additional fan. There are five fan headers around the socket, three above (CPU 4-pin, CPU 3-pin and PWR 3-pin) and two underneath the power heatsink, both CHA 3-pin. The final fan header on the motherboard is a CHA 4-pin in the bottom right.
Moving clockwise around the motherboard, the DRAM slots are double ended latch mechanisms, although they use the thinner latches with a full sized slot. Underneath the 24-pin ATX power connector is a USB 3.0 port, followed by six of the SATA 6 Gbps ports. ASRock provides two BIOSes on the Extreme6+, both replaceable should one fail. Next follows another SATA 6 Gbps port and a BIOS selector switch.
The chipset heatsink is small to cater for the A88X chipset (~7W). The sole additional controller on the motherboard is an ASMedia ASM1042 – a USB 3.0 controller near the rear IO that does not need a heatsink.
The PCIe layout uses two PCIe 2.0 x1 small slots, two PCI slots, two PCIe 3.0 slots (in either x16/- or x8/x8 mode) and a final PCIe 2.0 x4 slot from the chipset. This final slot is designed for other non-gaming GPU PCIe devices, although it can be used for 3-way CrossFire at a lower-than expected scaling rate. For users wanting to put three power-hungry devices into the full length PCIe slots, ASRock provides a 4-pin molex connector for extra power. In my opinion, the location of this connector is frustrating, requiring cables to reach over the motherboard. Other manufacturers have utilized SATA power, or 6-pin PCIe connector, at the edge of the motherboard. This is a preferred location, as it does not require cables reaching across the system.
On the bottom of the board we have a good combination of power and reset buttons coupled with a two-digit debug LED. If I had my way, these would be on all motherboards to help with debugging issues. Also present are three USB 2.0 headers, a COM header, a Front Panel audio header, a front panel header and one of the aforementioned fan headers.
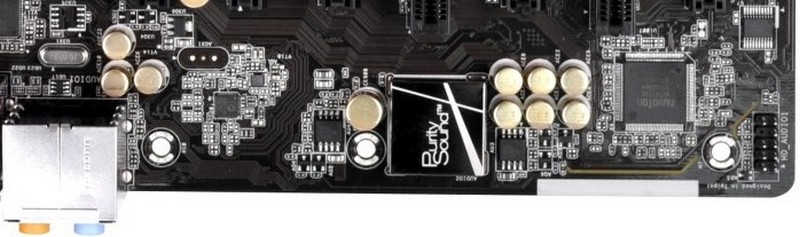
ASRock’s Purity Sound paradigm on the audio consists of a Realtek ALC1150 audio codec in an EMI shield, filter caps, a headphone amplifier and ASRock also list PCB shielding to help improve the audio signal.
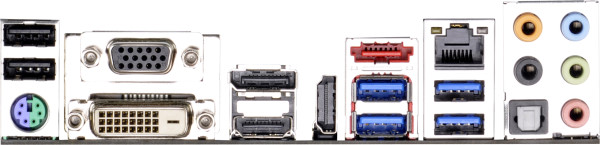
The rear IO of the motherboard consists of two USB 2.0 ports, a PS/2 combination port, VGA, dual-link DVI-D, a DisplayPort, a HDMI-out, a HDMI-in, an eSATA 6 Gbps (A88X), two USB 3.0 ports (A88X), two more USB 3.0 ports (ASMedia ASM1042), an Ethernet port (Atheros AR8171), an optical SPDIF output and audio jacks.
Board Features
| ASRock FM2A88X Extreme6+ | |
| Price | Link |
| Size | ATX |
| CPU Interface | FM2+ |
| Chipset | AMD A88X (Bolton D4) |
| Memory Slots |
Four DDR3 DIMM slots supporting up to 64 GB Up to Dual Channel, 1333-2600 MHz 2600 MHz with two modules |
| Video Outputs |
HDMI at 4096x2160 (24 Hz) DVI-D at 2560x1600 (60 Hz) D-Sub at 1920x1200 (60 Hz) DisplayPort at 4096x2400 (60 Hz) or 4096x2160 (60 Hz) |
| Onboard LAN | Qualcomm Atheros AR8171 |
| Onboard Audio | Realtek ALC1150 |
| Expansion Slots |
2 x PCIe 3.0 x16 (x16, x8/x8) 1 x PCIe 2.0 x4 (A88X) 2 x PCIe 2.0 x1 2 x PCI |
| Onboard SATA/RAID |
7 x SATA 6 Gbps (A88X), RAID 0, 1, 5, 10 1 x eSATA 6 Gbps (A88X) |
| USB 3.0 |
4 x USB 3.0 (A88X) [2 back panel, 1 header] 2 x USB 3.0 (ASMedia ASM1042) [2 back panel] |
| Onboard |
7 x SATA 6 Gbps 1 x USB 3.0 Header 3 x USB 2.0 Headers 6 x Fan Headers 1 x Front Panel Audio Header 1 x COM Header Power/Reset Switches BIOS Selection Switch Two-Digit Debug LED |
| Power Connectors |
1 x 24-pin ATX Power Connector 1 x 8-pin CPU Power Connector 1 x 4-pin Molex VGA Power Connector |
| Fan Headers |
2 x CPU (4-pin, 3-pin) 3 x CHA (4-pin, 2 x 3-pin) 1 x PWR (3-pin) |
| IO Panel |
PS/2 Combination Port D-Sub HDMI In HDMI Out DVI-D DisplayPort Optical SPDIF Output 2 x USB 2.0 Ports 2 x USB 3.0 Ports (A88X) 2 x USB 3.0 Ports (ASMedia) 1 x GbE LAN (AR8171) 1 x eSATA 6 Gbps (A88X) Audio Jacks |
| Warranty Period | 3 Years |
| Product Page | Link |
The addition of a USB 3.0 controller and a high-end Realtek audio codec puts the Extreme6+ high up the product stack for an AMD FM2+ motherboard. Unlike Intel were a $400 motherboard might be common, motherboard manufacturers tend not to splash out on an AMD motherboard (with PCIe PLX switches or obscure lane allocations) purely due to demand and volume.
ASRock FM2A88X Extreme6+ BIOS
ASRock’s graphical BIOS now sits and a relatively happy plateau. After the first couple of generations, we have a system that is easy to read, easy to follow and is aesthetically pleasing to look at (in my opinion at least). The white on black with the high image quality background at least is better than most, with higher definition images being used in the BIOS throughout. ASRock has a tendency to try out a lot of new things with a chipset release, see which ones users respond to and develop those in future releases. In FM2+ however, there is not that much extra from FM2/A85X, due to the similarities of the platform.
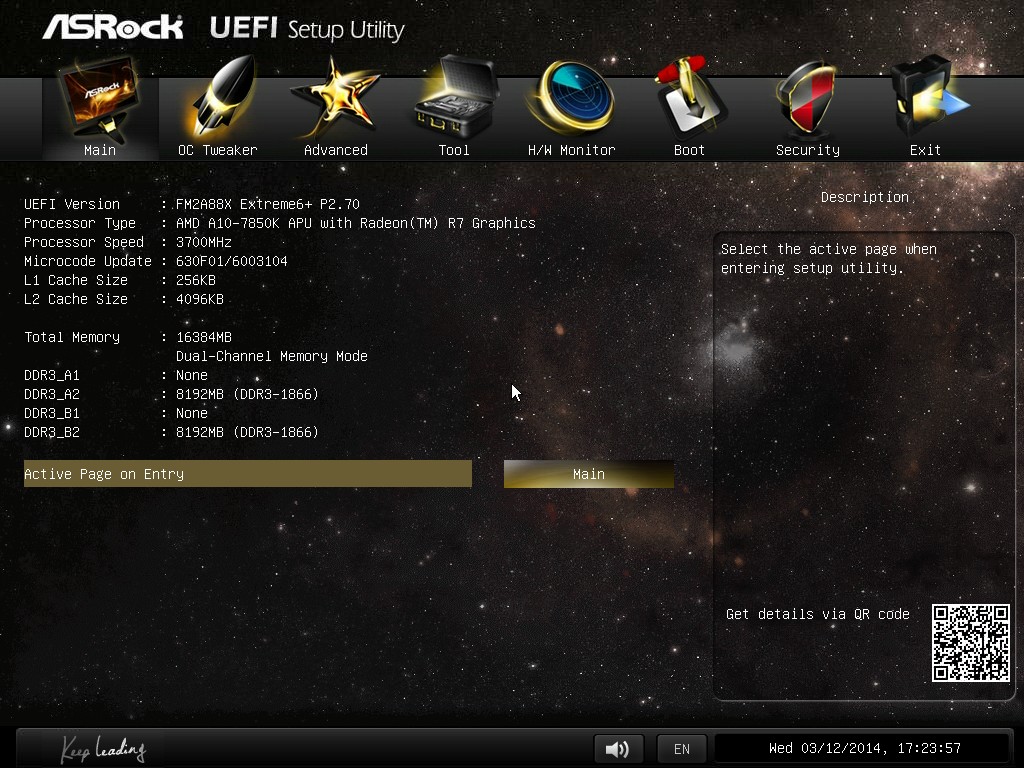
The screen we first get into is called ‘Main’, and gives us the motherboard being used, the BIOS revision, the CPU name and speed as well as the total memory installed, where it is installed, and how fast it is running at. This is 85% of what I want in the front screen on a motherboard: other features such as CPU temperature, voltage and fan speed would also be welcome. There is an option to adjust the point of entry into the BIOS, thus enthusiast users such as overclockers can boot straight into the OC Tweaker menu.
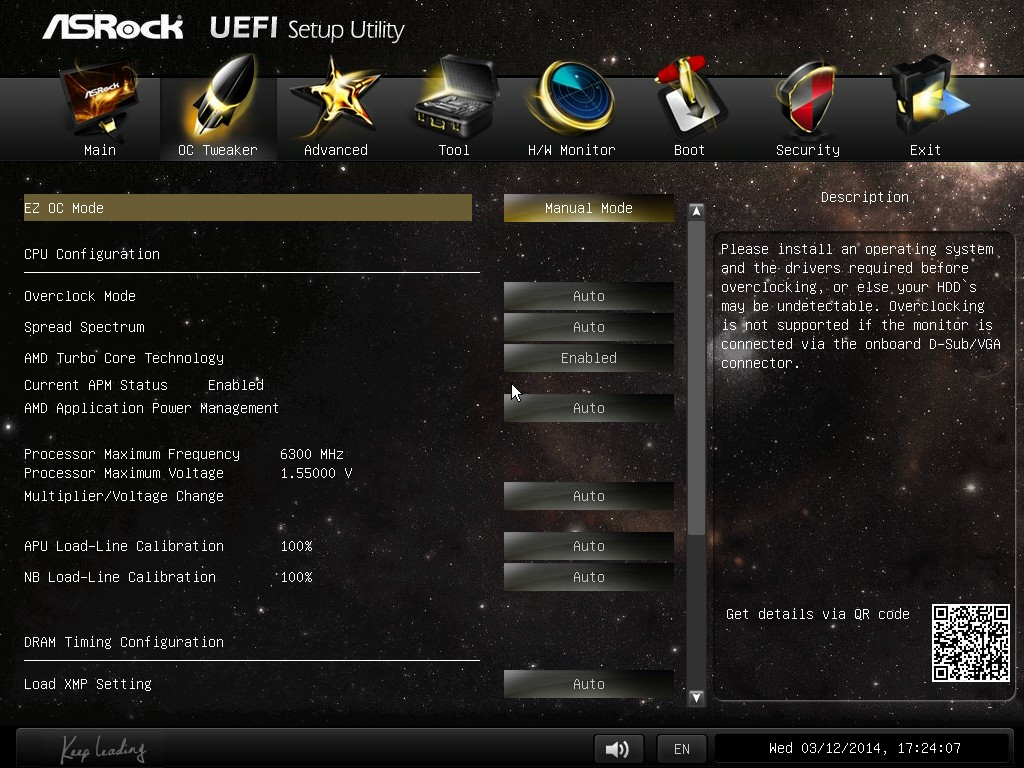
The OC Tweaker menu separates out all the main overclocking options into sections for the CPU, DRAM and voltage. At the top is an EZ OC Mode (‘Easy Overclocking’), which offers options from 4000 MHz to 4500 MHz with our A10-7850K.
For finer tuning of the DRAM timings, the DRAM Timing control should be adjusted to manual. Unfortunately this is a little confusing here – ASRock should have an ‘Auto’ option for all the memory sub-timings in case a user wants to adjust just one.

The ‘Advanced’ tab gives further submenus relating to CPU, North Bridge, South Bridge, Storage and Super IO configurations. In the CPU Configuration menu, features such as ‘Target TDP’ are present, such as when using the A8-7600 Kaveri APU, which can be used in 65W or 45W mode.

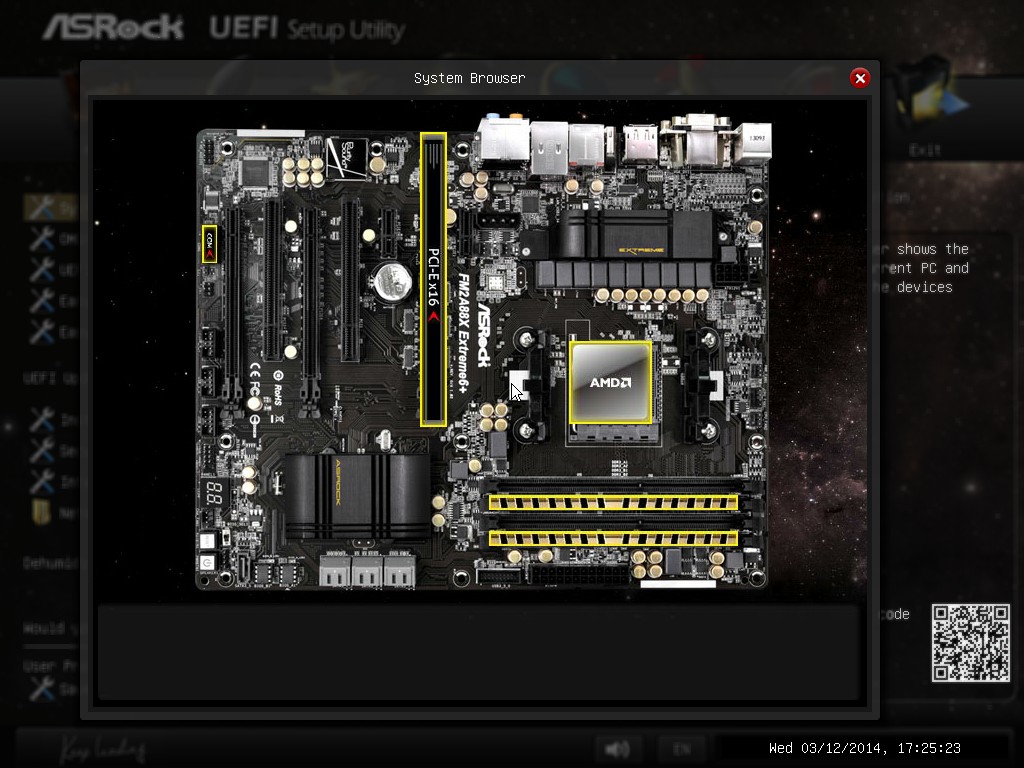
Whenever ASRock adds new utilities to the BIOS, they typically go under the Tool tab. Here we have features that have graduated through multiple generations, such as the System Browser which gives a visual representation of the motherboard along with all the equipment installed:
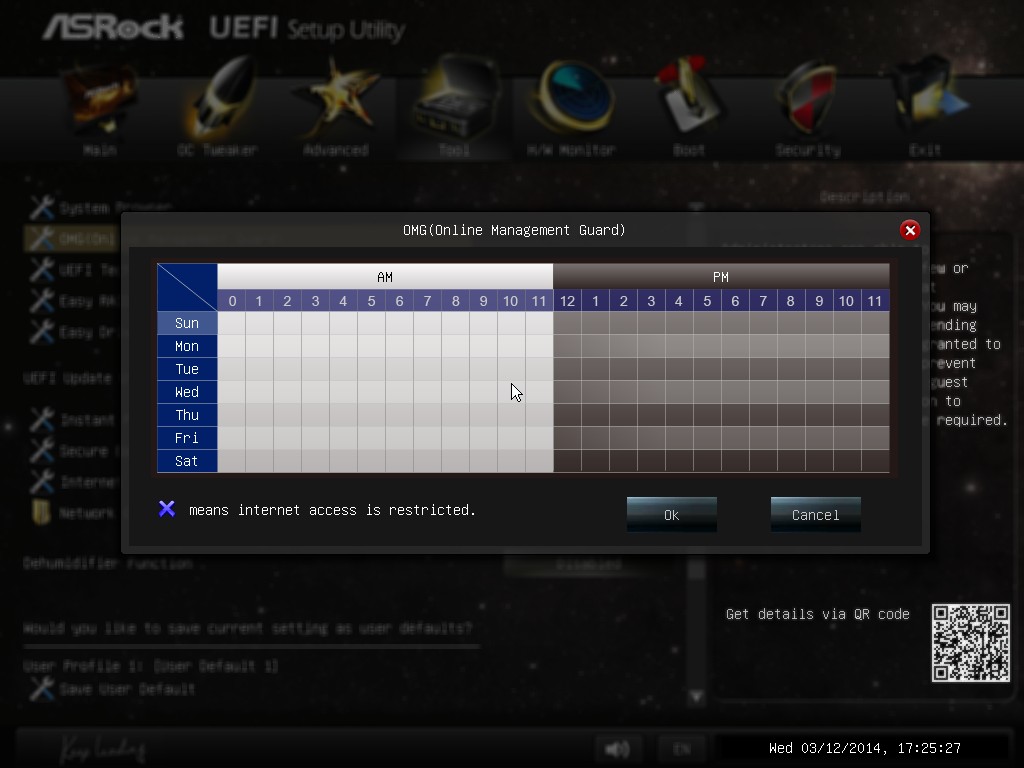
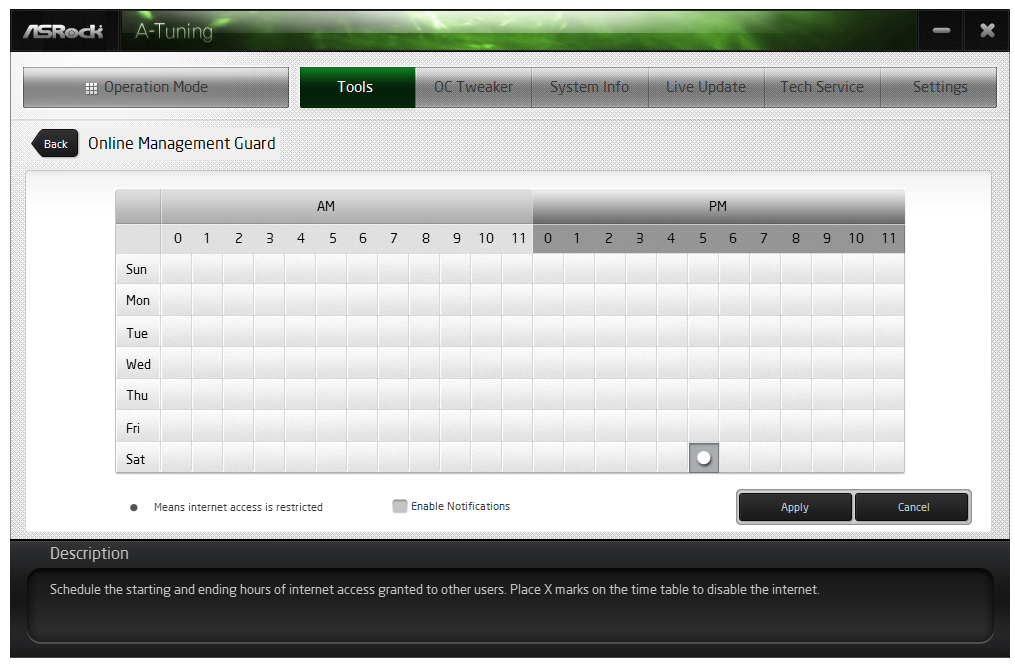
There is also the Online Management Guard, which disables the network ports when the BIOS reaches certain hours of the day:
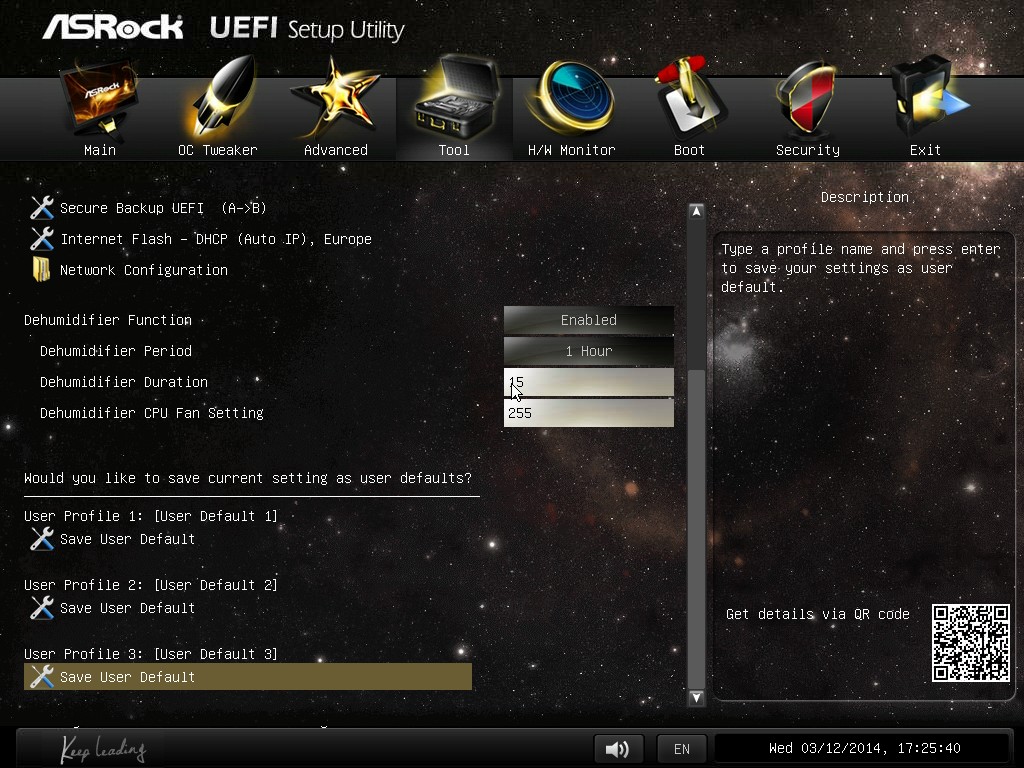
One of the newer features in the Tool menu is the Dehumidifier function, which we have covered in previous reviews. This allows the PC to enter a semi-sleep state to keep the fans spinning after the PC is turned off in order to equilibrate the air temperature inside and outside the case. In high humidity environments this helps reduce condensation inside the case as the PC cools naturally by forcing the equilibration. After talking with ASRock at Computex, ‘Dehumidifier’ works as an explanation in Chinese, although I think a little is lost in English as that word has a specific meaning. Nevertheless whatever the name, the feature is the same in any language.
The fan controls are in the HWMonitor menu, which gives our temperature sensor readings as well as fan speeds and voltages. For fans in the BIOS, ASRock gives pre-determined fan controls or allows users to specify a multi-point gradient:

I want to see this in every BIOS from every manufacturer. The only step up for this would be to combine something like MSI’s fan control representation system, along with a fan testing tool similar to what we see with Biostar, and we might actually have something approaching a proper adjustable fan control in a graphical setting in a BIOS.
Unfortunately one thing missing from the ASRock BIOSes is a Boot Override feature. Whenever I want to boot from a device once, I would like the option in the BIOS just to select that device and instantly boot from it. Almost all other BIOS manufacturers have this option, however in this regard ASRock is a little behind – the user needs to adjust the boot order to do so.


ASRock FM2A88X Extreme6+ Software
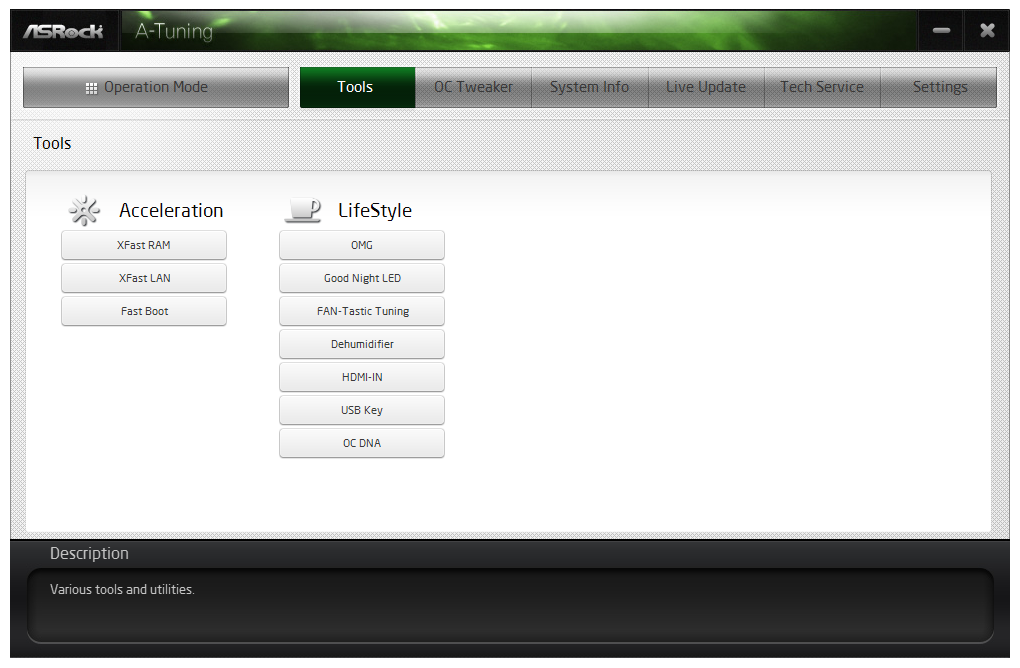
Building a software platform for a motherboard can be a walk in the park or a hard trek. Some manufacturers take the easy route with next to nothing for the user, whereas the majority of manufacturers do make the effort. Smoothing the software production requires good ideas and good software engineers. I have always stated that the best method to do this would be to start with the enthusiasts and ask what they want, then take it to a designer (as in, not a software designer but a general artist) to make it look elegant, and finally pass it on to the programming team. When the programming team is done, future iterations of the software should start with the enthusiasts again but from the software already at hand. My desires aside, ASRock is making progress with their A-Tuning software product, acting as a hub for all the other modular software implementations.
A-Tuning
The first interface of A-Tuning is the Operation Mode, which acts as a quick overclocking selection tool. By default we have standard mode, to the right is the power saving mode and a performance mode on the left. The Power Saving mode, as explained in the overclocking section later in the review, implements a gradient to apply the faster, more powerful processor modes. Thus in order to crank up to full speed, in this mode the system requires 8 seconds of full CPU load. Performance mode allows the CPU to access the full turbo mode immediately, and there is also an Auto Tuning option once Performance Mode is selected.

The Tools menu features the modular aspect of A-Tuning, giving access to XFast RAM, XFast LAN, Fast Boot, Online Management Guard, FAN-tastic Tuning, Dehumidifier function, HDMI-IN, USB Key and OC DNA.
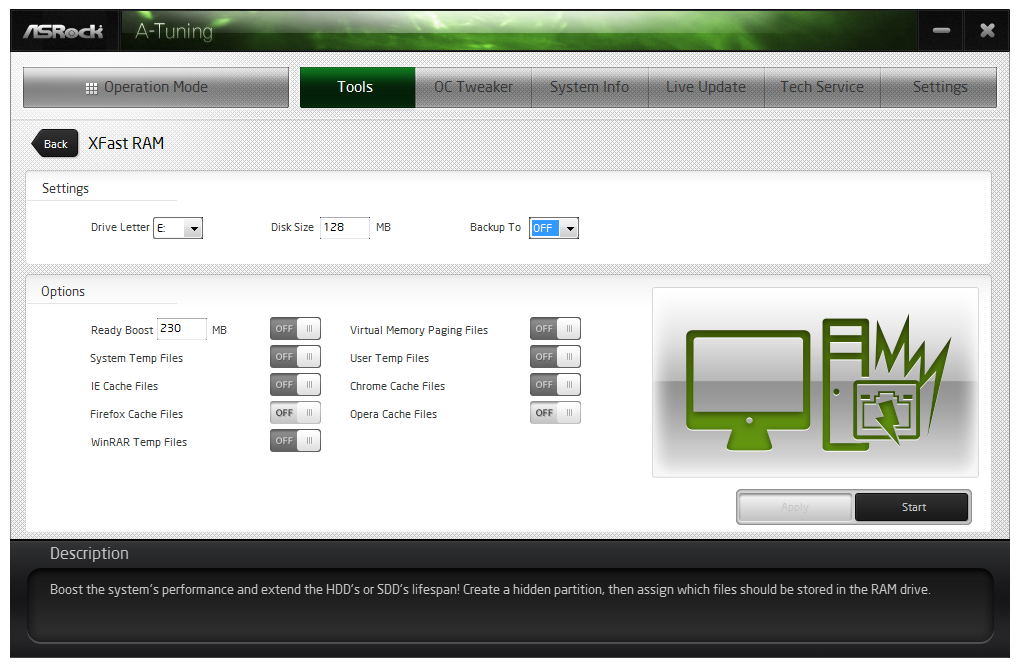
XFast RAM
ASRock’s main motherboard line has shipped with XFast RAM for a few generations. This is essentially RAMDisk software, allowing users to create a pseudo hard-disk from excess DRAM. ASRock’s implementation also includes a few options for commonly used programs, such as caching temporary internet files in the RAMDisk automatically, as well as other temporary files.
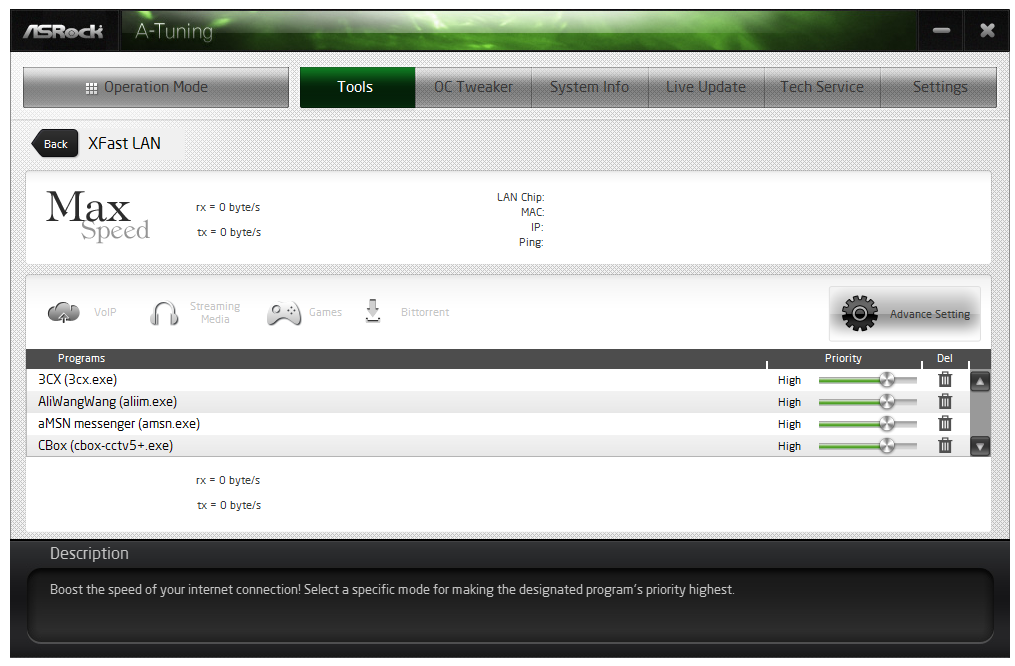
XFast LAN
Similarly with XFast LAN, this software is a main component of ASRock’s main motherboard line. Based from the cFos software network management program, ASRock has implemented a custom frontage similar to other manufacturers to allow users to prioritize the internet access of certain programs (e.g. VOIP/games) over others (updates/messengers).
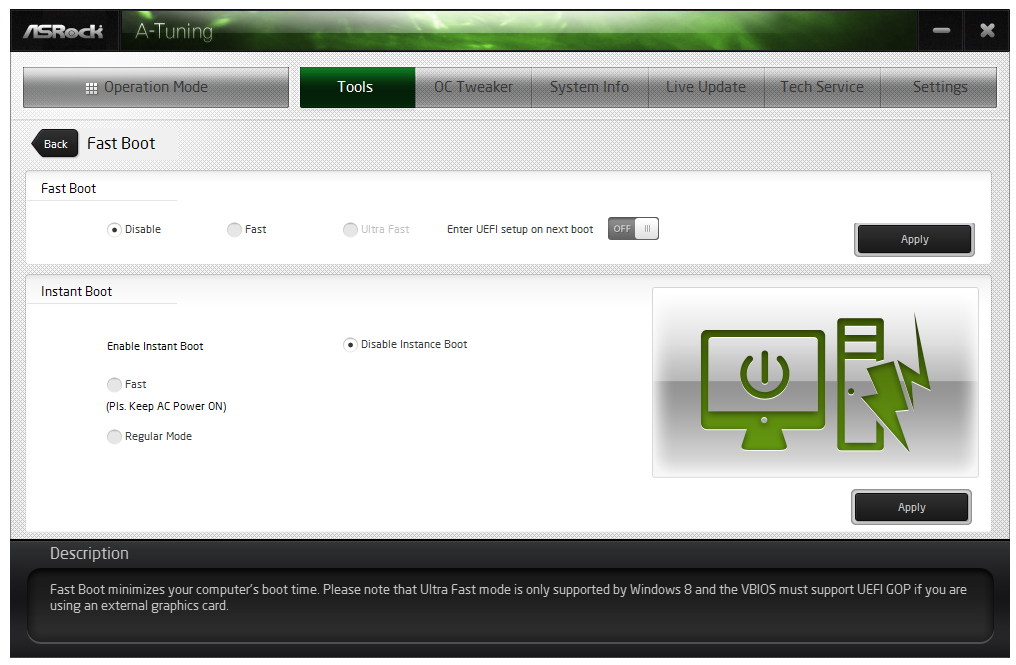
Fast Boot
Due to the capability of Windows 8 to implement a faster boot-to-OS topology, motherboard manufacturers use OS software to re-enable features such as booting into the BIOS. In some circumstances, there are several boot options relating to port enabling on boot that users can customize, and some software also provides an ‘instant boot’ option, which essentially reboots the system and places it in a deep sleep mode ready to ‘awake’ when the machine is turned on.
Online Management Guard (aka OMG)
The online management guard from ASRock, despite the acronym, is a tool designed to block network (internal and internet) access to the system during certain hours of the day. Two main reasons spring to mind as to why this software would be used. First is for children, when internet access is to be restricted, and second is in a public environment where the use of a computer might be restricted to one or two tasks.
FAN-Tastic Tuning
One of the bigger changes in the motherboard ecosystem ever since I started reviewing motherboards has been the response to upgrading fan controls. Previously, fan controls were a two point power-based gradient, which fails to comprehend that fan profiles are not always linear or that users might want a gradual or sharp incline at some point along the temperature scale. ASRock’s solution with FM2+ is the FAN-Tastic Tuning.

The software will test the equipped fan to provide a power vs. fan speed graph on the right hand side, and the user can describe a six point gradient in the graphing area. I need to confirm whether the ASRock graph is Fan Speed in RPM or Fan Power in %, given that the axis is labeled Fan Speed (%). If it is indeed Fan Speed as a % of RPM rather than a % of power, then this is the fan profiling agent I have been looking for.
Dehumidifier
The Dehumidifier function, similar to the BIOS implementation, is somewhat ill-named. This tool allows the fans to keep spinning after the system has been shut down but while the AC power is still running. The user can specify the length of time the fans remain on, the delay from turn off to fan-spinning, and the power of the fan. The purpose of this utility is to equilibrate the temperature of the air inside and outside the case. In hot and humid climates the different temperatures of air can hold different amounts of water vapor, such that when the warm air inside a case cools down slowly, it will precipitate the water as it cools but inside the case on the electronics. By equaling the temperature inside and outside of the case, this should not happen.

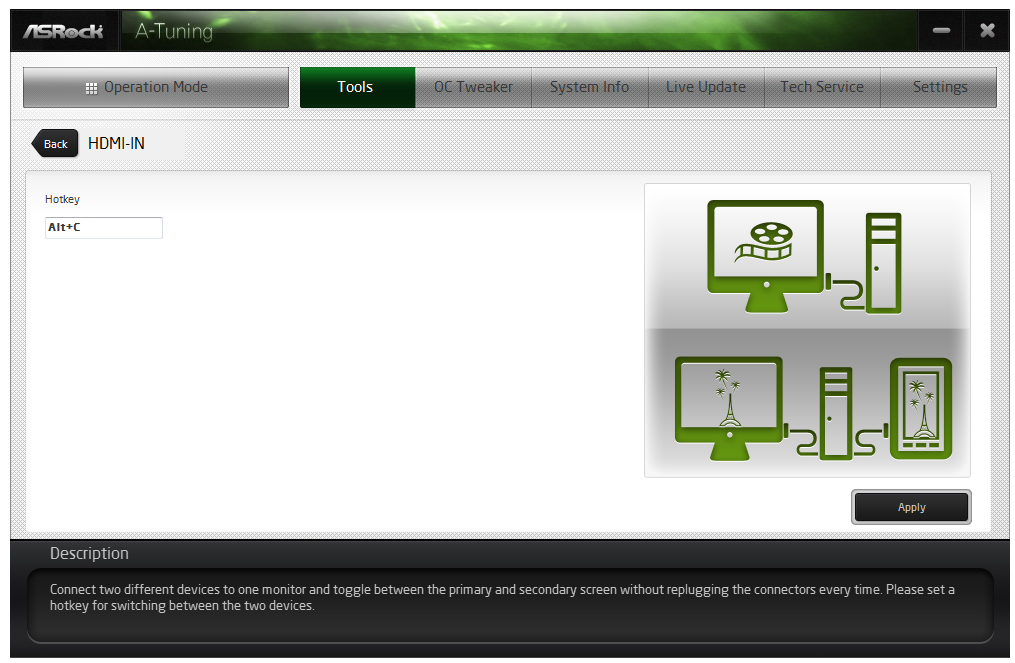
HDMI-In
One of ASRock’s new features in 2013 was HDMI-In – the use of two HDMI ports on the rear-IO panel to act as a pass-through for other HDMI devices. The situation ASRock usually has for this is when a user has a console next to their PC, but rather than having a monitor with two HDMI inputs, the console can send a HDMI to the PC, and the PC would act as a pass-through to the monitor. The user can then switch between the inputs using a hotkey. The next stage in this design would be for ASRock to create software to allow the HDMI-In stream to be recorded. With some other motherboard models, particularly the Killer range, ASRock bundle a 3 month license for XSplit for exactly this.
USB Key
Another of ASRock’s new features is USB Key. This is a tool that allows users of multiple ASRock systems to use a USB drive as a login tool, rather than input user names and passwords or for double verification.

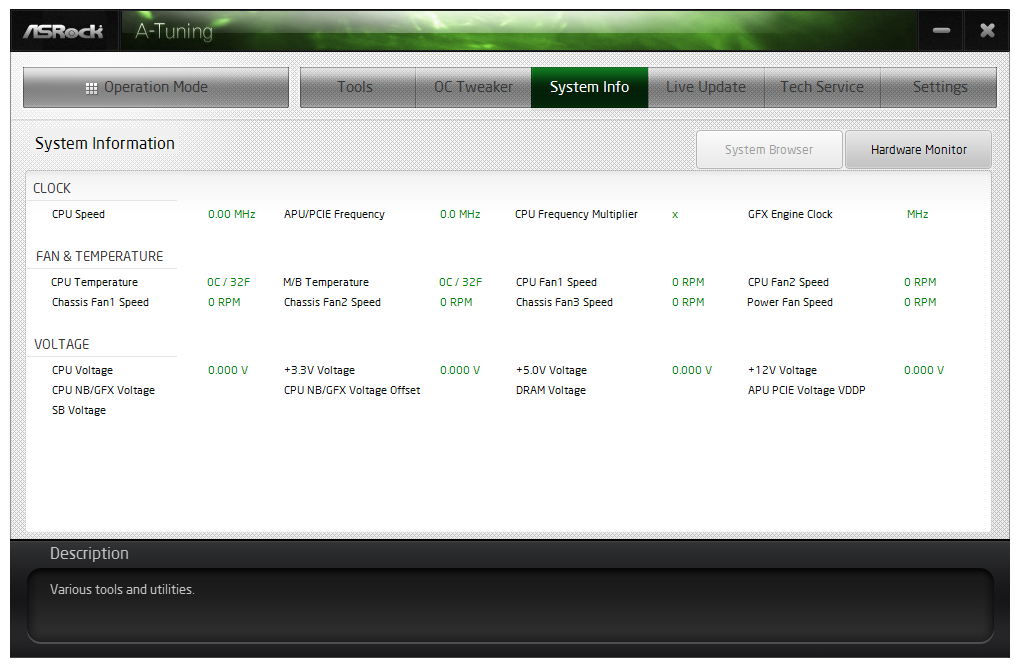
System Info
Another tab along A-Tuning is the monitoring software for all the system information. This includes speeds, voltages, temperatures and fan RPM. On our sample however, the software was not working, giving zeroes for every result as shown below. The System Browser tab was also non-functional.
Live Update
We are now in 2014. Every motherboard manufacturer should have a system in place to allow users to connect to the internet and download new drivers or software. ASRock now have this system in place via the Live Update tab in A-Tuning. As shown below, we see the software that the system recognizes is not the same version number as listed on the ASRock servers. The only failing with the software, like others that are in the market, is that we do not have the size (in MB) for each update before we download it. There are still some areas on limited data plans, and would rather not download a new audio driver if it requires 350 MB (but they might if it was 4 MB).

Gallery


ASRock FM2A88X Extreme6+ In The Box
AMD motherboards in general do not tend to have bonus bundles and packages. The last one of note was one of the ROG motherboards, but as we alluded to earlier, manufacturers do less in terms of motherboard innovation on the AMD platform as they do with Intel. This is purely as a result of sales volume. I am sure that if any of the manufacturers wanted to, we would see a PLX 8747 chip on an AMD motherboard for four-way x8/x8/x8/x8 AMD gaming, but there is no demand. This reflects back to the veracity of motherboard box contents, such that from ASRock we have:
Driver CD
Manuals
Rear IO Shield
Four SATA Cables
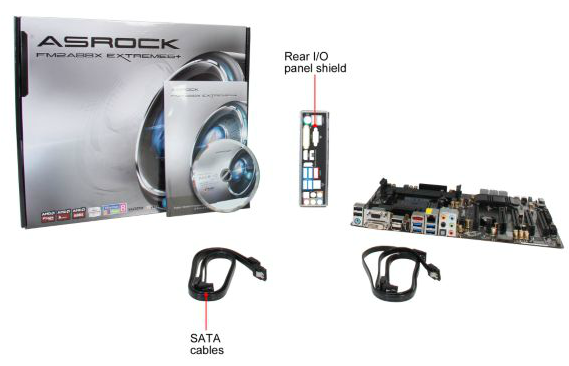
Because the A88X platform does not support SLI, there is no need for an SLI bridge. Similarly, there is no USB 3.0 front panel or extra utilities – the Extreme6+ is almost a box with almost the bare essentials.
ASRock FM2A88X Extreme6+ Overclocking
Experience with ASRock FM2A88X Extreme6+
Our overclocking experience with the FM2A88X Extreme6+ is identical to what we published in the Kaveri CPU review, given that we used the same motherboard for that review and this review. The Extreme6+ has several automatic overclock options in the BIOS, and the OS does give the Operation Mode options that have been on Intel 8-series motherboards for a number of months. These are a power saving mode and a performance mode, with the power saving mode having most effect on single thread operation requiring less than a couple of seconds of CPU time.
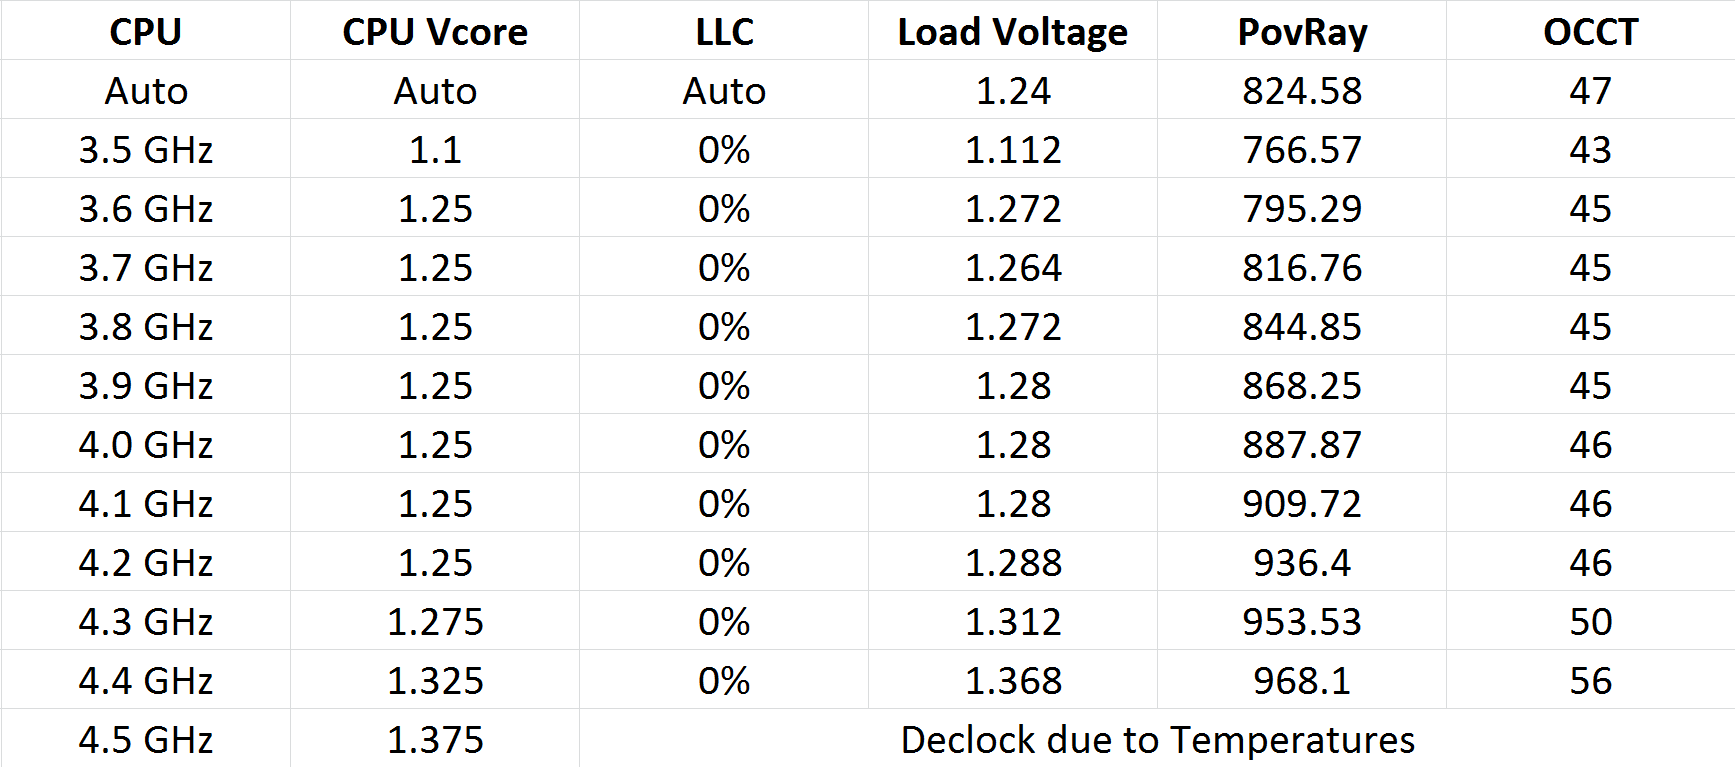
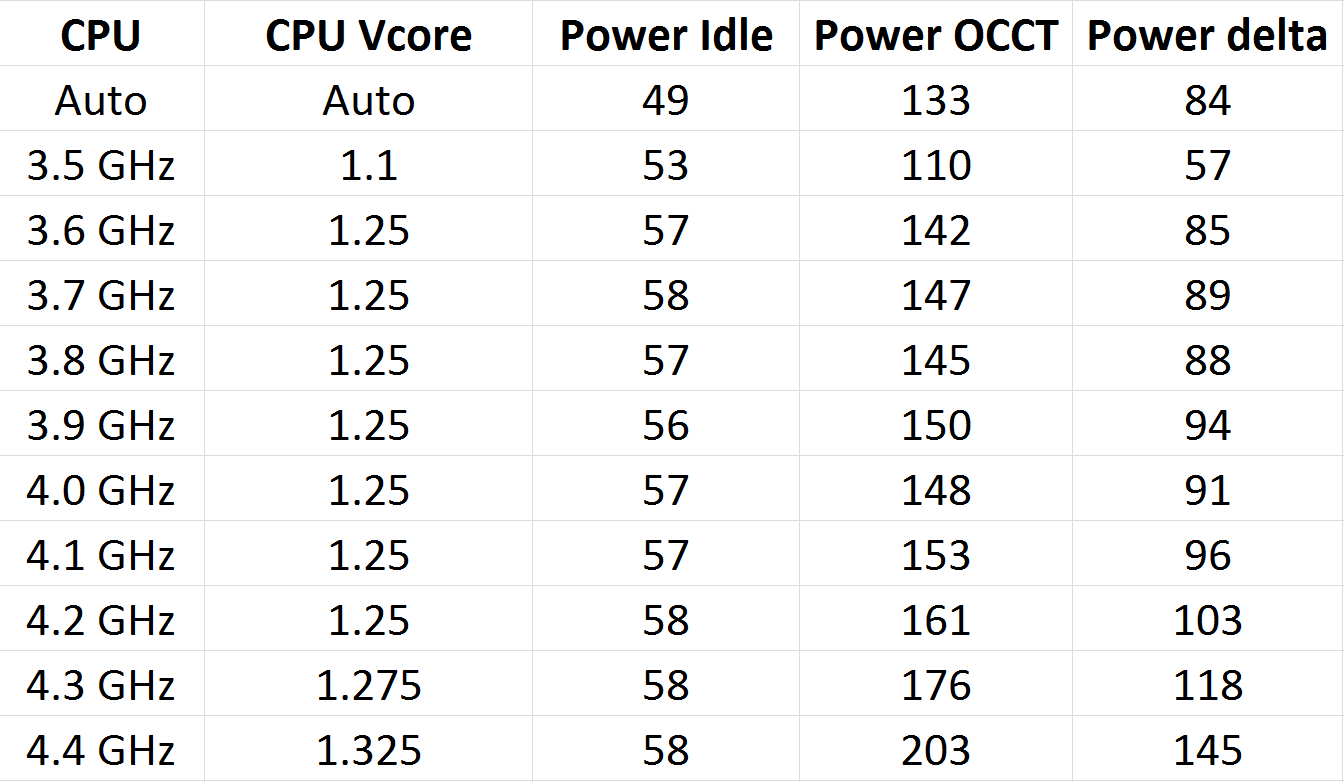
For the manual overclock, we used the BIOS and achieved 4.4 GHz, which is a far cry from some 4.6+ GHz on air results that have been published elsewhere. Our main limitation seemed to be the VRM cooling, given that the system de-clocked the CPU when we were at 4.5 GHz.
One issue worth mentioning, given the heat generation issue mentioned at the top of the review, is how the motherboard deals with overheating. Given that our normal overclocking tests are done for 5 minutes, we tested the system at stock for an hour with OCCT monitoring the CPU frequency:
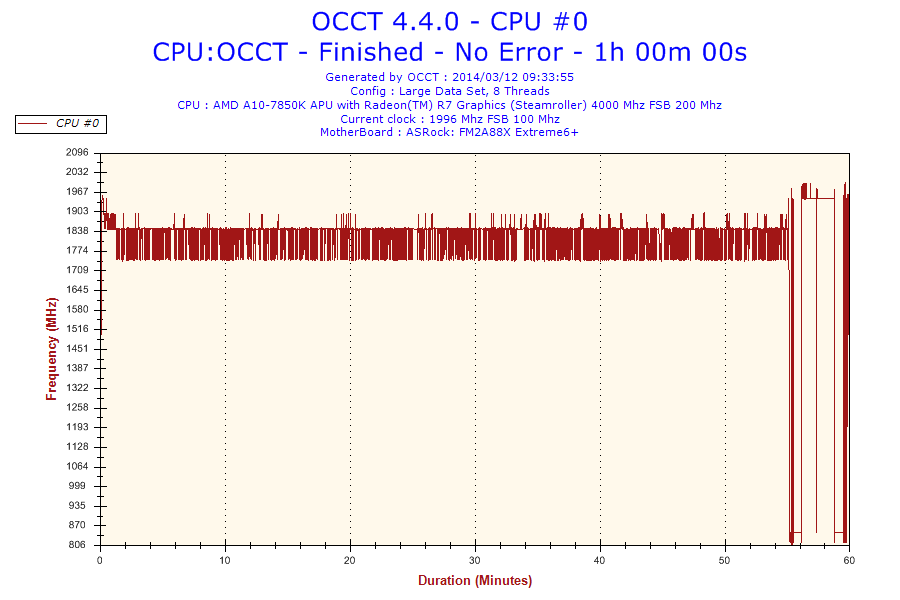
While OCCT has an issue reading the base frequency, we see jumps from 3700 MHz (1850 on the graph) to 3500 MHz (1750 on the graph). Given that this CPU is designed to go between 3700 MHz and 4000 MHz depending on loading, this shows that even with an average CPU cooler, hard CPU work can cause the CPU to decrease in frequency with sustained CPU load. Users who are thinking of overclocking Kaveri should have some good cooling in place.
Methodology:
Our standard overclocking methodology is as follows. We select the automatic overclock options and test for stability with PovRay and OCCT to simulate high-end workloads. These stability tests aim to catch any immediate causes for memory or CPU errors.
For manual overclocks, based on the information gathered from previous testing, starts off at a nominal voltage and CPU multiplier, and the multiplier is increased until the stability tests are failed. The CPU voltage is increased gradually until the stability tests are passed, and the process repeated until the motherboard reduces the multiplier automatically (due to safety protocol) or the CPU temperature reaches a stupidly high level (100ºC+). Our test bed is not in a case, which should push overclocks higher with fresher (cooler) air.
Manual Overclock:
Our results were as follows.
This gave the following power results while using the IGP:
Many thanks to...
We must thank the following companies for kindly providing hardware for our test bed:
Thank you to OCZ for providing us with 1250W Gold Power Supplies and SSDs.
Thank you to G.Skill and ADATA for providing us with memory kits.
Thank you to Corsair for providing us with an AX1200i PSU, Corsair H80i CLC and 16GB 2400C10 memory.
Thank you to ASUS for providing us with the AMD HD7970 GPUs and some IO Testing kit.
Thank you to MSI for providing us with the NVIDIA GTX 770 Lightning GPUs.
Thank you to Rosewill for providing us with the 500W Platinum Power Supply for mITX testing, BlackHawk Ultra, and 1600W Hercules PSU for extreme dual CPU + quad GPU testing, and RK-9100 keyboards.
Thank you to ASRock for providing us with the 802.11ac wireless router for testing.
| Test Setup | |
| Processor |
AMD A10-7850K (ES) 2 Modules, 4 Threads 3700 MHz, 4000 MHz Turbo 4MB L2 Cache |
| Motherboards | ASRock FM2A88X Extreme6+ |
| Cooling |
Corsair H80i Thermalright TRUE Copper |
| Power Supply |
OCZ 1250W Gold ZX Series Corsair AX1200i Platinum PSU |
| Memory | AMD Gaming 2x8GB DDR3-2133 10-11-11 Kit |
| Memory Settings | XMP |
| Video Cards |
MSI GTX 770 Lightning 2GB (1150/1202 Boost) ASUS HD7970 3GB (Reference) |
| Video Drivers |
Catalyst 13.12 NVIDIA Drivers 332.21 |
| Hard Drive | OCZ Vertex 3 256GB |
| Optical Drive | LG GH22NS50 |
| Case | Open Test Bed |
| Operating System | Windows 7 64-bit SP1 |
| USB 2/3 Testing | OCZ Vertex 3 240GB with SATA->USB Adaptor |
| WiFi Testing | D-Link DIR-865L 802.11ac Dual Band Router |
Power Consumption
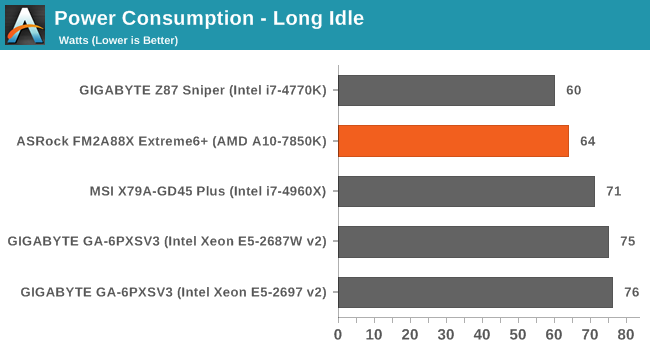
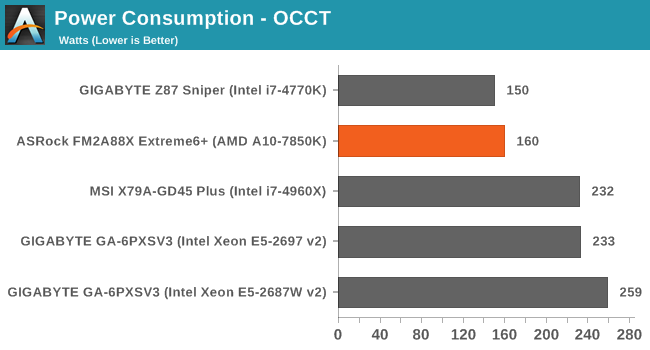
Power consumption was tested on the system as a whole with a wall meter connected to the OCZ 1250W power supply, while in a single MSI GTX 770 Lightning GPU configuration. This power supply is Gold rated, and as I am in the UK on a 230-240 V supply, leads to ~75% efficiency > 50W, and 90%+ efficiency at 250W, which is suitable for both idle and multi-GPU loading. This method of power reading allows us to compare the power management of the UEFI and the board to supply components with power under load, and includes typical PSU losses due to efficiency. These are the real world values that consumers may expect from a typical system (minus the monitor) using this motherboard.
While this method for power measurement may not be ideal, and you feel these numbers are not representative due to the high wattage power supply being used (we use the same PSU to remain consistent over a series of reviews, and the fact that some boards on our test bed get tested with three or four high powered GPUs), the important point to take away is the relationship between the numbers. These boards are all under the same conditions, and thus the differences between them should be easy to spot.

Windows 7 POST Time
Different motherboards have different POST sequences before an operating system is initialized. A lot of this is dependent on the board itself, and POST boot time is determined by the controllers on board (and the sequence of how those extras are organized). As part of our testing, we are now going to look at the POST Boot Time - this is the time from pressing the ON button on the computer to when Windows 7 starts loading. (We discount Windows loading as it is highly variable given Windows specific features.) These results are subject to human error, so please allow +/- 1 second in these results.
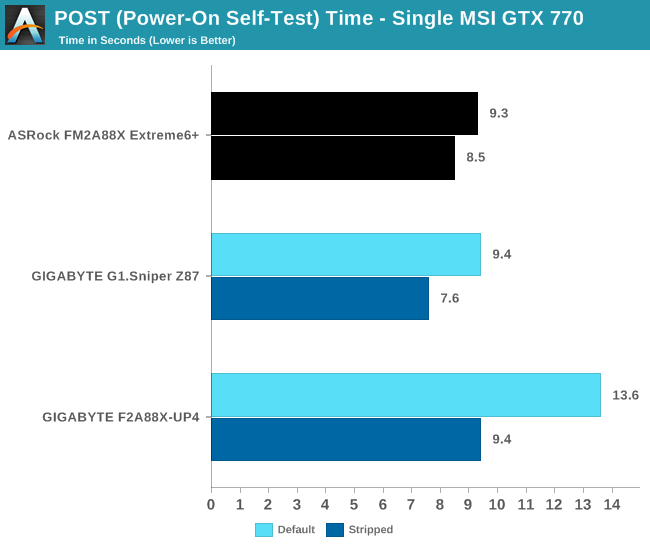
ASRock have historically been good with POST times, and under 10 seconds is a good score.
System Benchmarks
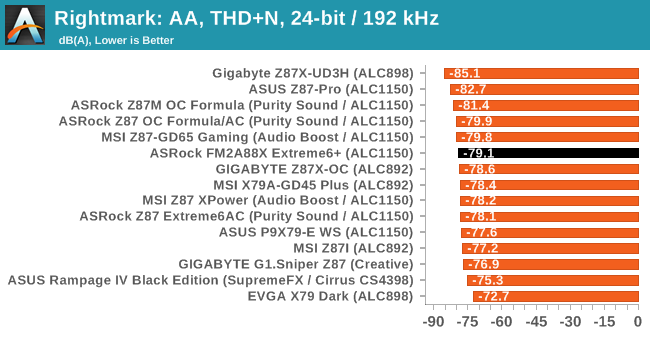
Rightmark Audio Analyzer 6.2.5
The premise behind Rightmark:AA is to test the input and output of the audio system to determine noise levels, range, harmonic distortion, stereo crosstalk and so forth. Rightmark:AA should indicate how well the sound system is built and isolated from electrical interference (either internally or externally). For this test we connect the Line Out to the Line In using a short six inch 3.5mm to 3.5mm high-quality jack, turn the OS speaker volume to 100%, and run the Rightmark default test suite at 192 kHz, 24-bit. The OS is tuned to 192 kHz/24-bit input and output, and the Line-In volume is adjusted until we have the best RMAA value in the mini-pretest. We look specifically at the Dynamic Range of the audio codec used on board, as well as the Total Harmonic Distortion + Noise.

Dynamic Range for the ASRock FM2A88X Extreme6+
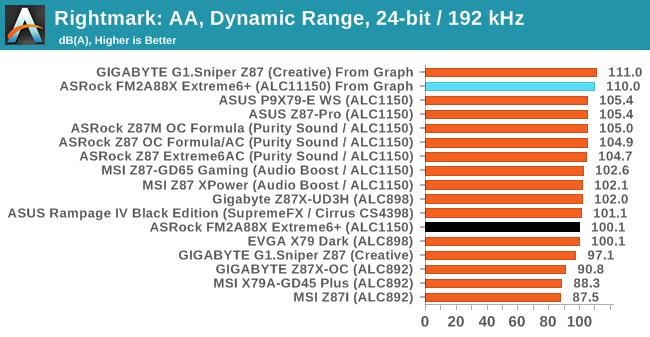
Despite the Realtek ALC1150 having a 115dB signal-to-noise rating, our RMAA test gave a result nearer 100. Within the 20 Hz – 20 kHz range of our SNR test, we see harmonic spikes at 100 Hz, 200 Hz and 300 Hz around 110 dB, making that our hearing range read-off value.
USB Backup
For this benchmark, we run CrystalDiskMark to determine the ideal sequential read and write speeds for the USB port using our 240 GB OCZ Vertex3 SSD with a SATA 6 Gbps to USB 3.0 converter. Then we transfer a set size of files from the SSD to the USB drive using DiskBench, which monitors the time taken to transfer. The files transferred are a 1.52 GB set of 2867 files across 320 folders – 95% of these files are small typical website files, and the rest (90% of the size) are the videos used in the WinRAR test. In an update to pre-Z87 testing, we also run MaxCPU to load up one of the threads during the test which improves general performance up to 15% by causing all the internal pathways to run at full speed.

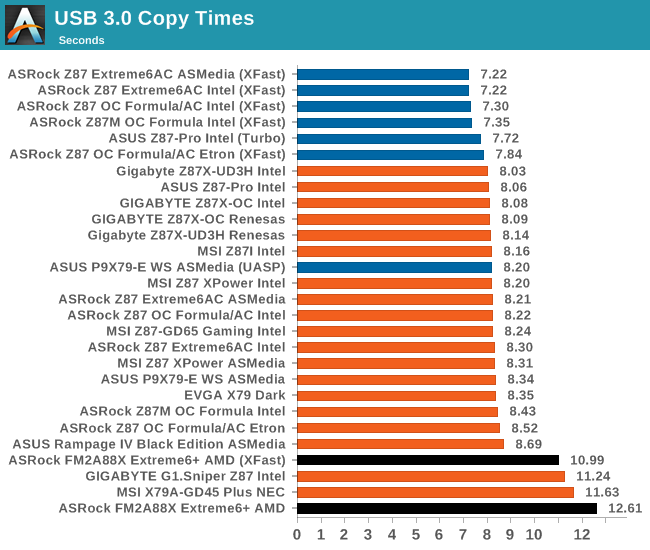
ASRock is still using its XFast software, which in our Windows 7 testing causes a significant shift in USB 2.0 performance. USB 3.0 also gets a ~13% speed-up.
DPC Latency
Deferred Procedure Call latency is a way in which Windows handles interrupt servicing. In order to wait for a processor to acknowledge the request, the system will queue all interrupt requests by priority. Critical interrupts will be handled as soon as possible, whereas lesser priority requests, such as audio, will be further down the line. So if the audio device requires data, it will have to wait until the request is processed before the buffer is filled. If the device drivers of higher priority components in a system are poorly implemented, this can cause delays in request scheduling and process time, resulting in an empty audio buffer – this leads to characteristic audible pauses, pops and clicks. Having a bigger buffer and correctly implemented system drivers obviously helps in this regard. The DPC latency checker measures how much time is processing DPCs from driver invocation – the lower the value will result in better audio transfer at smaller buffer sizes. Results are measured in microseconds and taken as the peak latency while cycling through a series of short HD videos - less than 500 microseconds usually gets the green light, but the lower the better.
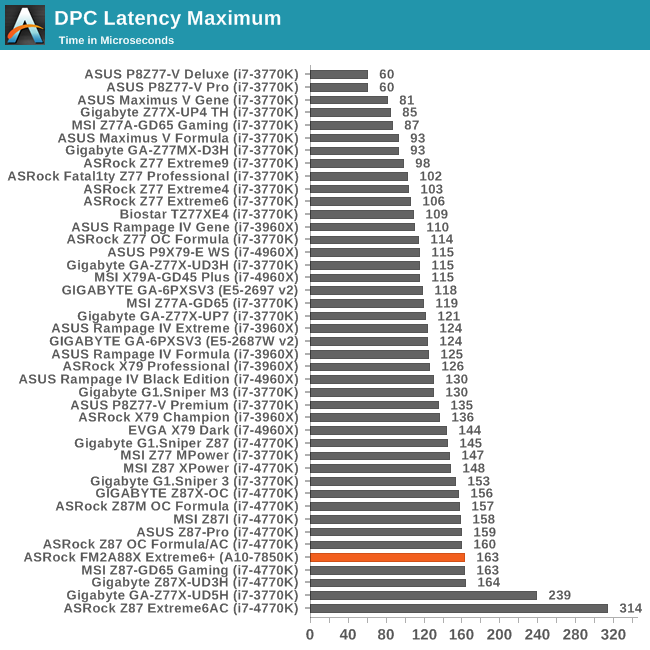
The A88X platform kicks off with a ~160 microsecond result in our DPC test, strangely matching most of our Intel 8-series results. We have another A88X motherboard in to test which also gets around the same result, suggesting that for lower peak DPC values, older platforms provide better results.
Real World CPU Benchmarks
Readers of our motherboard review section will have noted the trend in modern motherboards to implement a form of MultiCore Enhancement / Acceleration / Turbo (read our report here) on their motherboards. This does several things – better benchmark results at stock settings (not entirely needed if overclocking is an end-user goal), at the expense of heat and temperature, but also gives in essence an automatic overclock which may be against what the user wants. Our testing methodology is ‘out-of-the-box’, with the latest public BIOS installed and XMP enabled, and thus subject to the whims of this feature. It is ultimately up to the motherboard manufacturer to take this risk – and manufacturers taking risks in the setup is something they do on every product (think C-state settings, USB priority, DPC Latency / monitoring priority, memory subtimings at JEDEC). Processor speed change is part of that risk which is clearly visible, and ultimately if no overclocking is planned, some motherboards will affect how fast that shiny new processor goes and can be an important factor in the purchase.
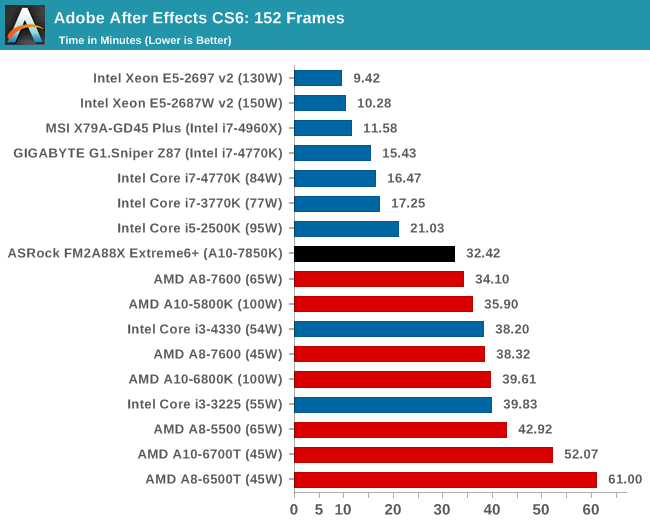
Rendering – Adobe After Effects CS6: link
Published by Adobe, After Effects is a digital motion graphics, visual effects and compositing software package used in the post-production process of filmmaking and television production. For our benchmark we downloaded a common scene in use on the AE forums for benchmarks and placed it under our own circumstances for a repeatable benchmark. We generate 152 frames of the scene and present the time to do so based purely on CPU calculations.
Compression – WinRAR 5.0.1: link
Our WinRAR test from 2013 is updated to the latest version of WinRAR at the start of 2014. We compress a set of 2867 files across 320 folders totaling 1.52 GB in size – 95% of these files are small typical website files, and the rest (90% of the size) are small 30 second 720p videos.
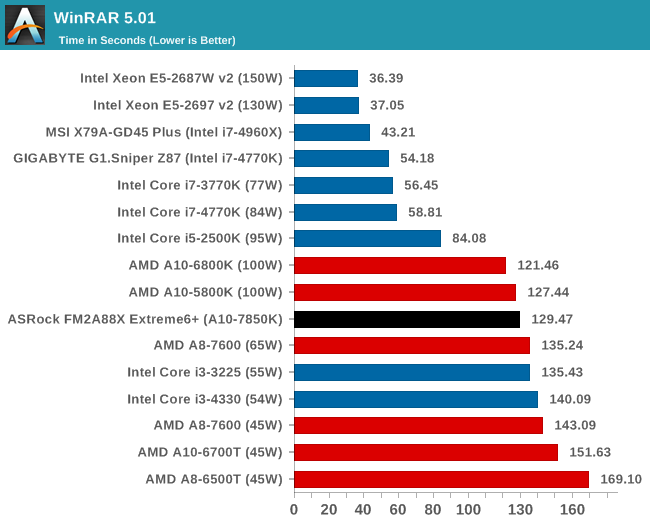
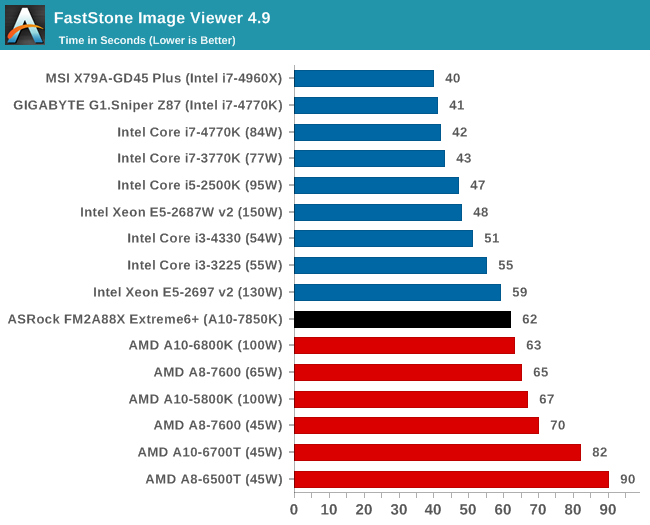
Image Manipulation – FastStone Image Viewer 4.9: link
Similarly to WinRAR, the FastStone test us updated for 2014 to the latest version. FastStone is the program I use to perform quick or bulk actions on images, such as resizing, adjusting for color and cropping. In our test we take a series of 170 images in various sizes and formats and convert them all into 640x480 .gif files, maintaining the aspect ratio. FastStone does not use multithreading for this test, and thus single threaded performance is often the winner.
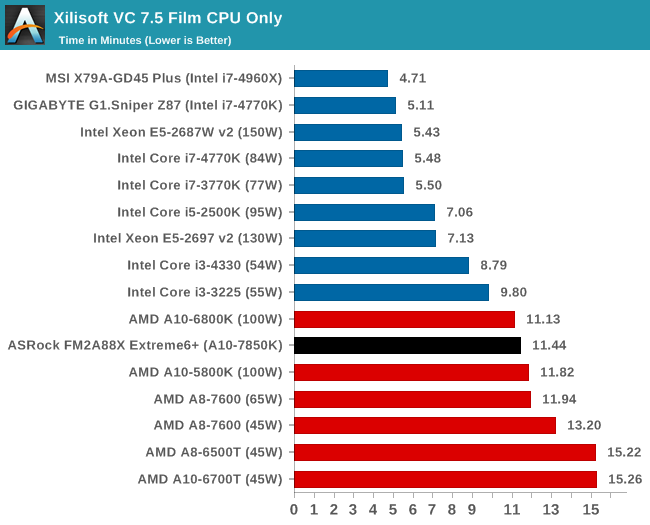
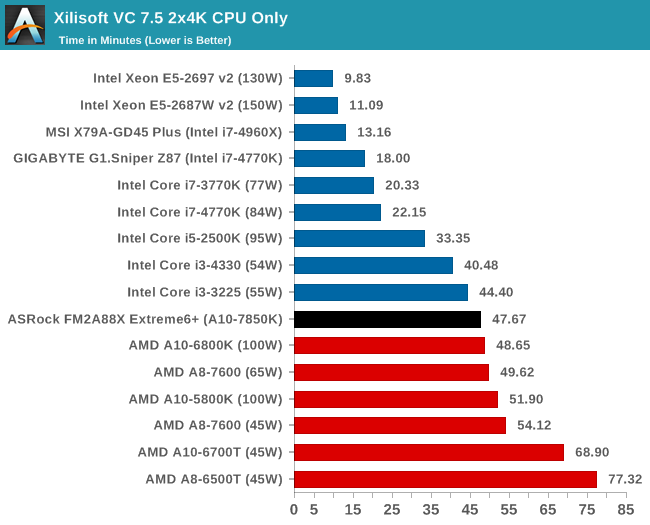
Video Conversion – Xilisoft Video Converter 7: link
The XVC test I normally do is updated to the full version of the software, and this time a different test as well. Here we take two different videos: a double UHD (3840x4320) clip of 10 minutes and a 640x266 DVD rip of a 2h20 film and convert both to iPod suitable formats. The reasoning here is simple – when frames are small enough to fit into memory, the algorithm has more chance to apply work between threads and process the video quicker. Results shown are in seconds and time taken to encode.
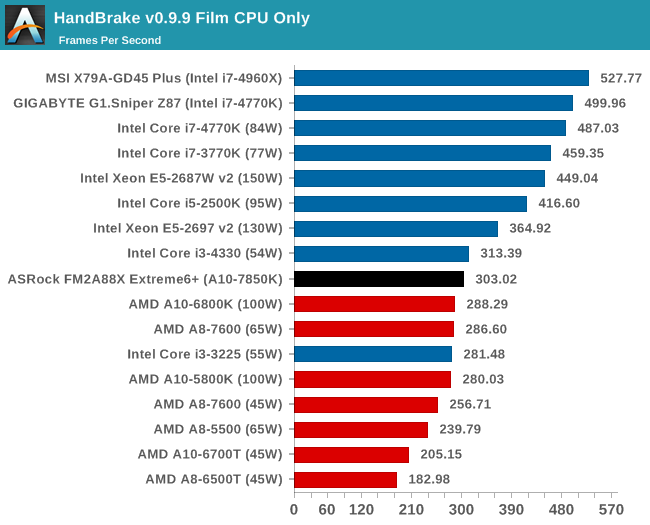
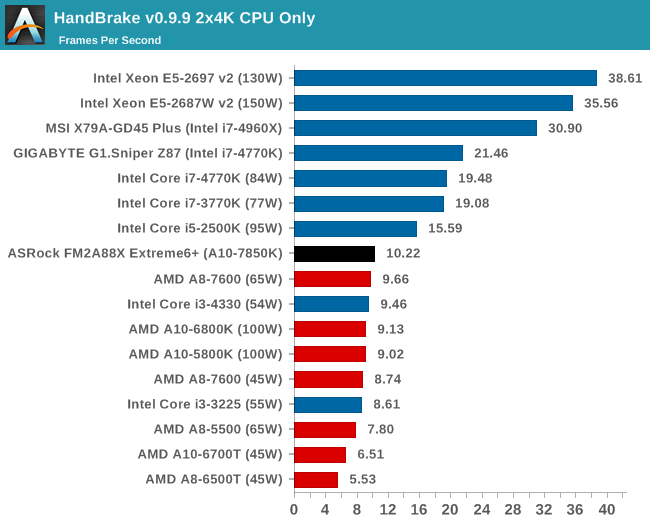
Video Conversion – Handbrake v0.9.9: link
Handbrake is a media conversion tool that was initially designed to help DVD ISOs and Video CDs into more common video formats. The principle today is still the same, primarily as an output for H.264 + AAC/MP3 audio within an MKV container. In our test we use the same videos as in the Xilisoft test, and results are given in frames per second.
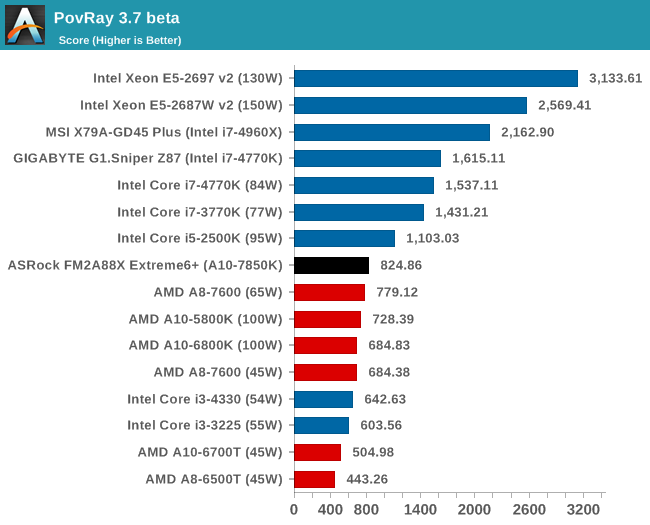
Rendering – PovRay 3.7: link
The Persistence of Vision RayTracer, or PovRay, is a freeware package for as the name suggests, ray tracing. It is a pure renderer, rather than modeling software, but the latest beta version contains a handy benchmark for stressing all processing threads on a platform. We have been using this test in motherboard reviews to test memory stability at various CPU speeds to good effect – if it passes the test, the IMC in the CPU is stable for a given CPU speed. As a CPU test, it runs for approximately 2-3 minutes on high end platforms.
Scientific and Synthetic Benchmarks
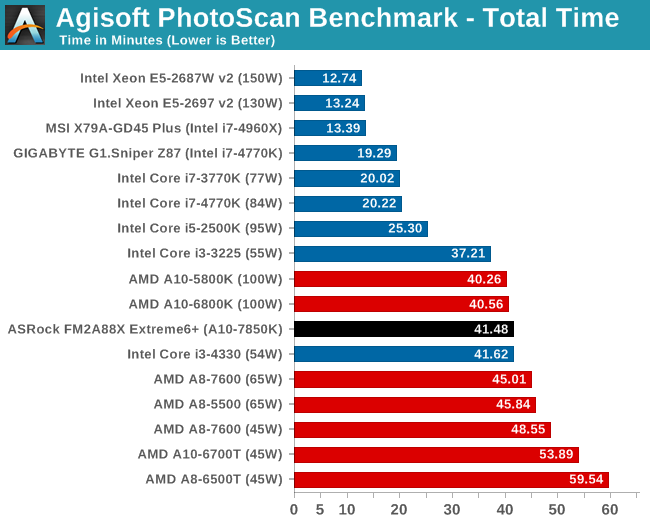
2D to 3D Rendering –Agisoft PhotoScan v1.0: link
Agisoft Photoscan creates 3D models from 2D images, a process which is very computationally expensive. The algorithm is split into four distinct phases, and different phases of the model reconstruction require either fast memory, fast IPC, more cores, or even OpenCL compute devices to hand. Agisoft supplied us with a special version of the software to script the process, where we take 50 images of a stately home and convert it into a medium quality model. This benchmark typically takes around 15-20 minutes on a high end PC on the CPU alone, with GPUs reducing the time.
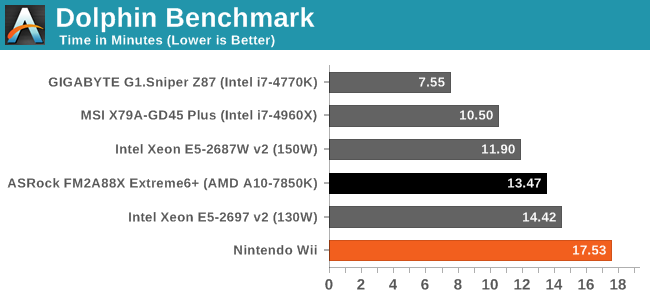
Console Emulation –Dolphin Benchmark: link
At the start of 2014 I was emailed with a link to a new emulation benchmark based on the Dolphin Emulator. The issue with emulators tends to be two-fold: game licensing and raw CPU power required for the emulation. As a result, many emulators are often bound by single thread CPU performance, and general reports tended to suggest that Haswell provided a significant boost to emulator performance. This benchmark runs a Wii program that raytraces a complex 3D scene inside the Dolphin Wii emulator. Performance on this benchmark is a good proxy of the speed of Dolphin CPU emulation, which is an intensive single core task using most aspects of a CPU. Results are given in minutes, where the Wii itself scores 17.53; meaning that anything above this is faster than an actual Wii for processing Wii code, albeit emulated.
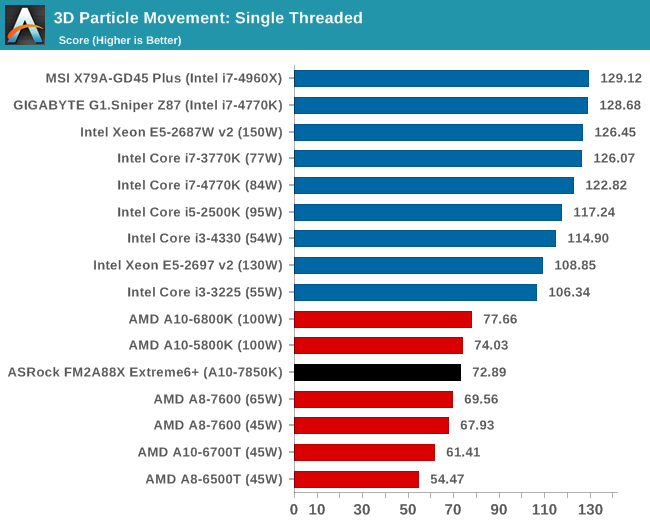
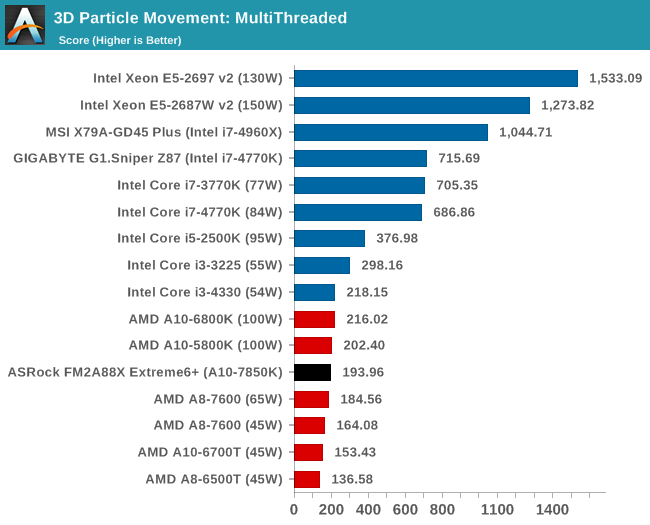
Point Calculations – 3D Movement Algorithm Test: link
3DPM is a self-penned benchmark, taking basic 3D movement algorithms used in Brownian Motion simulations and testing them for speed. High floating point performance, MHz and IPC wins in the single thread version, whereas the multithread version has to handle the threads and loves more cores.
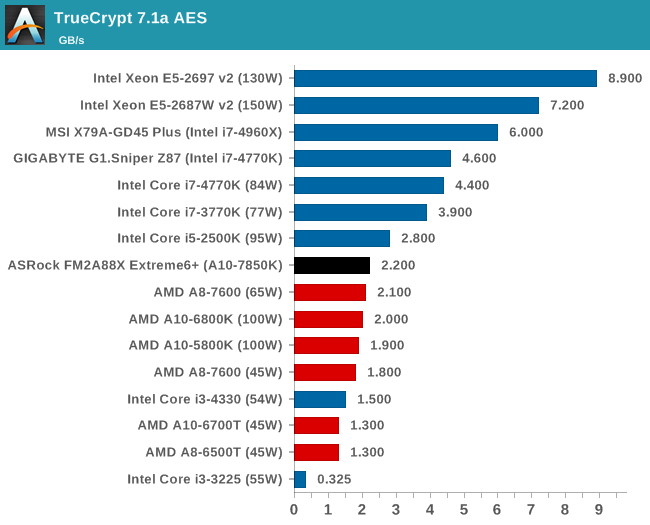
Encryption –TrueCrypt v0.7.1a: link
TrueCrypt is an off the shelf open source encryption tool for files and folders. For our test we run the benchmark mode using a 1GB buffer and take the mean result from AES encryption.
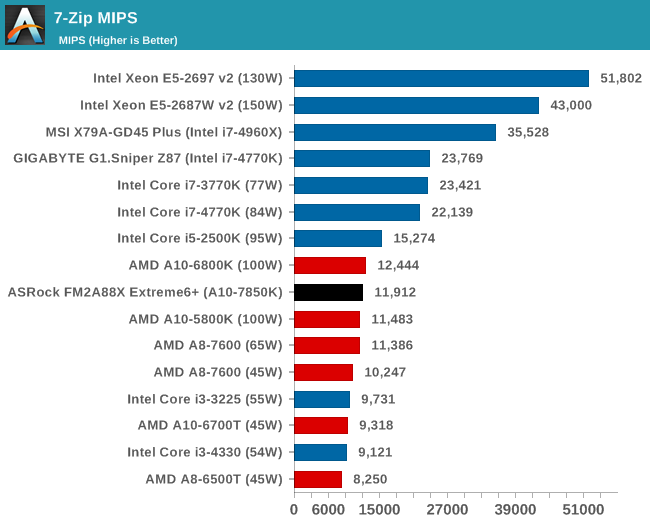
Synthetic – 7-Zip 9.2: link
As an open source compression tool, 7-Zip is a popular tool for making sets of files easier to handle and transfer. The software offers up its own benchmark, to which we report the result.
F1 2013
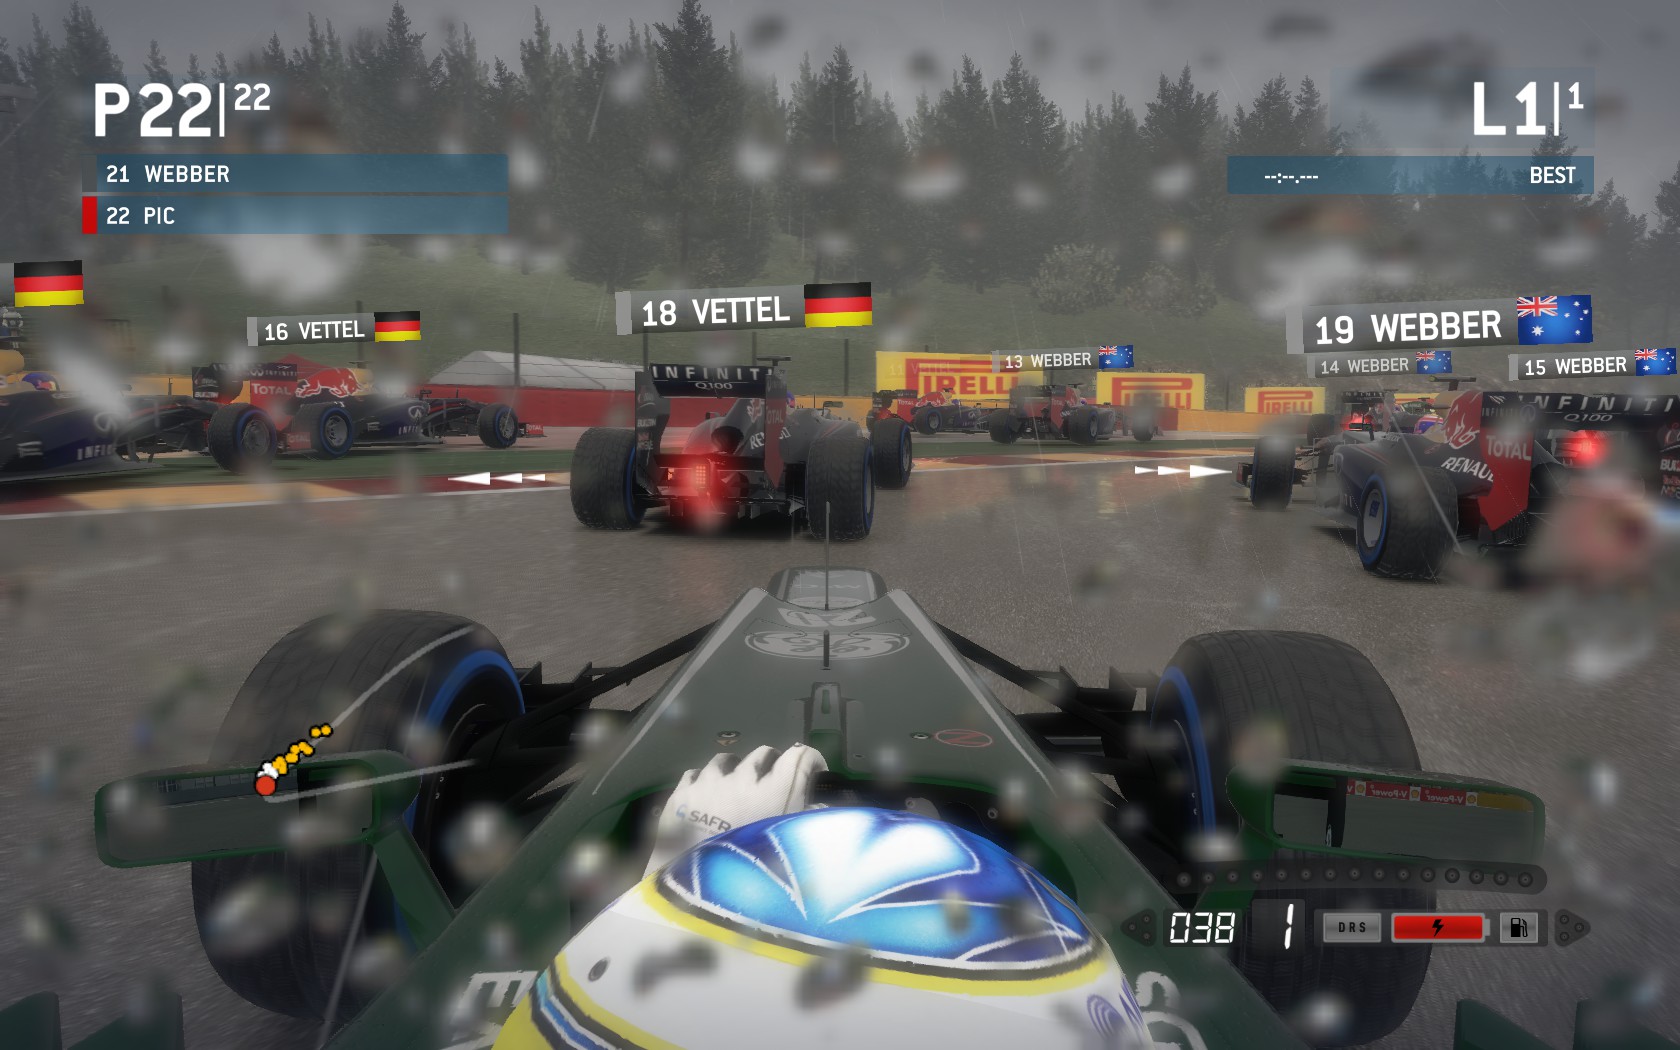
First up is F1 2013 by Codemasters. I am a big Formula 1 fan in my spare time, and nothing makes me happier than carving up the field in a Caterham, waving to the Red Bulls as I drive by (because I play on easy and take shortcuts). F1 2013 uses the EGO Engine, and like other Codemasters games ends up being very playable on old hardware quite easily. In order to beef up the benchmark a bit, we devised the following scenario for the benchmark mode: one lap of Spa-Francorchamps in the heavy wet, the benchmark follows Jenson Button in the McLaren who starts on the grid in 22nd place, with the field made up of 11 Williams cars, 5 Marussia and 5 Caterham in that order. This puts emphasis on the CPU to handle the AI in the wet, and allows for a good amount of overtaking during the automated benchmark. We test at 1920x1080 on Ultra graphical settings for a single GPU, as using multiple GPUs seems to have no scaling effect.

| F1 2013, 1080p Max | ||
| NVIDIA | AMD | |
| Average Frame Rates |
|
|
| Minimum Frame Rates |
|
|
Compared to the Intel platforms we have so far put through our 2014 gaming tests, the A10-7850K gives reasonable 60+ FPS numbers for single GPU F1 2013, but the high end Intel parts can offer almost a +50% gain. Adding more GPUs just compounds the issue. We are testing other FM2+ motherboards to see if this range of results is consistent.
Bioshock Infinite
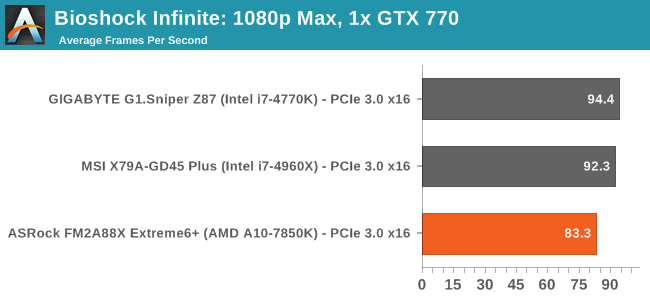
Bioshock Infinite was Zero Punctuation’s Game of the Year for 2013, uses the Unreal Engine 3, and is designed to scale with both cores and graphical prowess. We test the benchmark using the Adrenaline benchmark tool and the Xtreme (1920x1080, Maximum) performance setting, noting down the average frame rates and the minimum frame rates.

| Bioshock Infinite, 1080p Max | ||
| NVIDIA | AMD | |
| Average Frame Rates |
|
|
| Minimum Frame Rates |
|
|
With Bioshock Infinite the difference is not as much as it was in F1 2013, however beyond a single GPU there is a deficit.
Tomb Raider
The next benchmark in our test is Tomb Raider. Tomb Raider is an AMD optimized game, lauded for its use of TressFX creating dynamic hair to increase the immersion in game. Tomb Raider uses a modified version of the Crystal Engine, and enjoys raw horsepower. We test the benchmark using the Adrenaline benchmark tool and the Xtreme (1920x1080, Maximum) performance setting, noting down the average frame rates and the minimum frame rates.

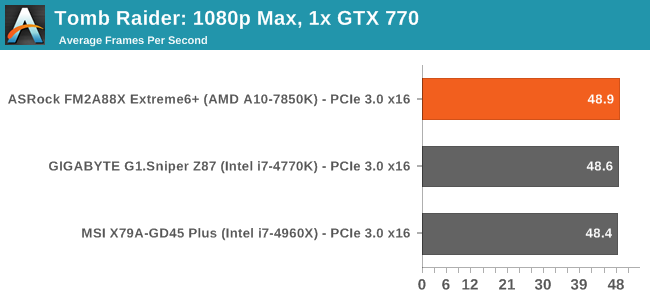
| Tomb Raider, 1080p Max | ||
| NVIDIA | AMD | |
| Average Frame Rates |
|
|
| Minimum Frame Rates |
|
|
Tomb Raider does great with AMD, with this game essentially being CPU agnostic.
Sleeping Dogs
Sleeping Dogs is a benchmarking wet dream – a highly complex benchmark that can bring the toughest setup and high resolutions down into single figures. Having an extreme SSAO setting can do that, but at the right settings Sleeping Dogs is highly playable and enjoyable. We run the basic benchmark program laid out in the Adrenaline benchmark tool, and the Xtreme (1920x1080, Maximum) performance setting, noting down the average frame rates and the minimum frame rates.

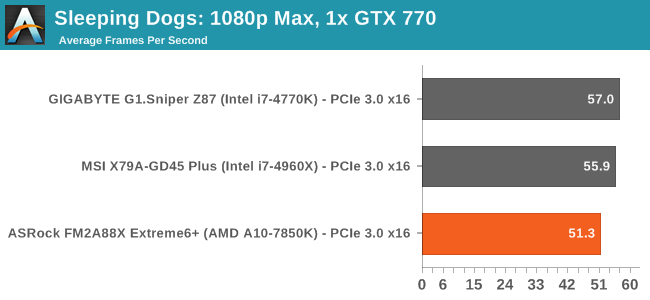
| Sleeping Dogs, 1080p Max | ||
| NVIDIA | AMD | |
| Average Frame Rates |
|
|
| Minimum Frame Rates |
|
|
Company of Heroes 2
The final gaming benchmark is another humdinger. Company of Heroes 2 also can bring a top end GPU to its knees, even at very basic benchmark settings. To get an average 30 FPS using a normal GPU is a challenge, let alone a minimum frame rate of 30 FPS. For this benchmark I use modified versions of Ryan’s batch files at 1920x1080 on Ultra. COH2 is a little odd in that it does not scale with more GPUs.

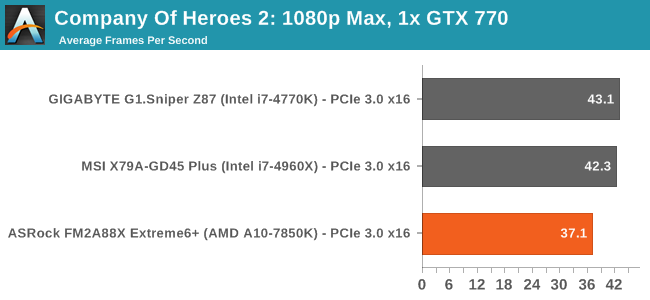
| Company of Heroes 2, 1080p Max | ||
| NVIDIA | AMD | |
| Average Frame Rates |
|
|
| Minimum Frame Rates |
|
|
ASRock FM2A88X Extreme6+ Conclusion
Motherboards bearing the FM2+ name fall into two categories – those released before the Kaveri launch in January and those released alongside or after. For the first category, certain assumptions about the state of the final Kaveri silicon had to be made, and the motherboards built around those assumptions. Because of the processing node difference between Richland and Kaveri and the differing voltage characteristics of the two processors therein, it was important to ‘over-engineer’ a motherboard to consider the potential consequences a hungry Kaveri could have made.
A similar comparison could be drawn with 990FX motherboards, first taking Zosma/Thuban K10 style cores and then moving onto the Bulldozer/Piledriver combination that exists. Some 990FX motherboards built could not seem to handle the stress of the new architecture.
The ASRock FM2A88X Extreme6+ is not that problematic – it will run both Richland and Kaveri without skipping a beat, as long as sufficient provisions are made to the power delivery cooling especially if the system is overclocked. It seems rough that the system would provide very high temperatures at stock (or stock + 20 minutes of intense CPU usage), but that is the unfortunate reality of the situation of our review. Ultimately this leads to the recommendation that users update the BIOS before they start installing an operating system, which in our testing led to a better temperature gradient after heavy CPU loading.
Temperature issues aside, the Extreme6+ sits at the top end of ASRock’s FM2 stack, with the Realtek ALC1150 audio codec, additional USB 3.0 ports and the BIOS/software platform being worthy of note. In performance terms ASRock trades blows with another motherboard we have on our test bed but not yet reviewed, although we will have to test a number of other FM2+ motherboards to see where it stacks up against the competition. Having a POST time lower than 10 seconds is a plus, although the lack of extras in the box for a high end FM2+ motherboard might be cause for concern. For legacy users who want to dabble with HSA, lots of memory, PCI and a COM port, ASRock has you covered with the FM2A88X Extreme6+.


